🧶 Beautiful ✨ Detailed 💝 Adorable

Crochet Christmas Granny Stitch Table Runner Pattern

Crochet Christmas Granny Stitch Table Runner Pattern
4.1★Rating
6-8 HoursTime Needed
2.6KMade This
✂️

Intermediate Level

Ideal for those with basic crocheting experience, featuring slightly more advanced stitches and techniques to expand your skills.

⏱️

All-Day Adventure

Requires 8-10 hours, ideal for a full day of immersive crocheting.

🎄

Holiday Cheer

Festive fun for the season, bringing handmade magic to celebrations and creating new family traditions.

About This Crochet Christmas Granny Stitch Table Runner Pattern

Crochet Christmas Granny Stitch Table Runner Pattern crochet pattern - detailed view

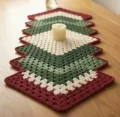
Run it down the center of a dining table, across a sideboard, or along a mantel. Roll it up with a cinnamon stick and a ribbon, and it’s a lovely gift for a host or a new neighbor.

Why You'll Love This Crochet Christmas Granny Stitch Table Runner Pattern

I’ll be honest, this one won me over with its rhythm. Once the first band is done, your hands just know what to do, and every color change feels like a tiny reward. I made mine over a few evenings and kept whispering ‘just one more stripe’ to myself. My favorite moment was laying it on the table for the first time and watching the whole room turn festive.

Crochet Christmas Granny Stitch Table Runner Pattern step 1 Crochet Christmas Granny Stitch Table Runner Pattern step 2 Crochet Christmas Granny Stitch Table Runner Pattern step 3 Crochet Christmas Granny Stitch Table Runner Pattern step 4

Switch Things Up

I made my first version of this runner for my sister’s first apartment, and I’ll admit I was a little nervous about the stair-step edges. Turns out they’re the easiest part. You add a short chain on one side, stop a bit early on the other, and the shape builds itself. By the third band I wasn’t even checking the pattern anymore.

I stitched mine on a rainy Sunday with a pot of tea, and it was done by the time the sun came back out. Honestly, the tassels were the part I loved most, since I used leftover bits from all three colors and they look so rich together. I may have petted them more than once.

A tip I swear by: pick a cotton with a little body so the clusters stay defined. Washable is even better, because a table runner will meet a few gravy drips. And if red and green feels too traditional, try navy, mustard, and oatmeal for a cozy autumn table, or soft pink, sage, and cream for spring. The construction stays exactly the same, which is half the fun of it.

Common Mistakes & How to Fix Them

✗ Pulling the 8-chain extension at the start of each new color band too tight makes the corner pucker and squeezes the first two clusters together, so chain loosely or use a hook one size larger just for those chains.✗ It’s easy to forget the shortened end of the first row in each new color and keep going across every gap, which quietly widens the runner by two clusters per band, so place a stitch marker in the sixth sp as a reminder to stop.✗ Counting the end dc as a cluster, or missing it, throws off every row after it, so before turning check that you have 8 clusters plus one dc worked into the top of the ch3.✗ Joining the new color after turning instead of at the corner dc leaves a gap and a loose tail right at the step, so join with a sl st in the last dc of the previous row first, then turn and chain 8.✗ The red border can ruffle at the inner corners of the stair-steps if you keep working sc straight through, so use sc2tog at each inner corner and 3 sc at each outer corner to keep the edge flat.✗ Tassels made with too few wraps look thin and stringy next to the chunky color bands, so wrap the full count of strands and bind the neck snugly before trimming.

Crochet Christmas Granny Stitch Table Runner Pattern

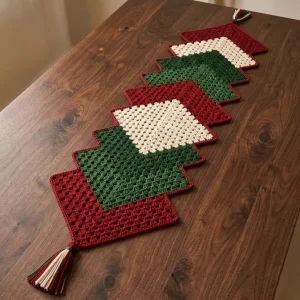
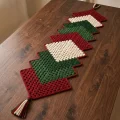
Imagine a table that already feels like Christmas before a single dish lands on it. This zigzag runner stacks deep red, forest green, and creamy white in staggered blocks, so it catches the eye from across the room. You’ll work one cozy row over and over, with just a tiny change at each color switch to keep things interesting. Add a tassel at each end and you’ve got a centerpiece that looks like it came from a little holiday market.

Intermediate 6-8 Hours

Materials Needed for Crochet Christmas Granny Stitch Table Runner Pattern

— Main Fabric

  • 01
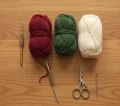
    Approximately 100g of DK weight cotton yarn in deep cranberry red for the three red bands, the border, and the tassels
  • 02
    Approximately 50g of DK weight cotton yarn in forest green for the two green bands and a little for the tassels
  • 03
    Approximately 50g of DK weight cotton yarn in soft cream for the two cream bands and a few strands for the tassels

— Tools Required

  • 01
    Approximately 4 mm (US G-6) crochet hook
  • 02
    Tapestry needle for weaving in ends
  • 03
    Sharp scissors
  • 04
    Stitch markers (at least 2)
  • 05
    Blocking mat and rust-proof pins
  • 06
    Measuring tape
  • 07
    Piece of cardboard about 6 in (15 cm) long for the large tassel
  • 08
    Piece of cardboard about 4 in (10 cm) long for the small tassel

Progress Tracker

0% Complete

— 1. Red Band (Bottom) :

Info :

Finished size is approximately 8 in (20 cm) wide across each row. The whole stair-step runner measures roughly 20 in (50 cm) across and 22 in (56 cm) long, not including tassels, when worked in DK cotton with a 4 mm hook. To make it longer, add another six-row band in any color, working a transition row and five regular rows exactly like the bands that follow. To make it wider by one cluster, chain 31 for the foundation, work one extra repeat in Row 1, and add one more sp to every regular row (3dc in each of next 8 sp) and every transition row (3dc in each of next 7 sp).

Info :

Odd rows are worked right to left and even rows left to right. Every row has 8 clusters plus one end dc, so you’ll count 8 clusters each time. A sp is the little gap between two groups of dc.

Row 1 :

With red, ch 28. 2dc in 4th ch from hook, *sk 2 ch, 3dc in next ch; repeat from * 6 more times, sk 2 ch, dc in last ch (8 cl).

Row 2-6 :

Turn, ch 3 (counts as dc), sk first dc, 2dc in next sp, 3dc in each of next 7 sp, sk 2 dc, dc in top of ch 3 (8 cl). Repeat this row for Rows 3, 4, 5, and 6. Do not fasten off yet.

— 2. Green Band :

Info :

This is where the stair-step begins. The first row of each new color adds a short chain on the right and stops two clusters early on the left, so the runner keeps its width but slides over to the right.

Row 7 :

Fasten off red. Join green with a sl st in the top of the last dc of Row 6, turn, ch 8. 2dc in 4th ch from hook, sk 2 ch, 3dc in next ch, sk the last ch and the first dc of Row 6, 3dc in each of next 6 sp, sk 2 dc, dc in next dc (8 cl). The last 2 clusters of Row 6 stay unworked and form the step.

Row 8-12 :

Turn, ch 3 (counts as dc), sk first dc, 2dc in next sp, 3dc in each of next 7 sp, sk 2 dc, dc in top of ch 3 (8 cl). Repeat this row for Rows 9, 10, 11, and 12.

— 3. Cream Band :

Row 13 :

Fasten off green. Join cream with a sl st in the top of the last dc of Row 12, turn, ch 8. 2dc in 4th ch from hook, sk 2 ch, 3dc in next ch, sk the last ch and the first dc of Row 12, 3dc in each of next 6 sp, sk 2 dc, dc in next dc (8 cl).

Row 14-18 :

Turn, ch 3 (counts as dc), sk first dc, 2dc in next sp, 3dc in each of next 7 sp, sk 2 dc, dc in top of ch 3 (8 cl). Repeat this row for Rows 15, 16, 17, and 18.

— 4. Red Band (Middle) :

Row 19 :

Fasten off cream. Join red with a sl st in the top of the last dc of Row 18, turn, ch 8. 2dc in 4th ch from hook, sk 2 ch, 3dc in next ch, sk the last ch and the first dc of Row 18, 3dc in each of next 6 sp, sk 2 dc, dc in next dc (8 cl).

Row 20-24 :

Turn, ch 3 (counts as dc), sk first dc, 2dc in next sp, 3dc in each of next 7 sp, sk 2 dc, dc in top of ch 3 (8 cl). Repeat this row for Rows 21, 22, 23, and 24.

— 5. Green Band (Upper) :

Row 25 :

Fasten off red. Join green with a sl st in the top of the last dc of Row 24, turn, ch 8. 2dc in 4th ch from hook, sk 2 ch, 3dc in next ch, sk the last ch and the first dc of Row 24, 3dc in each of next 6 sp, sk 2 dc, dc in next dc (8 cl).

Row 26-30 :

Turn, ch 3 (counts as dc), sk first dc, 2dc in next sp, 3dc in each of next 7 sp, sk 2 dc, dc in top of ch 3 (8 cl). Repeat this row for Rows 27, 28, 29, and 30.

— 6. Cream Band (Upper) :

Row 31 :

Fasten off green. Join cream with a sl st in the top of the last dc of Row 30, turn, ch 8. 2dc in 4th ch from hook, sk 2 ch, 3dc in next ch, sk the last ch and the first dc of Row 30, 3dc in each of next 6 sp, sk 2 dc, dc in next dc (8 cl).

Row 32-36 :

Turn, ch 3 (counts as dc), sk first dc, 2dc in next sp, 3dc in each of next 7 sp, sk 2 dc, dc in top of ch 3 (8 cl). Repeat this row for Rows 33, 34, 35, and 36.

— 7. Red Band (Top) :

Row 37 :

Fasten off cream. Join red with a sl st in the top of the last dc of Row 36, turn, ch 8. 2dc in 4th ch from hook, sk 2 ch, 3dc in next ch, sk the last ch and the first dc of Row 36, 3dc in each of next 6 sp, sk 2 dc, dc in next dc (8 cl).

Row 38-42 :

Turn, ch 3 (counts as dc), sk first dc, 2dc in next sp, 3dc in each of next 7 sp, sk 2 dc, dc in top of ch 3 (8 cl). Repeat this row for Rows 39, 40, 41, and 42. Do not fasten off; you’ll continue straight into the border.

— 8. Red Border :

Info :

The border goes all the way around the stepped outline with the same side facing you. Outer corners get 3 sc in one stitch, and inner corners get sc2tog so the edge stays flat. Your stitch total depends on the ledges, so aim for an even, snug edge rather than an exact count.

Round 1 :

Ch 1, turn so the top edge of Row 42 faces you, and work 1 sc in each dc and each sp across (33 sc), putting 3 sc in each end stitch to turn the corners (37 sc). Work down the right side with 2 sc in each row end, and along each extension ledge work 1 sc in each of the 8 ch. Across the foundation edge work 1 sc in each of the 28 ch, with 3 sc in each end ch. Work up the left side with 2 sc in each row end, and along each left-hand ledge work 1 sc in each dc and each sp (about 8 sc per ledge). Use sc2tog at every inner corner and 3 sc at every outer corner. Join with a sl st to the first sc.

Round 2 :

Ch 1, sc in each sc around, working 3 sc in the center sc of each outer corner and sc2tog over each inner corner. Join with a sl st to the first sc, then fasten off and leave a 6 in (15 cm) tail.

— 9. Large Tassel :

Wrap :

Wrap cream around the 6 in (15 cm) cardboard 14 times, then green 10 times, then red 24 times, keeping the wraps side by side.

Tie top :

Thread a 12 in (30 cm) strand of red under all the wraps at the top edge of the cardboard and tie it tightly with a double knot. Leave the tails long for attaching.

Cut :

Cut through the wraps along the bottom edge of the cardboard and slide the bundle off.

Bind neck :

About 1 in (2.5 cm) below the top knot, wind a strand of green around the bundle 6 times and tie it off, tucking the ends inside the tassel.

Trim :

Trim the bottom ends so they hang evenly.

— 10. Small Tassel :

Wrap :

Wrap red around the 4 in (10 cm) cardboard 8 times, then cream 5 times, then green 4 times.

Tie top :

Thread an 8 in (20 cm) strand of red under all the wraps at the top and tie it tightly with a double knot, leaving the tails long.

Cut and bind :

Cut through the bottom edge, slide the bundle off, and wind a strand of red 5 times around the bundle about 1/2 in (1.5 cm) below the top knot. Tie it off, tuck the ends inside, and trim evenly.

Assembly Instructions

  • Weave in all tails at the color changes diagonally through the middle of clusters of the same color, about 2 in (5 cm) each way, and trim close.
  • Soak the runner in lukewarm water for 10 minutes, press out the water in a towel, and pin it flat on a blocking mat, pinning every outer and inner corner of the stair-steps and the bottom and top edges.
  • While pinning, gently stretch the runner to about 8 in (20 cm) wide across the rows and let it dry fully before unpinning.
  • Tie the tails of the large tassel to the bottom-left corner of the runner, through the center sc of the 3-sc corner in Round 2 of the border, with three or four knots. Sew through that same corner stitch twice and hide the tails inside the tassel.
  • Attach the small tassel the same way to the top-right corner, through the center sc of the corner at the end of Row 42, then fluff both tassels.

Important Notes

  • 💡Odd rows run right to left and even rows left to right, so a transition row (7, 13, 19, 25, 31, 37) always starts on the right with the 8-chain extension.
  • 💡Count your clusters at the end of every row. You should have 8 clusters plus the end dc, and catching a miscount early saves a lot of frogging.
  • 💡Pick a washable cotton or cotton blend, since table runners meet spills, and wash it cold and lay it flat to dry.
  • 💡Cut the yarn at each color change rather than carrying it up the side, because the stair-step edges would show the strand.
  • 💡Use a stitch marker in the sixth sp on every transition row to remind yourself where to stop.
  • 💡Keep your tension relaxed on the 8-chain extensions so the new corner sits flat and doesn’t pull the band inward.
  • 💡If you’d like a different look, swap in any three colors. The construction stays exactly the same.

However you style it, this little stair-stepped beauty is going to make your holiday table feel loved. Every row you stitch builds a bit of cozy tradition, and by the time the last tassel is tied you’ll have something to pull out year after year. ✨ Take your time with the color switches, enjoy the soft rhythm of those clusters, and don’t be shy about showing it off. Happy hooking, and may your season be merry and full of yarn! 🧶
You ask,

we answer.

FAQs

Can I use worsted weight yarn instead of DK cotton?

Yes, but each cluster gets bigger, so the runner will come out wider and longer than the sizes given. Go up to a 5 mm hook, make a small swatch of a few clusters, and measure it. If you want to keep about 8 in (20 cm) width, you may need fewer clusters per row, so adjust the foundation chain in multiples of 3 plus 4.

How do I make the runner longer for a bigger table?

Add more six-row bands. Each new band is one transition row (chain 8, stop 2 clusters early) followed by five regular rows, and each one slides the runner over by 2 clusters. You can also lengthen each band by working extra regular rows, as long as every band has an even number of rows so the next transition row starts on the right.

Why is my runner getting wider with every band?

Most likely the transition row wasn’t stopped early on the left. After the 6 clusters worked into the sp, skip 2 dc and put the end dc into the next dc, leaving the last 2 clusters of the previous row unworked. If you work all 8 sp, each band adds 2 extra clusters.

Do I need to carry yarn up the side when I change colors?

No. Fasten off at the end of Row 6 (and every sixth row after), join the new color with a sl st in the last dc, and weave the tails in later. Carrying yarn would show along the stair-step edge and make the border bulky.

Is this pattern okay for someone new to granny stitch?

If you’re comfortable with chains and double crochet, you’ll be fine. The only tricky bit is the transition row, which starts with a chain and ends early. Work it slowly the first time and mark the sixth sp with a stitch marker.

How should I block a cotton granny stitch runner?

Wet block it. Soak it in lukewarm water, press out the water with a towel, and pin it flat to a mat, pinning every corner of the steps. Cotton has little memory, so this helps the clusters relax and the edges lie smooth.