About This Chic Mosaic Raffia Big Bag Pattern
This bag is the ultimate companion for beach days, market runs, or casual weekend outings, offering plenty of space for your essentials while adding a handmade touch to any outfit.
Ideal for those with basic crocheting experience, featuring slightly more advanced stitches and techniques to expand your skills.
A 10-12 hour project—great for savoring the process over several sessions.
An elegant detail to elevate any look, combining traditional techniques with contemporary design sensibilities.
This bag is the ultimate companion for beach days, market runs, or casual weekend outings, offering plenty of space for your essentials while adding a handmade touch to any outfit.
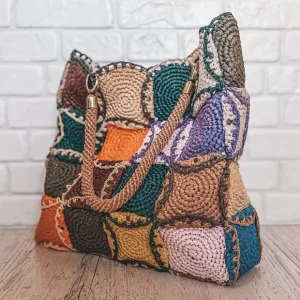
I absolutely adore how this bag plays with color and structure! Crocheting the individual circles is so therapeutic, and because they are small, you can easily take your work on the go. Plus, using rivets to join the pieces feels incredibly satisfying and gives the bag a high-end, boutique-quality finish that you will be so proud to show off.

Every time I carry this bag, I get so many compliments, and people can never believe I actually made it myself! There is something so incredibly satisfying about working with raffia. It has this rustic, earthy vibe that instantly makes me think of sunny beach days and weekend farmers' markets.
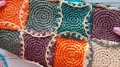
When I first started designing this piece, I wanted to create something that looked high-end but was still fun to make. That is how the circle mosaic idea was born. Crocheting each little medallion is so relaxing, and it is the perfect project to take with you on the go. You can just whip up a few circles whenever you have a spare moment.
My absolute favorite part of the process is the assembly. Using rivets instead of sewing gives the bag such a neat, professional look. If you want to customize your bag, try playing with different colors for each circle to create a beautiful gradient or a vibrant rainbow effect. It is your masterpiece, so have fun with it!
Get ready to create your new favorite accessory! This stunning, oversized tote is built from beautiful, textured circles that come together in a gorgeous mosaic design. You will love watching the colors blend as you piece together each medallion using earthy raffia. It is the perfect project to sit back, relax, and crochet at your own pace while creating a statement piece that is both incredibly sturdy and stylish.
ch2, then work 8 sc in the second ch from hook. Do not join, continue working in a spiral. (8)
Work 8 x inc around. (16)
Work 8 x (1 sc, inc) around. (24)
Work 6 x (3 sc, inc), then work 2 extra sc at the end of the round. (30)
Work 6 x (4 sc, inc), then work 2 extra sc at the end of the round. (36)
Work 6 x (5 sc, inc), then work 2 extra sc at the end of the round. (42)
Work 6 x (6 sc, inc), then work 2 extra sc at the end of the round. (48)
Work 6 x (7 sc, inc), then work 2 extra sc at the end of the round. (54)
Cut the yarn and pull the tail through. Skip one stitch and insert your hook under the second stitch of the round, pulling the tail through to the back. Tighten and weave in the end securely on the wrong side.
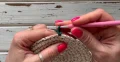
Join a contrasting color of raffia in any stitch of the circle with a sl st and ch1. Work [ch2, skip 1 stitch, 1 sc] repeatedly around the edge, ending with ch2, then fasten off, weave in, and secure all tails on the back with PVA glue.
ch2, then work 7 sc in the second ch from hook. Continue working in a continuous spiral. (7)
Work 7 sc around. (7)
Work 7 sc around. (7)
Work 7 sc, inserting your hook only into the left leg (left loop) of each stitch from the previous round. (7)
Repeat the previous round (7 sc into the left leg of each stitch only) until the handle reaches your desired length of about 22 inches (55 cm). (7)
Decrease 3 times to close the opening, cut the yarn, and hide the tail inside the handle cord.
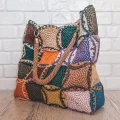
You did it! Your gorgeous mosaic tote bag is ready to turn heads. There is nothing quite like the feeling of carrying a completely handmade bag that looks this professional and chic. I hope you enjoyed every single stitch of this creative journey. Fill it up with your favorite things and take it out for a spin in the sunshine! Happy crafting, and may your days be filled with beautiful stitches! 🧶✨
You can, but raffia is highly recommended because it provides the structure and lightweight durability needed for a bag of this size. Cotton will be much heavier and stretchier, which might cause the bag to lose its shape when filled.
Yes, because raffia is slippery and doesn't hold knots as well as traditional wool or acrylic. A tiny dab of PVA glue on the wrong side ensures your ends stay securely tucked away and won't unravel with wear.
Since raffia is a natural paper-like fiber, do not submerge it in water. Instead, spot clean any dirty areas with a damp cloth and mild soap, then let it air dry completely out of direct sunlight.
Any standard 6 mm double-cap rivets from a craft or leatherworking store will work perfectly! Just make sure you have a rivet setter or a hammer to secure them tightly.
Crocheting into the left leg of the stitch creates a very dense cord, but if you want zero stretch, you can insert a length of cotton rope or clothesline inside the hollow center of the handle before attaching the metal holders.
