About This Crochet Blue and Cream Granny Square Blanket Pattern
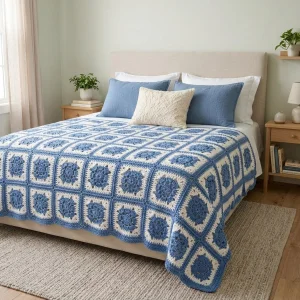
Layer it at the foot of a guest bed, drape it over a sofa, or wrap it up as a wedding or housewarming gift for someone who loves a bright, coastal-feeling room.
Ideal for those with basic crocheting experience, featuring slightly more advanced stitches and techniques to expand your skills.
A 10-12 hour project—great for savoring the process over several sessions.
A warm touch for your space that transforms ordinary corners into inviting nooks filled with handmade charm.
Layer it at the foot of a guest bed, drape it over a sofa, or wrap it up as a wedding or housewarming gift for someone who loves a bright, coastal-feeling room.
I keep coming back to this one because the squares are so forgiving. Three quick blue rounds, two cream rounds, and one blue outline, and a block is done before my tea gets cold. I can tuck a handful of squares in my bag and finish one in a waiting room. And honestly, the moment when the cream and blue finally sit side by side on the table is pure joy for me.
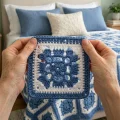
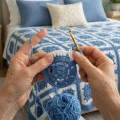
The first time I tried a blue and cream blanket, I made the mistake of choosing a blue that was almost navy. It looked gorgeous in the skein and heavy as a storm cloud on the bed. For this version I went lighter, a soft cornflower, and suddenly the whole room felt like a summer morning.
Here’s the tip I wish someone had handed me: make your squares in batches of six. Do all the blue centers in one sitting, then switch to cream for rounds 4 and 5, then finish with the blue outline. You’ll hardly ever stop to untangle colors, and the squares come out so even that joining them feels like a breeze.
I always keep a tiny tote by my favorite chair and a rule that a square is a sitting. Ninety-nine sittings sounds like a lot, but they pile up faster than you’d believe, and I love watching the stack grow.
If you want a different mood, try sage green with cream or a dusty rose with warm white. The pattern doesn’t care what color you pick, and the joined seams look good in any shade.
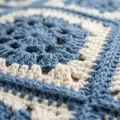
Picture a bed made up with a blanket that looks like it came straight from a seaside cottage. You’ll stitch square after square of cornflower blue medallions framed in soft cream, then join them with raised blue seams that outline every block like a window pane. The squares are small and portable, so you can crochet them on the couch, on the bus, or at a friend’s kitchen table. Finish with a rippling scalloped edge and you’ll have a cozy heirloom-style bedspread that suits a double or queen bed.
Each square measures approximately 18 cm (7 in) across with worsted cotton and a 5 mm hook. The finished blanket is approximately 170 x 206 cm (67 x 81 in) with the border, made from 99 squares, 9 across and 11 down. To resize, add or remove whole squares: each extra square adds roughly 18 cm (7 in). For the border, Round 1 totals 52 times the squares across, plus 52 times the squares down, plus 8 sts. Divide that total by 4 for the number of scallops in Round 2. Work every round with the right side facing you and do not turn.
With blue, MR, ch3 (counts as first dc), 15 dc in ring, join with sl st to top of ch3, pull the ring closed (16)
ch3 (counts as first dc), dc in same st, 2 dc in each remaining st around, join with sl st to top of ch3 (32)
ch1, sc in same st, [ch2, sk next st, sc in next st] 15 times, ch2, sk last st, join with sl st to first sc (16 sc and 16 ch2 sps). Fasten off blue.
Join cream in any ch2 sp, this is your first corner. ch3 (counts as first dc), 2 dc in same sp, ch2, 3 dc in same sp, ch1, [3 dc in next ch2 sp, ch1] 3 times. (3 dc, ch2, 3 dc) in next ch2 sp, ch1, [3 dc in next ch2 sp, ch1] 3 times, repeat from * to * 2 more times. Join with sl st to top of beginning ch3 (60 dc, 16 ch1 sps, 4 ch2 corner sps)
sl st in each of next 2 dc and in the next ch2 corner sp. ch3 (counts as first dc), 2 dc in same sp, ch2, 3 dc in same sp, ch1, [3 dc in next ch1 sp, ch1] 4 times. (3 dc, ch2, 3 dc) in next ch2 sp, ch1, [3 dc in next ch1 sp, ch1] 4 times, repeat from * to * 2 more times. Join with sl st to top of beginning ch3 (72 dc, 20 ch1 sps, 4 ch2 corner sps). Fasten off cream.
Join blue in any corner ch2 sp, ch1, 3 sc in same sp, sc in each of next 23 sts (every dc and every ch1 sp counts as a st). 3 sc in next ch2 sp, sc in each of next 23 sts, repeat from * to * 2 more times. Join with sl st to first sc (104 sc, 26 per side counting corners). Fasten off and weave in ends.
Lay out your squares 9 across and 11 down. Each corner has 3 sc, and the middle one is the corner center. Each side runs 27 sts from one corner center to the next, counting both corner centers. Join with blue yarn.
Hold two squares with wrong sides together and corner centers matching. Join blue at a corner center, then sl st through the back loops of both squares, one sl st in each pair of sts, across all 27 sts to the next corner center. Fasten off or carry the yarn across to add the next square. Join 9 squares into one row (8 seams). Make 11 rows.
With wrong sides together, join row to row the same way, working along the 9 squares of one row. At every point where four corners meet, sl st once through all four corner center sc. Add each row in turn until all 11 rows are joined (10 seams). Fasten off and weave in ends.
Join blue with a sl st in the center sc of any outer corner, ch1, 2 more sc in the same st (3 sc corner). sc in each of next 25 sts, sc2tog over the next two corner center sts at the seam, repeat from * to * until the last square of this edge, sc in each of next 25 sts, 3 sc in the next outer corner center st. Work the other three edges the same way, using 9 squares on the short edges and 11 on the long edges. Join with sl st to first sc (1048 sc: 233 on each short edge, 285 on each long edge, and 12 corner sc)
Join blue with a sl st in any st. sk 1 st, 5 dc in next st, sk 1 st, sl st in next st, repeat from * to * all the way around, working the final sl st into the joining st (262 scallops). Fasten off and weave in the end.
Your next big project is ready to start, one little square at a time. 🧶 Pick your two favorite colors, keep the hook moving, and let the growing stack of finished blocks cheer you on. When the last scallop is stitched and you spread the blanket across the mattress, you’ll see how every small round added up to something warm and lasting. Take your time, enjoy the rhythm, and hand it to someone who needs a good hug in blanket form. Happy crocheting! ✨
You can, but the squares were designed around worsted weight cotton and a 5 mm hook. Sport weight gives smaller squares, so you would need more of them, while bulky yarn gives larger squares. Make one test square, measure it, and recalculate how many you need and the border totals.
A throw of roughly 116 x 134 cm (46 x 53 in) uses 6 squares across and 7 down, 42 squares in total. A twin of roughly 116 x 188 cm (46 x 74 in) uses 6 across and 10 down. For the border, use 52 times the squares across plus 52 times the squares down plus 8 sts for Round 1.
This pattern joins them at the end with slip stitches through the back loops. That way you can finish all the squares first, block them evenly, and lay out the blue and cream blocks before you commit to any seam.
Roughly 22 g of blue and 17 g of cream, including your share of the seams and border. Buy a little extra of each color so you aren’t caught short.
Uneven corner chains or changing tension between the rounds are the usual causes. Keep the ch2 in each corner the same size and block every square to 18 cm (7 in) before joining.
Yes, if you’re comfortable with a magic ring, double crochet, and working in the round. The only new parts are the sc2tog in the border and the scallop repeat, and both are easy to learn on a single edge.