๐Ÿงถ Beautiful โœจ Detailed ๐Ÿ’ Adorable

Creeper Minecraft Character Amigurumi Pattern

Creeper Minecraft Character Amigurumi Pattern
4.8โ˜… Rating
3-4 Hours Time Needed
3.1K Made This
โœ‚๏ธ

Beginner Friendly Level

Perfect for those just starting their sewing journey, with clear instructions and simple techniques

โฑ๏ธ

Weekend Treat

Takes 5-7 hours, making it an enjoyable project to finish over a couple of days.

๐ŸŽฎ

Charming Critter

Delightful animal designs with sweet details that capture the essence of your favorite woodland and farmyard friends.

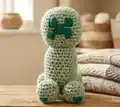
About This Creeper Minecraft Character Amigurumi Pattern

This Creeper amigurumi pattern is perfect for beginners learning square-shaping techniques in crochet! Using primarily green yarn with dark green embroidered details, you'll create Minecraft's most recognizable hostile mob in adorable plushie form. The pattern teaches corner marker placement and strategic decreasing to achieve that signature cubic Minecraft aesthetic with minimal color changes required.

Creeper Minecraft Character Amigurumi Pattern crochet pattern - detailed view of completed project

With a simple construction of head, body, and four identical legs, this pattern is quick to work up and incredibly satisfying. The embroidered face details bring personality without complex colorwork, making it accessible for newer crocheters.

Why You'll Love This Creeper Minecraft Character Amigurumi Pattern

I absolutely adore this Creeper pattern because it's the perfect introduction to making blocky amigurumi characters! The simplicity of using primarily one color makes it less intimidating than multi-colored patterns, yet the end result is instantly recognizable and impressive. I love how the square-shaping technique with corner markers teaches fundamental skills that apply to all Minecraft-style crochet. The fact that you make four identical legs means you get lots of practice perfecting your technique. Plus, there's something hilariously endearing about creating a cute, huggable version of a creature that explodes in the game! The embroidered face is so expressive and fun to personalize.

Creeper Minecraft Character Amigurumi Pattern step 1 - construction progress Creeper Minecraft Character Amigurumi Pattern step 2 - assembly progress Creeper Minecraft Character Amigurumi Pattern step 3 - details and accessories Creeper Minecraft Character Amigurumi Pattern step 4 - final assembly and finishing

Switch Things Up

I love experimenting with different shades of green for this Creeper pattern! Try using a variegated green yarn for a unique pixelated effect, or go bold with lime green for a brighter, more vibrant look. You could even make a charged Creeper by using blue yarn with light blue accents and adding a subtle sparkle with metallic thread.

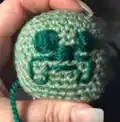
For the face, I sometimes switch up the expression - try making the mouth less jagged for a friendlier Creeper, or add eyebrows for extra personality. Some makers add small crocheted TNT blocks as accessories, which is adorable! You can create these with tiny red and white striped rectangles.

I've successfully made giant floor cushion Creepers using super bulky yarn and a 10mm hook, perfect for gaming rooms. On the flip side, tiny keychain versions with embroidery thread and a 1mm hook make perfect zipper pulls for backpacks.

For added dimension, try surface crochet in dark green over the body to create that pixelated texture pattern before embroidering the face. You could also make the whole Minecraft mob family - pair your Creeper with a zombie, skeleton, and Enderman for a complete hostile mob collection!

Common Mistakes & How to Fix Them

โœ— Placing corner markers unevenly when shaping the square head resulting in a lopsided or rectangular appearance instead of perfect cube โœ— Not stuffing the body and legs firmly enough which causes the Creeper to lose its blocky shape and slump over โœ— Forgetting to count the correct number of stitches between markers leading to misaligned corners and an asymmetrical final piece โœ— Pulling yarn tail too loosely when closing the top which leaves visible holes instead of a clean flat square closure

Creeper Minecraft Character Amigurumi Pattern

Create the most iconic Minecraft mob with this Creeper amigurumi crochet pattern! This explosive little character features the classic green pixelated body, four stubby legs, and that unforgettable worried face. Perfect for Minecraft enthusiasts and gaming fans, this pattern uses simple square-shaping techniques to achieve the authentic blocky Creeper look. With detailed instructions for the cubic head, body, and legs, you'll craft a recognizable gaming companion that's way cuter than the in-game version!

Beginner Friendly 3-4 Hours

Materials Needed for Creeper Minecraft Character Amigurumi Pattern

โ€” Main Fabric

  • 01
    DK yarn in green and dark green

โ€” Tools Required

  • 01
    3.5mm crochet hook
  • 02
    Embroidery needle
  • 03
    Scissors
  • 04
    Toy stuffing
  • 05
    4 clip markers

Progress Tracker

0% Complete

โ€” Head :

Info :

Make with green yarn

Round 1 :

8SC into a magic loop {8}

Round 2 :

(SC1, 3SC into the next ST) 4 times {16}

Round 3 :

SC2, 3SC into next ST, (SC3, 3SC into next ST) 3 times, SC1 {24}

Round 4 :

SC3, 3SC into next ST, (SC5, 3SC into next ST) 3 times, SC2 {32}

Round 5-14 :

SC around {32}

Info :

Add clip marker into 4 corners where decreases will be, with 7 stitches between every 2 stitches. Replace markers after each row

Round 15 :

(SC to stitch before marker SC3TOG) 4 times, SC to end {24}

Round 16 :

(SC to stitch before marker SC3TOG) 4 times, SC to end {16}

Info :

Stuff head

Round 17 :

(SC to stitch before marker SC3TOG) 4 times, SC to end, remove markers {8}

Info :

Join and FO. With yarn tail pick up front loop only of remaining 8 stitches in order, pull tight to close

โ€” Body :

Info :

Make with green yarn

Round 1 :

8SC into a magic loop {8}

Round 2 :

(SC1, 3SC into the next ST) 4 times {16}

Round 3 :

SC2, 3SC into next ST, (SC3, 3SC into next ST) 3 times, SC1 {24}

Round 4-18 :

SC around {24}

Info :

Add clip marker into 4 corners where decreases will be, with 5 stitches between every 2 stitches. Replace markers after each row

Round 19 :

(SC to stitch before marker SC3TOG) 4 times, SC to end {16}

Info :

Stuff body

Round 20 :

(SC to stitch before marker SC3TOG) 4 times, SC to end, remove markers {8}

Info :

Join and FO. With yarn tail pick up front loop only of remaining 8 stitches in order, pull tight to close

โ€” Legs :

Info :

Make 4 with green yarn

Round 1 :

8SC into a magic loop {8}

Round 2 :

(SC1, 3SC into the next ST) 4 times {16}

Round 3-7 :

SC around {16}

Round 8 :

(SC1, SC3TOG) 4 times {8}

Info :

Join and FO, stuff legs. With yarn tail pick up front loop only of remaining 8 stitches in order, pull tight to close. Sew feet onto bottom of Creeper, two at front and two at back

โ€” Face and Body Detail :

Info :

With dark green yarn sew eyes, nose and mouth onto Creeper's head. Sew square shapes first, then fill in with colour

Assembly Instructions

  • Sew completed head onto the body ensuring proper alignment with the face positioned forward
  • Attach four stuffed legs to the bottom of the body, positioning two at the front and two at the back evenly
  • Use dark green yarn to embroider the iconic face details: two square eyes, rectangular nose, and jagged mouth
  • Outline each facial feature shape first with running stitch, then fill in with satin stitch for clean squares
  • Ensure all pieces are stuffed firmly before final assembly to maintain the blocky cubic Minecraft appearance

Important Notes

  • ๐Ÿ’กUse clip markers consistently to identify the four corners for square shaping throughout head and body construction
  • ๐Ÿ’กCount stitches carefully between markers - head needs 7 stitches between corners, body needs 5 stitches between corners
  • ๐Ÿ’กStuff each piece firmly as you go, especially legs, to maintain the rigid blocky appearance characteristic of Minecraft
  • ๐Ÿ’กWhen embroidering face details, outline the square shapes first before filling with color for cleaner geometric lines
  • ๐Ÿ’กAll four legs are identical, so use the first leg as your template for consistent sizing
  • ๐Ÿ’กReplace stitch markers after each decrease round to maintain accurate corner positioning
  • ๐Ÿ’กPull yarn tail tight when closing tops using front loops only to create flat square surfaces

This adorable Creeper amigurumi pattern transforms Minecraft's most explosive mob into a huggable companion! Perfect for beginners learning square-shaping techniques, this pattern uses simple construction with primarily one color and embroidered details. The iconic worried face and blocky body make it instantly recognizable to any Minecraft fan. Create your own pixelated friend that's guaranteed not to explode! ๐Ÿ’š๐ŸŽฎ Happy crocheting! โœจ

You ask,

we answer.

FAQs

Why does my Creeper look round instead of square?

The key is proper marker placement at the four corners with exact stitch counts between them (7 for head, 5 for body). Make sure you're doing SC3TOG decreases at each marked corner and stuffing very firmly to maintain the cubic shape.

How do I make the face look neat and pixelated?

Use the outline-first method: create the square shape with running stitch, then fill in with satin stitch or small straight stitches. Working in a grid pattern helps maintain that blocky Minecraft aesthetic rather than curved embroidery.

Can I make a bigger or smaller Creeper?

Absolutely! Use worsted weight yarn with a 4.5mm hook for a larger version, or fingering weight yarn with a 2mm hook for a mini Creeper. Just maintain the same stitch count ratios for proper proportions.

Do all four legs need to be the same size?

Yes! Creepers have four identical stubby legs. Making them all the same size ensures your Creeper stands evenly. Use the first leg you complete as a size reference for the remaining three.

What's the best way to attach the legs?

Position two legs at the front bottom corners and two at the back bottom corners of the body. Pin them in place first to check balance before sewing, ensuring the Creeper can stand upright on its own.