๐Ÿงถ Beautiful โœจ Detailed ๐Ÿ’ Adorable

Cow Granny Square Crochet Pattern

Cow Granny Square Crochet Pattern
4.4โ˜… Rating
2-3 Hours Time Needed
1.2K Made This
โœ‚๏ธ

Intermediate Level

Ideal for those with basic knitting experience, featuring slightly more advanced stitches and techniques to expand your skills.

โฑ๏ธ

Bite-Sized Project

Complete in under 2 hoursโ€”quick, fun, and perfect for a little creative escape.

๐Ÿ„

Charming Critter

Delightful animal designs with sweet details that capture the essence of your favorite woodland and farmyard friends.

About This Cow Granny Square Crochet Pattern

Cow Granny Square Crochet Pattern crochet pattern - detailed view of completed project

The finished 11cm x 11cm square is perfect for combining into larger projects like baby blankets, throw pillows, or wall hangings. Each component is worked separately and then stitched onto the base square, allowing you to customize colors and placement.

Why You'll Love This Cow Granny Square Crochet Pattern

I absolutely love how this pattern transforms a simple granny square into something full of personality! The way the cow's face comes together is so satisfyingโ€”each little piece adds character, from the floppy ears positioned at the corners to the adorable brown nose pieces. I find the construction method brilliant because you can work on the base square and all the facial features separately, making it a perfect portable project. The color changes are straightforward, and watching that cute cow face emerge as you assemble everything is pure joy. It's one of those patterns that looks impressive but doesn't require advanced skills, just patience and attention to detail.

Cow Granny Square Crochet Pattern step 1 - construction progress Cow Granny Square Crochet Pattern step 2 - assembly progress Cow Granny Square Crochet Pattern step 3 - details and accessories Cow Granny Square Crochet Pattern step 4 - final assembly and finishing

Switch Things Up

I love experimenting with this pattern to create different cow personalities! Sometimes I swap the pink ears for white ones to make a Holstein-style cow, or I add more black spots for a heavily spotted look. You could even try brown yarn for the base instead of white to create a Jersey cow variation.

For a playful twist, I've made the spots in different colorsโ€”imagine a purple or blue fantasy cow! The horns can be made longer for a Texas longhorn effect, or you can skip them entirely for a hornless breed. I've also experimented with embroidering small flowers on the green border or adding a tiny bell applique under the mouth.

If you're making multiple squares for a blanket, try varying the spot patterns on each cow so they all have unique markingsโ€”just like real cows! You could also adjust the facial expressions by changing eye placement slightly. Some crafters add white highlights to the eyes using embroidery for extra sparkle. The possibilities are truly endless, and each variation brings its own charm to your finished project!

Common Mistakes & How to Fix Them

โœ— Forgetting to leave long tails on facial features for stitching, which makes assembly difficult and messy with added yarn โœ— Not tightening the magic ring properly on small pieces like nose and spots, causing holes in the center โœ— Placing ears incorrectly away from corner spaces, disrupting the square's symmetry and overall balanced cow face appearance โœ— Rushing through color changes without securing yarn properly, leading to loose stitches and gaps in your work

Cow Granny Square Crochet Pattern

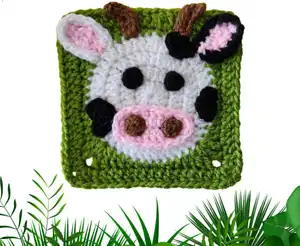
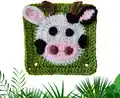
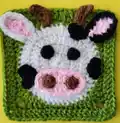
Create an adorable cow-themed granny square with this charming crochet pattern! Perfect for blankets, pillows, or decorative projects, this square features a sweet cow face complete with pink ears, brown nose pieces, black spots, and tiny horns. The 11cm x 11cm finished square combines classic granny square construction with playful amigurumi-style details. Whether you're making a farm-themed baby blanket or adding whimsy to your home decor, this pattern brings countryside charm to your crochet projects with detailed assembly instructions for all facial features.

Intermediate 2-3 Hours

Materials Needed for Cow Granny Square Crochet Pattern

โ€” Main Fabric

  • 01
    Lightweight acrylic yarn in white color for the main square base
  • 02
    Lightweight acrylic yarn in pink color for mouth and ear details
  • 03
    Lightweight acrylic yarn in black color for spots, eyes, and ear accent
  • 04
    Lightweight acrylic yarn in green color for the border edge
  • 05
    Lightweight acrylic yarn in brown color for nose pieces and horns

โ€” Tools Required

  • 01
    4mm crochet hook
  • 02
    Yarn needle for weaving and stitching
  • 03
    Scissors for cutting yarn

Progress Tracker

0% Complete

โ€” Square :

Info :

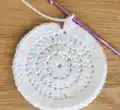
Using the white yarn

Round 1 :

MR, ch2, 12dc inside MR (12)

Info :

Tighten the MR by pulling on the tail and then sl st in the 1st dc (skip the ch2)
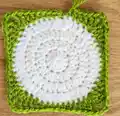
Round 2 :

ch2, *dc inc* all around (24)

Round 3 :

ch2, *dc, dc inc* all around (36)

Round 4 :

ch2, *2dc, dc inc* all around (48)

Info :

Color Change: at the end of Round 4, change to green using Method 1 (change color at the last dc) or Method 2 (finish with invisible stitch and attach new color)

Round 5 :

ch1, *3sc, 2hdc, 2dc, [2tc + ch2 + 2tc] in the same stitch, 2dc, 2hdc* all around (68)

Info :

Sl st in the first sc at the beginning of Round 5

Round 6 :

ch2, *dc* all around and [2dc + ch2 + 2dc] in the ch2 space (84)

Info :

Finish off and weave in any excess yarn using invisible stitch or sl st in the 1st dc

โ€” Mouth :

Info :

Using the pink yarn

Round 1 :

sl knot, ch11, (the last ch3 count as a dc), dc in the 5th ch away from the hook, 5dc, 4dc in 1 st, 6dc, 3dc in the last st (20)

Info :

Cut the yarn and finish off. Leave a long tail for stitching

โ€” Ears (Make 2) :

Info :

Using the pink yarn

Round 1 :

sl knot, ch8 (the last ch2 count as a sc), hdc in the 3rd ch away from the hook, dc, tc, dc, hdc, sc (7) change color to white at the last sc

Round 2 :

ch1, turn, *sc* all around (14)

Info :

Cut the yarn and finish off. Leave a long tail for stitching. For the second ear, change color to black instead of white when finishing Round 1

โ€” Nose Pieces (Make 2) :

Info :

Using the brown yarn

Round 1 :

MR, 5sc in MR (5)

Info :

Close the MR, finish off, and leave a long tail for stitching

โ€” Eyes (Make 2) :

Info :

Using the black yarn

Round 1 :

MR, ch1, 5sc in MR (5)

Info :

Close the MR, finish off, and leave a long tail for stitching

โ€” Spots :

Info :

Using the black yarn

Small Spots (Make 2) :

Round 1: MR, ch1, 5sc in MR (5); Round 2: ch1, turn, *inc* all around (10). Tighten the MR but do not close completely. Finish off and leave a long tail

Big Spot (Make 1) :

Round 1: MR, ch1, 3sc in MR (3); Round 2: ch1, turn, *inc* all around (6). Tighten the MR but do not close completely. Finish off and leave a long tail

โ€” Horns (Make 2) :

Info :

Using the brown yarn

Round 1 :

slip stitch, ch6, sc in the 2nd ch away from the hook, sc, inc, 2sc (6)

Info :

Cut the yarn, finish off, and leave a long tail for stitching

Assembly Instructions

  • Place all face components on the completed square before stitching to ensure proper positioning and spacing.
  • Align the ears to the corners of the square in the [2tc + ch2 + 2tc] spaces, one with white accent and one with black.
  • Position the mouth piece between Round 1 and Round 4 of the face, centering it horizontally.
  • Attach the nose pieces at the edge stitches of the mouth in the 4dc spaces on each side.
  • Place the eyes on Round 2 of the face, spacing them evenly to create an appealing expression.
  • Distribute the spots around the edges of the face for a realistic cow pattern appearance.
  • Position the horns at the top of the head, spacing them equally apart for balanced symmetry.

Important Notes

  • ๐Ÿ’กAlways leave long tails on all facial features and components for easier and more secure stitching during assembly
  • ๐Ÿ’กThe ch1 or ch2 at the beginning of each round do not count as stitches unless stated otherwise
  • ๐Ÿ’กWork through both loops (back loop and front loop) unless the pattern specifically instructs otherwise
  • ๐Ÿ’กYou can adjust the size of the square by using different hook sizes and appropriate yarn weights
  • ๐Ÿ’กTighten magic rings properly on small pieces to prevent holes, but don't close spots completely for better appearance
  • ๐Ÿ’กUse pins to temporarily position all pieces before final stitching to achieve the best facial expression
  • ๐Ÿ’กWeave in yarn tails as you work by crocheting over them to reduce finishing time

This delightful Cow Granny Square pattern brings farmyard charm to your crochet projects! Combining traditional granny square techniques with adorable three-dimensional details, this pattern creates a square that's perfect for baby blankets, decorative pillows, or wall hangings. The sweet cow face with its floppy ears, spotted pattern, and tiny horns adds personality to any project. With clear instructions for each component and detailed assembly guidance, you'll enjoy watching this charming critter come to life stitch by stitch. ๐Ÿ„๐Ÿงถโœจ

You ask,

we answer.

FAQs

Can I use different yarn weights for this pattern?

Yes! The pattern works with various yarn weights. Using a smaller hook with lightweight yarn will create a smaller square, while bulkier yarn with a larger hook will make it bigger. Just maintain consistent yarn weight throughout for best results.

Do I need to make the color changes exactly as written?

The pattern provides two methods for color changes (Method 1 and Method 2). Choose whichever method you're more comfortable with. Both create clean transitions from white to green for the border.

How do I prevent holes in the small pieces like nose and eyes?

Make sure to tighten your magic ring properly by pulling the tail firmly before closing. For the spots, the pattern instructs not to close the magic ring completely for a better flat appearance.

Can I customize the cow's expression or features?

Absolutely! You can adjust eye placement for different expressions, add more or fewer spots, or even change colors. The modular design makes it easy to personalize your cow's appearance.

What's the best way to attach all the facial features securely?

Use the long tails left from each piece and a yarn needle. Pin everything in place first to visualize the final look, then whipstitch around each piece multiple times for security, especially if making items for children.