About This Contoured Ribbed Face Mask Pattern
A fantastic project for gifting or personal use, this mask is both practical and stylish. It washes beautifully and can be customized with different yarn shades to match any outfit.
Perfect for those just starting their crocheting journey, with clear instructions and simple techniques
Fits nicely into a free afternoon — 2 to 5 hours of focused, enjoyable crocheting.
An elegant detail to elevate any look, combining traditional techniques with contemporary design sensibilities.
A fantastic project for gifting or personal use, this mask is both practical and stylish. It washes beautifully and can be customized with different yarn shades to match any outfit.
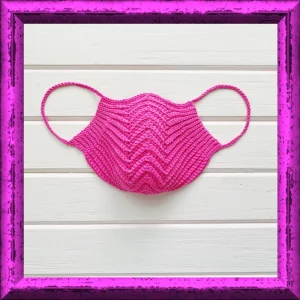
I absolutely adore how quickly this project comes together! The ribbed texture is so soothing to crochet, and watching the chevron shape form with just a few simple increases and decreases is pure magic. Plus, adjusting the ear loops for a custom, pain-free fit is incredibly easy.

One of my favorite things about this design is how versatile it is. While the pattern suggests a cotton-acrylic blend like Yarn Art Jeans, you can play around with different fibers to suit your needs. A 100% organic cotton yarn is incredibly soft against the skin and highly breathable, making it perfect for warmer days. I highly recommend choosing a yarn that is machine washable, as you'll want to keep this accessory clean and fresh with regular washing.
If you want to add a bit of personal flair, try experimenting with color! A self-striping yarn creates amazing chevron stripes automatically, or you can manually change colors every few rows for a bold, retro look. For a subtle, elegant style, a solid pastel or neutral tone really lets that gorgeous ribbed stitch definition shine. You could also sew a soft, breathable fabric lining like cotton jersey on the inside for extra comfort and structure. It's a small detail that makes a huge difference, and it's a great way to use up tiny fabric scraps from your stash!
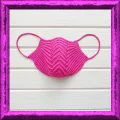
Looking for a stylish, comfortable, and reusable accessory? This contoured ribbed face mask is the perfect project to whip up in an afternoon. It features a beautifully textured chevron design that hugs the face perfectly, thanks to some clever stitch placement and shaping. It's worked flat in one piece, making it an incredibly satisfying make that you can easily customize to fit your face shape exactly.
ch 34 to begin your foundation.
Starting in the 2nd ch from your hook, work 33 sc in blo. ch 1, turn. Place stitch markers in the 10th, 17th, and 24th stitches to guide your shaping. (33)
8 sl st in blo, 1 sc in blo, inc in blo, 5 sc in blo, dec in blo, 5 sc in blo, inc in blo, 1 sc in blo, 8 sl st in blo. ch 1, turn. Move your markers up to the middle of the increases and decreases. (35)
8 sl st in blo, 2 sc in blo, inc in blo, 5 sc in blo, dec in blo, 5 sc in blo, inc in blo, 2 sc in blo, 8 sl st in blo. ch 1, turn. (37)
8 sl st in blo, 3 sc in blo, inc in blo, 5 sc in blo, dec in blo, 5 sc in blo, inc in blo, 3 sc in blo, 8 sl st in blo. ch 1, turn. (39)
8 sl st in blo, 4 sc in blo, inc in blo, 5 sc in blo, dec in blo, 5 sc in blo, inc in blo, 4 sc in blo, 8 sl st in blo. ch 1, turn. (41)
8 sl st in blo, 5 sc in blo, inc in blo, 5 sc in blo, dec in blo, 5 sc in blo, inc in blo, 5 sc in blo, 8 sl st in blo. ch 1, turn. (43)
8 sl st in blo, 6 sc in blo, inc in blo, 5 sc in blo, dec in blo, 5 sc in blo, inc in blo, 6 sc in blo, 8 sl st in blo. ch 1, turn. (45)
8 sl st in blo, 7 sc in blo, inc in blo, 5 sc in blo, dec in blo, 5 sc in blo, inc in blo, 7 sc in blo, 8 sl st in blo. ch 1, turn. (47)
8 sl st in blo, 8 sc in blo, inc in blo, 5 sc in blo, dec in blo, 5 sc in blo, inc in blo, 8 sc in blo, 8 sl st in blo. ch 1, turn. (49)
8 sl st in blo, 9 sc in blo, inc in blo, 5 sc in blo, dec in blo, 5 sc in blo, inc in blo, 9 sc in blo, 8 sl st in blo. ch 1, turn. (51)
8 sl st in blo, 10 sc in blo, inc in blo, 5 sc in blo, dec in blo, 5 sc in blo, inc in blo, 10 sc in blo, 8 sl st in blo. ch 1, turn. (53)
8 sl st in blo, 11 sc in blo, inc in blo, 5 sc in blo, dec in blo, 5 sc in blo, inc in blo, 11 sc in blo, 8 sl st in blo. ch 1, turn. (55)
8 sl st in blo, 12 sc in blo, inc in blo, 5 sc in blo, dec in blo, 5 sc in blo, inc in blo, 12 sc in blo, 8 sl st in blo. ch 1, turn. (57)
8 sl st in blo, 13 sc in blo, inc in blo, 5 sc in blo, dec in blo, 5 sc in blo, inc in blo, 13 sc in blo, 8 sl st in blo. ch 1, turn. (59)
8 sl st in blo, 14 sc in blo, inc in blo, 5 sc in blo, dec in blo, 5 sc in blo, inc in blo, 14 sc in blo, 8 sl st in blo. ch 1, turn. (61)
8 sl st in blo, 15 sc in blo, inc in blo, 5 sc in blo, dec in blo, 5 sc in blo, inc in blo, 15 sc in blo, 8 sl st in blo. ch 1, turn. (63)
8 sl st in blo, 16 sc in blo, inc in blo, 5 sc in blo, dec in blo, 5 sc in blo, inc in blo, 16 sc in blo, 8 sl st in blo. ch 1, turn. (65)
8 sl st in blo, 17 sc in blo, inc in blo, 5 sc in blo, dec in blo, 5 sc in blo, inc in blo, 17 sc in blo, 8 sl st in blo. ch 1, turn. (67)
8 sl st in blo, 18 sc in blo, inc in blo, 5 sc in blo, dec in blo, 5 sc in blo, inc in blo, 18 sc in blo, 8 sl st in blo. ch 1, turn. Remove the outer two markers and leave only the central marker in place. (69)
8 sl st in blo, 25 sc in blo, dec in blo, 25 sc in blo, 8 sl st in blo. ch 1, turn. Move your marker up to track the central decrease. (67)
8 sl st in blo, 24 sc in blo, dec in blo, 24 sc in blo, 8 sl st in blo. ch 1, turn. (65)
8 sl st in blo, 23 sc in blo, dec in blo, 23 sc in blo, 8 sl st in blo. ch 1, turn. (63)
8 sl st in blo, 22 sc in blo, dec in blo, 22 sc in blo, 8 sl st in blo. ch 1, turn. (61)
8 sl st in blo, 21 sc in blo, dec in blo, 21 sc in blo, 8 sl st in blo. ch 1, turn. (59)
8 sl st in blo, 20 sc in blo, dec in blo, 20 sc in blo, 8 sl st in blo. ch 1, turn. (57)
8 sl st in blo, 19 sc in blo, dec in blo, 19 sc in blo, 8 sl st in blo. ch 1, turn. (55)
8 sl st in blo, 18 sc in blo, dec in blo, 18 sc in blo, 8 sl st in blo. ch 1, turn. Do not cut your yarn; we will proceed directly to the edging. (53)
Now we will create the ear straps and clean up the bottom edge. Make sure to test the length of the chain on yourself or the recipient before finishing.
ch 40 (or your custom number of chains) to form the first ear loop.
Secure this chain to the very first stitch of Row 1 with a sl st.
Work 33 sl st along the bottom edge of the mask canvas.
ch 40 (or matching your first strap length) for the second ear loop.
Attach this chain to the opposite corner of the mask. Secure with a sl st, fasten off, and weave in all yarn tails.
I hope you have the absolute best time making your new contoured mask! There is something so satisfying about creating functional, beautiful items with our own two hands. Once you finish crocheting, don't skip the blocking step—it really helps relax those stitches and gives your mask that professional, polished finish. Wear it with pride, make a bunch in different colors to match your wardrobe, or gift them to friends who appreciate handmade quality. Happy crafting, and may your stitches always bring you joy! 🧶✨
While you can, a cotton or cotton-acrylic blend is highly recommended. Cotton is much more breathable and softer against the skin, whereas 100% acrylic can feel hot and scratchy over time.
To change the width, you can add or subtract rows from the pattern. To change the height, you can adjust the initial chain count, but keep in mind you will need to recalculate your marker placements accordingly.
This is a very common issue! Try consciously loosening your tension when working the 8 slip stitches at the beginning and end of each row, or temporarily switch to a hook that is half a millimeter larger just for those sections.
Yes, blocking is highly recommended for this design. Because of the ribbed construction, the edges will naturally curl. Steam blocking relaxes the stitches, flattens the edges, and lets the beautiful chevron shape shine.
The pattern suggests 40 chains, but ear sizes and head shapes vary. Hold the mask up to your face before finishing the strap and chain enough stitches to comfortably reach around your ear without pulling too tight.
