🧢 Beautiful ✨ Detailed πŸ’ Adorable

Colorful Mini Dino Amigurumi Pattern

Colorful Mini Dino Amigurumi Pattern
4.6β˜… Rating
2-3 Hours Time Needed
3.4K Made This
βœ‚οΈ

Beginner Friendly Level

Perfect for those just starting their sewing journey, with clear instructions and simple techniques

⏱️

Bite-Sized Project

Complete in under 2 hoursβ€”quick, fun, and perfect for a little creative escape.

🧸

Cute Companion

An adorable friend to cherish, handcrafted with love to bring comfort and joy for years to come.

About This Colorful Mini Dino Amigurumi Pattern

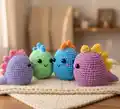
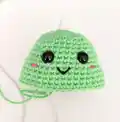
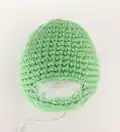
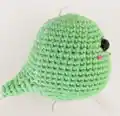
This Colorful Mini Dino pattern is worked in continuous rounds starting from the head down to create a seamless one-piece body. The design features an integrated tail worked into the body structure, eliminating the need for additional assembly. Decorative spikes in contrasting colors add personality and charm to your dinosaur friend. With simple increases and decreases, this pattern teaches fundamental amigurumi techniques while creating an adorable finished piece that's perfect for gifts or personal collections.

Colorful Mini Dino Amigurumi Pattern crochet pattern - detailed view of completed project

The pattern includes detailed placement guides for safety eyes and embroidered features, ensuring your dino has the perfect expression. Optional spike variations let you customize the final look to suit your style preferences.

Why You'll Love This Colorful Mini Dino Amigurumi Pattern

I absolutely love this pattern because it's incredibly satisfying to complete in just one sitting! The clever construction method where the tail is integrated into the body makes assembly so much easier than traditional amigurumi patterns. I'm always amazed at how such simple stitches create such an adorable character with so much personality. The colorful spikes add a playful touch that makes each dino unique, and I find myself wanting to make multiples in different color combinations. It's the perfect project when I need a quick creative boost or want to make heartfelt handmade gifts that don't require days of work!

Colorful Mini Dino Amigurumi Pattern step 1 - construction progress Colorful Mini Dino Amigurumi Pattern step 2 - assembly progress Colorful Mini Dino Amigurumi Pattern step 3 - details and accessories Colorful Mini Dino Amigurumi Pattern step 4 - final assembly and finishing

Switch Things Up

I love experimenting with different color combinations for this little dino! While the original uses green and blue, I've made versions with pastel pink bodies and lavender spikes that look absolutely dreamy. You could also try a classic brown body with orange spikes for a more realistic dinosaur look, or go wild with rainbow spikes using yarn scraps.

For a different texture, I sometimes use velvet or chenille yarn which creates an incredibly soft and cuddly finish that kids especially love. Another fun variation is adding extra embroidered details like spots or stripes along the body using a contrasting color.

If you want to make your dino extra special, consider adding small felt claws to the bottom where it sits, or create tiny arms by making very short limb pieces. I've even attached a small ribbon around the neck like a scarf for winter-themed versions!

The spike count is also flexible - you could make more medium spikes for a fuller back ridge, or create alternating spike sizes for a more varied look. Some makers skip spikes entirely and add a mane-like fringe instead for a completely different character.

Common Mistakes & How to Fix Them

βœ— Not using a stitch marker can cause you to lose track of rounds, leading to misshapen body proportions and incorrect stitch counts βœ— Forgetting to place safety eyes between rounds 9 and 10 at the correct spacing will affect facial symmetry and expression βœ— Skipping the stuffing reminders during rounds can make it difficult to stuff evenly, resulting in lumpy or loose finished pieces βœ— Not leaving long enough tails when fastening off spikes makes sewing them securely to the body extremely challenging and frustrating

Colorful Mini Dino Amigurumi Pattern

Create your own adorable mini dinosaur friend with this delightful free crochet pattern! This charming little dino stands approximately 7.5cm tall and features colorful spikes along its back, making it perfect for kids and dinosaur lovers alike. The pattern uses simple techniques worked in continuous rounds, with clear instructions for creating the head, body, tail, and decorative spikes. Customize your dino with bright or pastel colors to make each creation unique. This quick project is ideal for using up yarn scraps while creating an irresistible pocket-sized companion that's sure to bring smiles!

Beginner Friendly 2-3 Hours

Materials Needed for Colorful Mini Dino Amigurumi Pattern

β€” Main Fabric

  • 01
    8 ply (DK) cotton yarn in green for head and body
  • 02
    8 ply (DK) cotton yarn in blue for spikes
  • 03
    Black embroidery thread for mouth details
  • 04
    Pink embroidery thread for cheek details
  • 05
    Polyester fibrefill stuffing

β€” Tools Required

  • 01
    3mm crochet hook
  • 02
    Yarn needle
  • 03
    8mm safety eyes
  • 04
    Stitch markers or scrap yarn
  • 05
    Scissors

Progress Tracker

0% Complete

β€” Head and Body :

Round 1 :

6 dc in magic circle [6 sts]

Round 2 :

(inc) x 6 [12 sts]

Round 3 :

(dc 1, inc) x 6 [18 sts]

Round 4 :

(dc 1, inc, dc 1) x 6 [24 sts]

Round 5 :

(dc 3, inc) x 6 [30 sts]

Round 6 :

dc in each st [30 sts]

Round 7 :

(dc 7, inc, dc 7) x 2 [32 sts]

Round 8 :

(dc 15, inc) x 2 [34 sts]

Round 9 :

(dc 8, inc, dc 8) x 2 [36 sts]

Round 10 :

dc in each st [36 sts]

Round 11 :

(dc 5, inc) x 6 [42 sts]

Round 12-15 :

dc in each st i.e. 4 rounds [42 sts]

Info :

Place safety eyes between rounds 9 and 10 (st 12 and st 18). Embroider a mouth between the eyes and some cheeks next to the eyes.

Round 16 :

dc 34, ch 8, skip 8 sts [42 sts]

Info :

We will be crocheting the tail using this chain and the skipped 8 stitches later on

Round 17-18 :

dc in each st i.e. 2 rounds [42 sts]

Round 19 :

(dc 5, dec) x 6 [36 sts]

Round 20 :

(dc 2, dec, dc 2) x 6 [30 sts]

Round 21 :

(dc 3, dec) x 6 [24 sts]

Round 22 :

(dc 1, dec, dc 1) x 6 [18 sts]

Info :

Begin stuffing

Round 23 :

(dec) x 9 [9 sts]

Info :

Finish stuffing. Fasten off and leave a long thread. Thread the yarn through the front loops of the 9 sts and pull to close. Weave in the end.

β€” Tail :

Info :

Re-join yarn to first skipped stitch of R16 using a standing dc (or your preferred method). The standing dc will count as the first st of the round.

Round 1 :

dc in each st [16 sts]

Round 2 :

(dc 3, dec, dc 3) x 2 [14 sts]

Round 3 :

(dc 5, dec) x 2 [12 sts]

Round 4 :

(dc 2, dec, dc 2) x 2 [10 sts]

Info :

Begin stuffing

Round 5 :

(dc 3, dec) x 2 [8 sts]

Round 6 :

(dc 1, dec, dc 1) x 2 [6 sts]

Round 7 :

(dc 1, dec) x 2 [4 sts]

Info :

Finish stuffing. Fasten off and leave a long thread. Thread the yarn through the front loops of the 4 sts and pull to close. Weave in the end.

β€” Small Spike :

Info :

Make 1 piece

Round 1 :

4 dc in magic circle [4 sts]

Round 2 :

(dc 1, inc) x 2 [6 sts]

Round 3 :

(dc 1, inc, dc 1) x 2 [8 sts]

Info :

Fasten off and leave a long thread for sewing - we will be using the thread from the small spike to sew all the spikes to the body

β€” Medium Spike :

Info :

Make 3 pieces

Round 1 :

4 dc in magic circle [4 sts]

Round 2 :

(dc 1, inc) x 2 [6 sts]

Round 3 :

(dc 1, inc, dc 1) x 2 [8 sts]

Round 4 :

(dc 3, inc) x 2 [10 sts]

Info :

Fasten off - no need to leave a long thread as we will be using the thread from the small spike to sew these spikes to the body

β€” X-Small Spike (Optional) :

Info :

Make 1 piece

Round 1 :

4 dc in magic circle [4 sts]

Round 2 :

(dc 1, inc) x 2 [6 sts]

Info :

Fasten off - no need to leave a long thread as we will be using the thread from the small spike to sew this spike to the body

Assembly Instructions

  • Sew small spike over rounds 1 and 3 of the head and body using the long tail left from fastening off
  • Using the thread from the small spike, sew the 3 medium spikes in a line down the back of the dino
  • If desired, sew the optional x-small spike last at the end of the spike line using the same thread
  • Ensure all spikes are securely attached and weave in all remaining ends on the inside of the body

Important Notes

  • πŸ’‘This pattern uses UK terminology - refer to the conversion table if you're familiar with US crochet terms
  • πŸ’‘Work in continuous rounds unless otherwise specified, using a stitch marker to track the beginning of each round
  • πŸ’‘The placement of safety eyes between rounds 9 and 10 is crucial for proper tail alignment during construction
  • πŸ’‘Stuff the body and tail firmly but not too tightly to maintain the proper rounded dinosaur shape
  • πŸ’‘The standing double crochet technique is recommended for joining yarn to begin the tail section seamlessly

This adorable Colorful Mini Dino pattern was designed by Handmade by Ani to bring prehistoric cuteness into pocket-sized form! The clever one-piece construction and integrated tail make this pattern beginner-friendly while still creating impressive results. Whether you choose bright rainbow colors or soft pastels, each little dino develops its own charming personality. Perfect for quick gifts, stash-busting projects, or simply adding a smile to your day! πŸ¦•πŸ§Άβœ¨

You ask,

we answer.

FAQs

What's the difference between UK and US crochet terminology in this pattern?

This pattern uses UK terminology where 'double crochet (dc)' is the same as US 'single crochet (sc)'. A conversion table is included in the pattern to help you translate all stitches correctly if you're used to US terms.

Can I make the dino larger or smaller?

Yes! You can use a larger hook and bulkier yarn to make a bigger dino, or a smaller hook and finer yarn for a tiny version. The finished size of 7.5cm is based on using 8 ply DK cotton with a 3mm hook.

How do I crochet the tail into the body opening?

After completing round 16 where you create a chain and skip stitches, you'll rejoin your yarn to the first skipped stitch using a standing double crochet. Then work around both the skipped stitches and the chain from the previous round. The pattern includes video tutorial links for this technique.

Do I need to make the optional x-small spike?

No, the x-small spike is completely optional! The dino looks adorable with just the small spike and three medium spikes. Add the x-small one if you want a slightly longer spike row down the back.

What if I can't find 8mm safety eyes?

You can substitute with any safety eyes between 6-10mm, or embroider eyes using black yarn or thread. Just adjust the eye placement slightly if using significantly different sizes to maintain good proportions.