🧶 Beautiful ✨ Detailed 💝 Adorable

Claude the Cloud Amigurumi Pattern

Claude the Cloud Amigurumi Pattern
4.7★ Rating
2-3 Hours Time Needed
1.1K Made This
✂️

Beginner Friendly Level

Perfect for those just starting their sewing journey, with clear instructions and simple techniques

⏱️

Bite-Sized Project

Complete in under 2 hours—quick, fun, and perfect for a little creative escape.

🧸

Cute Companion

An adorable friend to cherish, handcrafted with love to bring comfort and joy for years to come.

About This Claude the Cloud Amigurumi Pattern

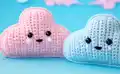
Claude the Cloud is a delightfully simple no-sew amigurumi pattern that's perfect for crocheters who want instant gratification without the fuss of assembly. This pattern uses a unique flat-piece construction method where you create two identical cloud shapes and crochet them together directly, eliminating all sewing work. The result is a plump, three-dimensional cloud with an irresistibly sweet face that measures approximately 7cm x 13cm when finished using DK weight yarn.

Claude the Cloud Amigurumi Pattern crochet pattern - detailed view of completed project

What makes this pattern special is its row-by-row construction that builds the organic cloud shape naturally through strategic increases and decreases. The no-sew technique means you'll spend more time enjoying your finished creation and less time with a needle and thread.

Why You'll Love This Claude the Cloud Amigurumi Pattern

I absolutely love this pattern because it proves that adorable amigurumi doesn't have to be complicated or time-consuming. The no-sew construction is genuinely liberating—you simply crochet the two pieces together as you stuff, which means your project goes from hook to finished in one satisfying session. I'm always amazed at how such simple stitches create those perfect puffy cloud curves, and there's something deeply satisfying about watching Claude's personality emerge as you add the safety eyes and embroider that sweet little smile. This is the kind of pattern I reach for when I need a quick creative win or want to make heartfelt handmade gifts without spending days on assembly.

Claude the Cloud Amigurumi Pattern step 1 - construction progress Claude the Cloud Amigurumi Pattern step 2 - assembly progress Claude the Cloud Amigurumi Pattern step 3 - details and accessories Claude the Cloud Amigurumi Pattern step 4 - final assembly and finishing

Switch Things Up

I love experimenting with different color combinations for Claude the Cloud! While the classic blue and white scheme is absolutely precious, don't be afraid to get creative with your yarn choices.

Try making a sunset cloud using oranges, pinks, and purples blended together, or create a stormy grey cloud with darker charcoal tones. Rainbow clouds are particularly popular with kids—you can alternate colors every few rows for a striped effect or blend pastel rainbow shades for a dreamy aesthetic.

For seasonal variations, I've made cotton-candy pink clouds for baby showers, mint green clouds for nurseries, and even metallic silver clouds for a modern twist. You could also add texture by using fuzzy or chenille yarn for an extra soft, fluffy appearance.

Consider making a whole family of clouds in graduating sizes by changing your hook and yarn weight—imagine a papa cloud, mama cloud, and baby cloud all displayed together! I've even seen makers add small embroidered raindrops or lightning bolts beneath their clouds for extra personality, or attach them to mobile hangers for nursery decor.

The simple construction of this pattern makes it perfect for yarn-bombing projects too—attach a ribbon loop at the top and hang your clouds from windows, doorknobs, or create a whole sky installation.

Common Mistakes & How to Fix Them

✗ Not using stitch markers consistently in each row can cause you to lose track of stitch counts and create uneven cloud shapes ✗ Under-stuffing the cloud will result in a flat, lifeless appearance instead of the desired puffy three-dimensional form with rounded edges ✗ Forgetting to hide yarn ends before crocheting pieces together will leave visible tails trapped inside your finished cloud ✗ Placing safety eyes at different heights or off-center will give Claude an unbalanced expression rather than a sweet centered face ✗ Rushing through the joining process without adequate stuffing in the corners will prevent the cloud from achieving its characteristic plump rounded shape

Claude the Cloud Amigurumi Pattern

Create your own adorable Claude the Cloud with this delightful no-sew amigurumi pattern! This charming little cloud friend features a sweet smiling face with rosy cheeks and safety eyes that bring personality to life. Perfect for beginners and experienced crocheters alike, this pattern uses simple row-by-row construction to build two identical pieces that are crocheted together seamlessly. Make Claude in classic blue and white, soft pastels, or any color combination that speaks to your creative heart. This quick and satisfying project will brighten any space and makes a wonderful handmade gift for cloud lovers of all ages.

Beginner Friendly 2-3 Hours

Materials Needed for Claude the Cloud Amigurumi Pattern

— Main Fabric

  • 01
    DK weight yarn (light worsted, number 3) in blue, white, and rose colors
  • 02
    DK weight yarn approximately 120-150m/50gr in your choice of cloud colors

— Tools Required

  • 01
    3mm crochet hook
  • 02
    Safety eyes 9mm
  • 03
    Stitch markers
  • 04
    Black yarn or embroidery floss for mouth
  • 05
    Rose yarn or embroidery floss for cheeks
  • 06
    Embroidery needle
  • 07
    Yarn needle
  • 08
    Scissors
  • 09
    Polyester stuffing

Progress Tracker

0% Complete

— Cloud Front-Piece :

R1 :

Ch 9, turn (9)

R2 :

Inc, 7 sc, turn (9)

R3 :

Ch 1, 8 sc, inc, turn (10)

R4 :

Ch 1, inc, 9, turn (11)

R5 :

Ch 1, 10 sc, inc, turn (12)

R6 :

Ch 1, 12 sc, turn (12)

R7 :

Ch 1, 12 sc, turn (12)

R8 :

Ch 1, inc, 11 sc, turn (13)

R9 :

Ch 1, 13 sc, ch 6, turn (19)

R10 :

1 sc, in second ch from hook, and next 17 sc (18)

R11 :

Ch 1, 17 sc, inc, turn (19)

R12-18 (7 rows) :

Ch 1, 19 sc, turn (19)

R19 :

Ch 1, 17 sc, dec turn (18)

R20 :

Ch 1, dec, 16 sc (17)

R21 :

Ch 1, 13 sc, keeping the last 4 stitches unstitched (13)

R22 :

Ch 1, dec, 11 sc, turn (12)

R23 :

Ch 1, 12 sc, turn (12)

R24 :

Ch 1, dec, 10 sc, turn (11)

R25 :

Ch 1, 9 sc, dec, turn (10)

R26 :

Ch 1, dec, 8 sc, turn (9)

R27 :

no chain, 7 sc, dec, turn (8)

R28 :

no chain, dec, 6 sc (7)

Info :

Cut yarn. Hide yarn ends.

— Cloud Back-Piece :

Info :

Make the back-piece the same way as the front-piece, but don't cut the yarn.

Info :

Once the second piece is finished, hide the other yarn end.

— Assembly & Finishing :

Eye Placement :

Add the safety eyes in one of the pieces, between row 11 and 12 and 17 and 18. Check that the eyes are on the same height and vertically in the middle of the piece.

Joining Pieces :

Lay the pieces flat onto each other. Now crochet them together with a sc. We begin where we made the last stitch. Continue to stuff the cloud while crocheting along.

Stuffing :

Make sure, the cloud is very firmly stuffed, especially add stuffing at the three corners. This way the cloud gets the cute round three-dimensional shape that we want.

Face Details :

Cut a piece of black yarn or embroidery-floss and embroider on the mouth. Then embroider on the cheeks with a few stitches.

Assembly Instructions

  • Create two identical cloud pieces following the row-by-row pattern instructions exactly
  • Hide the starting yarn end on the back piece before assembly begins
  • Position safety eyes on one piece between rows 11-12 and 17-18, ensuring they are level and centered vertically
  • Place both pieces flat together with right sides facing out and begin single crocheting around the edges where the last stitch was made
  • Stuff the cloud firmly as you crochet the pieces together, paying special attention to the three corners for proper shaping
  • Use black yarn or embroidery floss to embroider a simple smile for the mouth
  • Add rosy cheeks by embroidering a few stitches with rose-colored yarn or floss on each side of the face

Important Notes

  • 💡Use a stitch marker in the last stitch of each row and move it up as you progress to maintain accurate stitch counts
  • 💡The turning chains at the beginning of rows are not counted as stitches in this pattern
  • 💡You can use any DK weight yarn and corresponding 3mm hook to create different sized clouds while maintaining proportions
  • 💡Install safety eyes before joining the pieces together as they cannot be added once the cloud is assembled
  • 💡Firm stuffing is essential especially in the corners to achieve the characteristic puffy three-dimensional cloud shape
  • 💡This is a true no-sew pattern so there is no need for a yarn needle except for hiding initial ends

This sweet Claude the Cloud pattern was designed to bring joy and smiles through simple, accessible crochet techniques. The innovative no-sew construction makes it perfect for beginners who want professional-looking results without complicated assembly. Whether you make Claude in traditional sky blue or experiment with rainbow colors, this little cloud friend is guaranteed to brighten someone's day. The quick completion time means you can create an entire fleet of happy clouds for gifts, nursery decor, or just because they're irresistibly cute! 🧶☁️✨

You ask,

we answer.

FAQs

Can I make Claude the Cloud in different sizes?

Absolutely! You can use any weight of yarn with the corresponding hook size. Using bulky yarn with a larger hook will create a bigger cloud, while fingering weight yarn with a smaller hook will make a tiny version. The proportions will remain the same regardless of size.

What does 'no-sew' pattern mean?

This pattern eliminates all sewing by crocheting the two pieces directly together with single crochet stitches. You'll only need a yarn needle to hide the initial yarn ends, making assembly incredibly quick and beginner-friendly.

When should I add the safety eyes?

Add the safety eyes to one of the finished pieces before you begin crocheting them together. Place them between rows 11-12 and 17-18, making sure they're level and centered. Once the pieces are joined, you won't be able to install them.

How do I get the cloud shape to look puffy and three-dimensional?

The key is very firm stuffing, especially in the three corner areas of the cloud. Don't be afraid to really pack in the stuffing as you crochet the pieces together. This creates the rounded, plump shape that makes Claude so adorable.

Can I use embroidery floss instead of yarn for the face details?

Yes! The pattern specifically mentions you can use either black and rose yarn or embroidery floss for the mouth and cheeks. Embroidery floss often gives finer, more detailed facial features.