About This Classic Superhero Amigurumi Pattern
This heroic little doll makes an incredible handmade gift for comic book enthusiasts, kids, or anyone who needs a little extra courage on their desk.
Ideal for those with basic crocheting experience, featuring slightly more advanced stitches and techniques to expand your skills.
Takes 5-7 hours, making it an enjoyable project to finish over a couple of days.
Playful characters full of personality, designed to spark imagination and become cherished playtime favorites.
This heroic little doll makes an incredible handmade gift for comic book enthusiasts, kids, or anyone who needs a little extra courage on their desk.
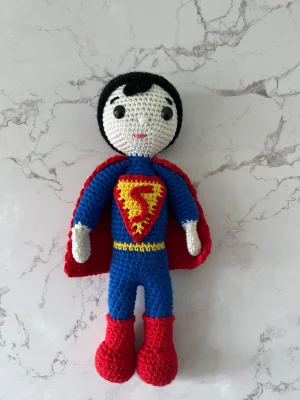
I absolutely fell in love with designing the details on this little guy! The way the signature hair curl is worked directly into the hair piece is pure genius and so satisfying to make. Plus, crocheting the tiny cape and emblem feels like assembling a real miniature costume—it's incredibly fun and rewarding.


I still remember the first time I crocheted a little superhero for a friend's birthday. The joy on their face was absolutely priceless, and that's exactly the feeling I wanted to capture when putting this pattern together for you. There is something so magical about watching a pile of colorful yarn transform into a brave little defender of the desk!
If you want to customize your hero, why not play around with the color palette? You could easily swap the classic blue and red for a sleek black and gray scheme to create a dark knight, or try a vibrant green and white for a space-themed protector. I always encourage crafters to make these designs their own.
When you're working on the chest emblem, take your time with the embroidery. A neat 'S' shape really makes the whole project pop! I like to draw the shape on a tiny piece of paper first to use as a template. I can't wait to see your finished heroes standing proud on your shelves!
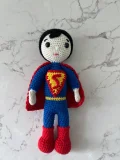
Bring the ultimate symbol of hope to your crochet hook! This classic superhero amigurumi doll is the perfect project for anyone who loves comic book legends. With his iconic red cape, bold chest emblem, and signature hair curl, he's ready to stand tall on your desk or fly straight into a loved one's heart. You'll love watching this little hero come together stitch by stitch!
With Red yarn, make a mr and work 6 sc into the ring (6)
Work 1 inc in each of the next 6 sts (12)
Repeat [1 sc, 1 inc] 6 times (18)
sc in next 6 sts, inc in next 6 sts, sc in next 6 sts (24)
sc in each of the next 24 sts (24)
sc in each of the next 24 sts (24)
sc in each of the next 24 sts (24)
sc in next 6 sts, dec 6 times, sc in next 6 sts (18)
sc in next 7 sts, dec 4 times, sc in next 7 sts (14)
Stuff the leg firmly with fiberfill. Continue stuffing as you progress.
sc in each of the next 14 sts (14)
sc in each of the next 14 sts (14)
sc in each of the next 14 sts (14)
sc in each of the next 14 sts (14)
sc in each of the next 14 sts (14)
Working in blo, sc in each of the next 14 sts (14). Switch to Blue yarn.
Working in flo, sc in each of the next 14 sts (14)
sc in each of the next 14 sts (14)
sc in each of the next 14 sts (14)
sc in each of the next 14 sts (14)
sc in each of the next 14 sts (14)
sc in each of the next 14 sts (14)
sc in each of the next 14 sts (14)
sc in each of the next 14 sts (14)
Fasten off the first leg. Repeat steps 1 through 23 to make the second leg, but do not fasten off the second leg.
Bring both legs together and join them. Work 1 sc in each of the 14 sts of the first leg, then 1 sc in each of the 14 sts of the second leg (28)
sc in each of the next 28 sts (28)
sc in each of the next 28 sts (28)
sc in each of the next 28 sts (28)
sc in each of the next 28 sts (28)
sc in each of the next 28 sts (28)
Switch to Yellow yarn.
sc in each of the next 28 sts (28)
sc in each of the next 28 sts (28)
Switch to Blue yarn.
Work 2 inc evenly spaced around the round (30)
sc in each of the next 30 sts (30)
sc in each of the next 30 sts (30)
sc in each of the next 30 sts (30)
sc in each of the next 30 sts (30)
sc in each of the next 30 sts (30)
sc in each of the next 30 sts (30)
sc in each of the next 30 sts (30)
sc in each of the next 30 sts (30)
sc in each of the next 30 sts (30)
sc in each of the next 30 sts (30)
Repeat [3 sc, 1 dec] 6 times (24)
sc in each of the next 24 sts (24)
Repeat [2 sc, 1 dec] 6 times (18)
Stuff the body firmly with fiberfill. Continue to stuff as you go.
sc in each of the next 18 sts (18)
sc in each of the next 18 sts (18)
Repeat [1 sc, 1 dec] 6 times (12)
sc in each of the next 12 sts (12)
sc in each of the next 12 sts (12)
sc in each of the next 12 sts (12)
Switch to Cream yarn.
Repeat [1 sc, 1 inc] 6 times (18)
Repeat [2 sc, 1 inc] 6 times (24)
Repeat [3 sc, 1 inc] 6 times (30)
Repeat [4 sc, 1 inc] 6 times (36)
Repeat [5 sc, 1 inc] 6 times (42)
Repeat [6 sc, 1 inc] 6 times (48)
sc in each of the next 48 sts (48)
sc in each of the next 48 sts (48)
sc in each of the next 48 sts (48)
sc in each of the next 48 sts (48)
sc in each of the next 48 sts (48)
sc in each of the next 48 sts (48)
sc in each of the next 48 sts (48)
sc in each of the next 48 sts (48)
Secure 10mm safety eyes between Rounds 65 and 66 (which are Rounds 14 and 15 of the head section), leaving a space of 8 sts between them.
Repeat [6 sc, 1 dec] 6 times (42)
Repeat [5 sc, 1 dec] 6 times (36)
Repeat [4 sc, 1 dec] 6 times (30)
Repeat [3 sc, 1 dec] 6 times (24)
Repeat [2 sc, 1 dec] 6 times (18)
Repeat [1 sc, 1 dec] 6 times (12)
Work 6 dec (6). Fasten off, weave in the yarn end to close the head.
With Cream yarn, make a mr and work 6 sc into the ring (6)
Work 1 inc in each of the next 6 sts (12)
sc in each of the next 12 sts (12)
sc in each of the next 12 sts (12)
sc in each of the next 12 sts (12)
sc in each of the next 12 sts (12)
Repeat [1 sc, 1 dec] 4 times (8)
ch 2, turn, sc in each of the next 8 sts (8)
Repeat [1 sc, 1 inc] 4 times (12)
Switch to Blue yarn. Stuff the lower hand portion of the arm lightly.
sc in each of the next 12 sts (12)
sc in each of the next 12 sts (12)
sc in each of the next 12 sts (12)
sc in each of the next 12 sts (12)
sc in each of the next 12 sts (12)
sc in each of the next 12 sts (12)
sc in each of the next 12 sts (12)
sc in each of the next 12 sts (12)
sc in each of the next 12 sts (12)
sc in each of the next 12 sts (12)
sc in each of the next 12 sts (12)
sc in each of the next 12 sts (12)
sc in each of the next 12 sts (12)
sc in each of the next 12 sts (12)
sc in each of the next 12 sts (12)
Flatten the opening of the arm. Working through both layers at once to close, work 6 sc. Fasten off, leaving a long yarn tail for sewing.
With Yellow yarn, ch 3, turn, sc in 2nd ch from hook and next ch (2), turn
sc in first st, inc in next st, sc in last st (3), turn
sc in first st, inc in next st, sc in next 2 sts (4), turn
sc in first st, inc in next st, sc in next 3 sts (5), turn
sc in first st, inc in next st, sc in next 4 sts (6), turn
sc in first st, inc in next st, sc in next 5 sts (7), turn
sc in first st, inc in next st, sc in next 6 sts (8), turn
sc in first st, inc in next st, sc in next 7 sts (9), turn
sc in first st, inc in next st, sc in next 8 sts (10), turn
sc in first st, inc in next st, sc in next 9 sts (11), turn
sc in first st, inc in next st, sc in next 10 sts (12). Fasten off.
Attach Red yarn and work 35 sc evenly around the entire edge of the yellow triangle. Fasten off, leaving a long tail for sewing.
With Red yarn, ch 16. Sew this chain onto the yellow triangle in the shape of the letter S.
With Black yarn, make a mr and work 6 sc into the ring (6)
Work 1 inc in each of the next 6 sts (12)
Repeat [1 sc, 1 inc] 6 times (18)
Repeat [2 sc, 1 inc] 6 times (24)
Repeat [3 sc, 1 inc] 6 times (30)
Repeat [4 sc, 1 inc] 6 times (36)
Repeat [5 sc, 1 inc] 6 times (42)
Repeat [6 sc, 1 inc] 6 times (48)
sc in each of the next 48 sts (48)
sc in each of the next 48 sts (48)
sc in each of the next 48 sts (48)
sc in each of the next 48 sts (48)
sc in each of the next 48 sts (48)
ch 7, turn, work 6 sc back down the chain, then sc in each of the 48 sts of the hair cap. Fasten off, leaving a long tail for sewing.
With Red yarn, ch 23, turn, sc in 2nd ch from hook and each remaining ch across (22), ch 1, turn
sc in each of the next 22 sts (22), ch 1, turn
sc in each of the next 22 sts (22), ch 1, turn
Work 1 inc, sc in next 20 sts, work 1 inc (24), ch 1, turn
Work 1 inc, sc in next 23 sts (25), ch 1, turn
Work 1 inc, sc in next 24 sts (26), ch 1, turn
Work 1 inc, sc in next 25 sts (27), ch 1, turn
Work 1 inc, sc in next 26 sts (28), ch 1, turn
Work 1 inc, sc in next 27 sts (29), ch 1, turn
Work 1 inc, sc in next 28 sts (30), ch 1, turn
Work 1 inc, sc in next 29 sts (31). Fasten off and weave in all loose ends.
I hope you have the absolute best time bringing this little superhero to life! He is such a joy to make, and seeing him stand tall with his flowing cape always puts a massive smile on my face. Don't forget to share your finished creations with our wonderful crafting family—we all love to see your unique touches. Happy stitching, my friends! 🧶✨
Yes, you can! If you're using a slightly larger hook or thicker yarn, 12mm eyes might look even better. Just make sure they are secured tightly before closing the head.
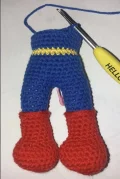
To help him stand, stuff the feet and lower legs very firmly. You can also place a small, flat plastic disk (cut from a clean container lid) inside the bottom of the boots before stuffing.
Pin the curl onto the forehead exactly where you want it. Use a thin sewing needle and the black yarn tail to sew a few tiny, hidden stitches along the back of the curl to secure its shape.
Absolutely! If you switch to worsted weight yarn, use a 3.5 mm hook. Keep in mind that your finished superhero doll will turn out about 20-30% larger, which is perfect for an extra-huggable toy.
