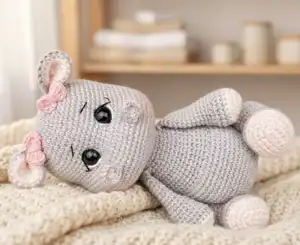
Create your own lovable Clara Hippo with this delightful amigurumi pattern! This charming design features a sweet gray hippo with adorable pink inner ears and feet details, expressive facial features with optional eyelashes for the girl version, and endearing chubby proportions that make Clara irresistibly huggable. Choose between a dapper tie for boys or a beautiful dress with lace details and sweet bows for girls. The pattern includes comprehensive instructions for achieving Clara's characteristic round face with specially positioned eyes, detailed embroidery techniques for facial features, and professional finishing methods that bring this gentle giant to life with warmth and personality.
Progress Tracker
0% Complete
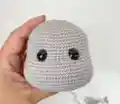
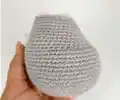
— Head :
Round 1 :
Use Quarry: AM of 8 sc (8)
Round 2 :
Inc in each sc (16)
Round 3 :
[1 sc and 1 inc] 8x (24)
Round 4 :
[2 sc and 1 inc] 8x (32)
Round 5 :
[3 sc and 1 inc] 8x (40)
Round 6 :
sc over sc (40)
Round 7 :
[4 sc and 1 inc] 8x (48)
Round 8 :
sc over sc (48)
Round 9 :
[5 sc and 1 inc] 8x (56)
Round 10 :
[6 sc and 1 inc] 8x (64)
Round 11-18 :
sc over sc - [8 rows] (64)
Round 19 :
24 sc, 16 inc, 24 sc (80)
Round 20-27 :
sc over sc - [8 rows] (80)
Round 28 :
[3 sc and 1 dec] 16x (64)
Round 29 :
sc over sc (64)
Round 30 :
[1 dec and 2 sc] 16x (48)
Round 31 :
sc over sc (48)
Round 32 :
[1 sc and 1 dec] 16x (32)
Round 33 :
sc over sc all the way around (32). Close with sl st
Info :
Place eyes between rows 16-17, separated by 6 sc. Take increase on row 19 into account to avoid crooked eyes. Center eyes on increase part. Press locks to second step for depth and security
— Whites of the Eyes :
Step 1 :
Use double White Amigurumi yarn. Insert needle into open part of head, exit at corner of eye
Step 2 :
Insert needle at corner of lower eye part, exit into open part of head
Step 3 :
Exit with needle in corner of second eye
Step 4 :
Insert needle at corner of lower eye part, exit into open head part, pull threads and tie 2 knots
— Black Embroidery of Eyes :
Step 1 :
Use double Black Cléa yarn. Insert needle into open head part, exit at eye corner
Step 2 :
Insert needle at corner of upper eye part, exit into open head part
Step 3 :
Exit with needle in corner of second eye
Step 4 :
Insert needle at corner of upper eye part, exit into open head, pull threads and tie 2 knots
— Eyelash (Girl Version Only) :
Step 1 :
Use Black Cléa yarn (single strand). Insert needle into open head, exit in middle of eye details
Step 2 :
Insert needle with space of one stitch in row above middle of black embroidery
Step 3 :
Repeat process on other eye, join thread ends and tie two knots
— Eyebrows :
Step 1 :
Use Black Cléa yarn (single strand). Insert needle into open head, leave on second row above eyes, skip 3 sc, insert needle in row above
Step 2 :
Repeat same process on other side of eyes. Join thread ends and tie knots
— Face Expression :
Info :
Use Quarry thread to join eyes and make them more sunken. This step is very important for delicate, charming expression. Watch auxiliary video for technique
— Body :
Round 1 :
Use Quarry: AM of 8 sc (8)
Round 2 :
Inc all around (16)
Round 3 :
[1 sc and 1 inc] 8x (24)
Round 4 :
[2 sc and 1 inc] 8x (32)
Round 5 :
[3 sc and 1 inc] 8x (40)
Round 6 :
[4 sc and 1 inc] 8x (48)
Round 7 :
[5 sc and 1 inc] 8x (56)
Round 8 :
[6 sc and 1 inc] 8x (64)
Round 9-20 :
sc over sc (64) - [12 rows]
Round 21 :
16 sc, 16 dec, 16 sc (48)
Round 22-25 :
sc over sc (48) - [4 rows]
Round 26 :
[4 sc and 1 dec] 8x (40)
Round 27-30 :
sc over sc (40) - [4 rows]
Round 31 :
[3 sc and 1 dec] 8x (32)
Round 32-33 :
sc over sc all the way around (32) - [2 rows]. Close with sl st
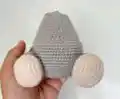
— Ears :
Info :
Make 2 equal parts with Pink and finish. Make 2 equal parts with Quarry but don't finish. Join parts together to form ear
Round 2 :
Inc all around (12)
Round 3 :
[1 sc and 1 inc] 6x (18)
Round 4 :
[2 sc and 1 inc] 6x (24)
Step 1 :
Join Pink and Quarry parts wrong sides together. Make sc all around taking sc stitch on both parts
Step 2 :
Fold ear in half and make 5 sc, taking sc on each side. Make 1 chain
Info :
Sew ears on row 5 of head with 10 sc separation. Leave them centered, take eyes into consideration
— Legs :
Row 1 :
Start with Pink: Make 6 ch, skip first ch, from second ch do 4 dc, in last ch 3 dc in same place, at bottom of ch do 3 dc, in last ch 1 inc (12)
Round 2 :
1 inc, 3 sc, 3 inc, 3 sc, 2 inc (18)
Round 3 :
1 sc and 1 inc, 3 sc, [1 sc and 1 inc] 3x, 3 sc, [1 sc and 1 inc] 2x (24)
Round 4 :
2 sc and 1 inc, 3 sc, [2 sc and 1 inc] 3x, 3 sc, [2 sc and 1 inc] 2x (30)
Round 5 :
Change to Quarry: sc over sc in BLO (30)
Round 6-7 :
sc over sc (30) - [2 rows]
Round 8 :
4 sc, [1 dec and 1 sc] 6x, 8 sc (24)
Round 9 :
[2 sc and 1 dec] 6x (18)
Round 10 :
sc over sc (18)
Round 11 :
6 sc, [1 inc] 6x, 6 sc (24)
Round 12 :
6 sc, [1 sc and 1 inc] 6x, 6 sc (30)
Round 13 :
[1 inc] 2x, 24 sc, [1 inc] 4x (36)
Round 14-16 :
sc over sc (36) - [3 rows]
Round 17 :
8 sc, [1 sc and 1 dec] 6x, 10 sc (30)
Round 18-19 :
sc over sc (30) - [2 rows]
Round 20 :
8 sc, [1 dec] 6x, 10 sc (24)
Round 21 :
[1 dec] 2x, 12 sc, [1 dec] 4x (18)
Info :
Add filling. Don't over-stuff thigh part to keep it flatter
Round 22 :
[1 sc and 1 dec] 6x (12)
Round 23 :
[1 dec] 6x (6). Close with inverted magic ring
Info :
Position legs slightly forward before attaching to prevent large gaps. Watch video tutorial for attachment
— Arms :
Round 1 :
Start with Pink: AM of 6 sc (6)
Round 2 :
Inc all around (12)
Round 3 :
[1 sc and 1 inc] 6x (18)
Round 4 :
[2 sc and 1 inc] 6x (24)
Round 5 :
Change to Quarry: sc over sc in BLO (24)
Round 6-7 :
sc over sc (24) - [2 rows]
Round 8 :
3 sc, [1 dec and 1 sc] 6x, 3 sc (18)
Round 9-18 :
sc over sc (18) - [10 rows]
Info :
Only stuff lower part of arm
Round 19 :
[4 sc and 1 dec] 3x (15)
Round 20 :
[3 sc and 1 dec] 6x (12)
Round 21 :
Fold arm in half and close with 6 sc (6). Make 1 ch
Info :
Watch video tutorial for arm sewing technique
— Bows (Girl Version) :
Step 1 :
Use Sweetness: Make AM, inside go up 3 ch, 3 dc, 2 ch, 1 sl st, 2 ch, 3 dc, 2 ch and 1 sl st
Step 2 :
Cut larger thread, make about 4 turns in middle of bow. Take thread to back, tie knots
Info :
Sew bow to head near ears
— Dress (Girl Version) :
Round 1 :
Use Sweetness with 3mm hook: Make 42 ch, close with sl st forming ring. Go up 2 ch, do 1 hdc for each ch (42)
Round 2 :
Go up 2 ch and do hdc over hdc all around (42). Close with sl st
Round 3 :
Go up 3 ch, make 1 dc in same place, make 2 dc for each dc all around (84)
Lace Edging :
Change to Pink: Do lace stitch - 1 sl st and 2 ch until end
Straps :
Attach Sweetness thread to first row. Make 6 sc, go up 18 ch, skip 6 ch make 1 sc for each ch, do 30 sc at base, go up 18 ch, skip 6 ch make 1 sc for each ch, finish with 6 sc
Strap Lace :
Attach Pink thread on first strap after 6 ch, do lace stitch: 1 sl st and 2 ch to last sc. Repeat on second strap from bottom
Info :
Place dress on hippo, check strap position and distance. Remove dress, position strap ends inside, sew to secure. Can add buttons if desired
— Tie (Boy Version) :
Round 1 :
Use Parakeet: Make 30 ch, close with sl st forming ring. Go up 2 ch, do 1 hdc for each ch (30)
Info :
Work all around taking only front loops of first chain. Wrap thread in middle about 6 turns, tie knots at back, finish excess. Place around neck
This adorable Clara Hippo pattern beautifully captures the gentle, lovable nature of hippos in a perfectly huggable amigurumi form! The special increase row creates Clara's signature chubby cheeks, while the eye-sinking technique brings incredible depth and personality to her sweet face. With pink accent details on ears and feet adding warmth and charm, plus options for both dressed-up girl and classic boy versions, Clara is perfect for gifting or cuddling. Every carefully crafted detail comes together to create a companion full of character and love! 🦛💕✨