🧢 Beautiful ✨ Detailed πŸ’ Adorable

Circus Lion Amigurumi Pattern

Circus Lion Amigurumi Pattern
4.8β˜… Rating
12-15 Hours Time Needed
2.6K Made This
βœ‚οΈ

Advanced Level

Designed for experienced knitters, these patterns involve intricate designs and complex techniques to challenge and inspire.

⏱️

Slow & Steady

A 10-12 hour projectβ€”great for savoring the process over several sessions.

🎁

Tiny Treasure

Small, sweet, and gift-worthy creations that fit perfectly in the palm of your hand with detailed charm.

About This Circus Lion Amigurumi Pattern

This spectacular Circus Lion pattern is truly a masterpiece that combines artistic design with technical prowess. The lion features a complete head-and-body construction worked as one continuous piece, creating seamless proportions and excellent structural integrity. The show-stopping mane is crafted with an ingenious tube construction technique that's then sewn into a ring, with cascading loops in up to four vibrant colors (purple, hot pink, orange, and turquoise in Version 1, or purple, yellow, orange, and light green in Version 2). The pattern includes detailed instructions for creating a realistic trunk-style nose, carefully positioned limbs for perfect sitting posture, and your choice of two elaborate circus stands - a diamond stand or heart stand - each featuring intricate colorwork patterns and special concave shaping techniques.

Circus Lion Amigurumi Pattern crochet pattern - detailed view of completed project

With two complete color variations provided, comprehensive stand construction tutorials including photo references for the concave shaping technique, and clear mane assembly instructions, this pattern ensures your lion will be truly spectacular. The finished lion sits proudly atop its coordinating decorative stand, creating an impressive circus centerpiece.

Why You'll Love This Circus Lion Amigurumi Pattern

I'm completely obsessed with this pattern because it's like creating a work of art with yarn! The mane construction is absolutely genius - watching that tube transform into a magnificent ring of cascading rainbow loops is pure magic, and seeing all those colors work together is incredibly satisfying. What really makes my heart race is the challenge of the circus stand construction - that concave shaping technique creates such professional-looking dimension, and when you finally place your finished lion on top, it's such a triumphant moment! I love that you get two complete versions to choose from, so you can match your personal style or make both for variety. The continuous head-and-body construction means fewer seams and better proportions, which makes the finished piece look so polished. Every section of this pattern teaches you something valuable, from strategic stuffing techniques to color transitions to sculptural shaping. It's one of those projects where you push your skills to new heights and end up with a centerpiece so stunning that everyone asks 'you MADE that?!' The sense of accomplishment when you complete this regal performer is absolutely unbeatable!

Circus Lion Amigurumi Pattern step 1 - construction progress Circus Lion Amigurumi Pattern step 2 - assembly progress Circus Lion Amigurumi Pattern step 3 - details and accessories Circus Lion Amigurumi Pattern step 4 - final assembly and finishing

Switch Things Up

I'm thrilled by how versatile this pattern is for customization! While the two versions provided offer stunning color schemes, you could create entirely different moods with your color choices. For a majestic wild lion, use golden orange for the body with rich browns, burnt oranges, and deep reds in the mane. For a fantasy version, try making the body in pastel lavender or mint green with a rainbow mane using every color of the spectrum!

The mane offers endless creative possibilities - instead of the four-color scheme, you could use just two colors for a simpler striped effect, or go wild with six or seven colors for maximum rainbow drama. Ombre or gradient yarns would create a stunning flowing effect through the loops. I've even thought about using metallic or sparkly yarns in the mane for a truly show-stopping circus star!

For the stands, you could customize the colorwork patterns to match team colors, holiday themes, or personal preferences. Try red and green for a Christmas circus lion, orange and black for Halloween, or your favorite sports team colors. You could even add tiny crocheted stars or sequins to the stand for extra sparkle.

If you want to make a lioness instead, simply skip the mane entirely and add a smaller decorative collar or bow around the neck. For cubs, work the pattern with a smaller hook and thinner yarn, and make the mane smaller with fewer rounds. The possibilities for creating an entire circus lion family are endless!

Common Mistakes & How to Fix Them

βœ— Not leaving yarn tails when changing colors in the mane, making it extremely difficult to weave in ends later between all the loop stitches βœ— Sewing the mane tube edges together incorrectly, creating a twisted or uneven ring that won't sit properly on the head βœ— Forgetting to stuff progressively during the body decreases, making it impossible to shape properly once the opening becomes too small βœ— Not pulling the concave shaping stitches tight enough on the circus stand, resulting in a puffy stand instead of the intended flat base with dimensional edges βœ— Misaligning the color patterns when working the diamond or heart stand designs, creating asymmetrical or unbalanced colorwork throughout the piece βœ— Skipping the decorative border rounds on the stands (rounds 16 and 29), missing the polished circus aesthetic entirely

Circus Lion Amigurumi Pattern

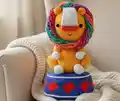
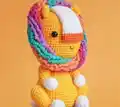
Unleash your creativity with this majestic Circus Lion amigurumi pattern that offers TWO stunning versions to choose from! This incredible design features a magnificent lion with a dramatic rainbow-striped mane, complete with your choice of a diamond or heart-shaped circus stand. Perfect for advanced crocheters who love show-stopping projects, this pattern includes intricate techniques like creating dimensional multi-colored mane loops, constructing a detailed trunk and nose piece, and crafting decorative stands with unique concave shaping. Whether you're making this regal performer in vibrant yellow or gentle skin tones, with classic circus colors or pastel variations, this lion will command attention as the star of any circus collection or nursery display!

Advanced 12-15 Hours

Materials Needed for Circus Lion Amigurumi Pattern

β€” Main Fabric

  • 01
    Version 1: YarnArt Jeans 35 yellow (50g, 160m) - Color A
  • 02
    Version 1: YarnArt Jeans 62 white (50g, 160m) - Color B
  • 03
    Version 1: YarnArt Jeans 85 hot orange (50g, 160m) - Color C
  • 04
    Version 1: YarnArt Jeans 72 purple (50g, 160m) - Color D
  • 05
    Version 1: YarnArt Jeans 59 hot pink (50g, 160m) - Color E
  • 06
    Version 1: YarnArt Jeans 23 orange (50g, 160m) - Color F
  • 07
    Version 1: Alize Cotton Gold 610 turquoise (100g, 330m) - Color G
  • 08
    Version 1: YarnArt Jeans 47 blue (50g, 160m) - Color H
  • 09
    Version 1: YarnArt Jeans 90 red (50g, 160m) - Color I
  • 10
    Version 2: YarnArt Jeans 07 skin color (50g, 160m) - Color A
  • 11
    Version 2: YarnArt Jeans 62 white (50g, 160m) - Color B
  • 12
    Version 2: YarnArt Jeans 23 orange (50g, 160m) - Color C
  • 13
    Version 2: YarnArt Jeans 89 purple (50g, 160m) - Color D
  • 14
    Version 2: YarnArt Jeans 88 yellow (50g, 160m) - Color E
  • 15
    Version 2: YarnArt Jeans 79 light green (50g, 160m) - Color G
  • 16
    Version 2: YarnArt Jeans 71 light brown (50g, 160m) - Color H
  • 17
    Version 2: YarnArt Jeans 36 pink (50g, 160m) - Color I

β€” Tools Required

  • 01
    Crochet hook size 2.5mm
  • 02
    1 pair of black safety eyes 10mm
  • 03
    Tapestry needles
  • 04
    Black thread for embroidery
  • 05
    Pins
  • 06
    Stitch markers
  • 07
    Scissors
  • 08
    Polyester fiberfill

Progress Tracker

0% Complete

β€” Head & Body (yarn A):

Round 1:

sc 6 into a magic loop (6)

Round 2:

inc 6 (12)

Round 3:

[sc 1, inc 1] 6x (18)

Round 4:

sc 1, inc 1, [sc 2, inc 1] 5x, sc 1 (24)

Round 5:

[sc 3, inc 1] 6x (30)

Round 6:

sc 2, inc 1, [sc 4, inc 1] 5x, sc 2 (36)

Round 7:

[sc 5, inc 1] 6x (42)

Round 8:

sc 3, inc 1, [sc 6, inc 1] 5x, sc 3 (48)

Round 9:

[sc 7, inc 1] 6x (54)

Round 10:

sc 4, inc 1, [sc 8, inc 1] 5x, sc 4 (60)

Round 11-23:

sc 60 (13 rnds), insert safety eyes between rnd 15 & 16, 12 sts apart (count from the inner edge of the eyes) (60)

Round 24:

[sc 8, dec 1] 6x (54)

Round 25:

[sc 7, dec 1] 6x (48)

Round 26:

[sc 6, dec 1] 6x (42)

Round 27:

[sc 5, dec 1] 6x (36)

Round 28:

[sc 4, dec 1] 6x (30)

Round 29:

[sc 3, dec 1] 6x, start stuffing (24)

Round 30:

[sc 2, dec 1] 6x (18)

Round 31:

[sc 1, dec 1] 6x (12)

Round 32:

[sc 1, inc 1] 6x (18)

Round 33:

sc 18 (18)

Round 34:

[sc 2, inc 1] 6x (24)

Round 35:

sc 24 (24)

Round 36:

[sc 3, inc 1] 6x (30)

Round 37:

sc 30 (30)

Round 38:

[sc 4, inc 1] 6x (36)

Round 39:

sc 36 (36)

Round 40:

[sc 5, inc 1] 6x (42)

Round 41:

sc 42 (42)

Round 42:

[sc 6, inc 1] 6x (48)

Round 43-50:

sc 48 (8 rnds) (48)

Round 51:

[sc 6, dec 1] 6x (42)

Round 52:

[sc 5, dec 1] 6x (36)

Round 53:

[sc 4, dec 1] 6x (30)

Round 54:

[sc 3, dec 1] 6x, stuffing firmly (24)

Round 55:

[sc 2, dec 1] 6x (18)

Round 56:

[sc 1, dec 1] 6x (12)

Round 57:

dec 6 (6)

Info:

Break the yarn, weave in the last 6 sts on the last rnd.

β€” Nose (yarn C):

Round 1:

ch 12, start on the 2nd stitch from the hook, sc 10, (sc 3), continue to crochet on the other side of the foundation chain, sc 9, inc 1 (24)

Round 2-3:

sc 24 (2 rnds), change to yarn B (24)

Round 4:

sc 24 (24)

Round 5:

dec 1, sc 8, dec 1, sc 12 (22)

Round 6-8:

sc 22 (3 rnds) (22)

Round 9:

dec 1, sc 6, dec 1, sc 12 (20)

Round 10-12:

sc 20 (3 rnds) (20)

Round 13:

dec 1, sc 4, dec 1, sc 12 (18)

Round 14-16:

sc 18 (3 rnds) (18)

Round 17:

dec 1, sc 2, dec 1, sc 12 (16)

Round 18-19:

sc 16 (2 rnds) (16)

Info:

Break the yarn with a long rest to sew, use the tapestry needle to sew 2 edges together.

β€” Ears (yarn A, make 2):

Round 1:

sc 6 into a magic loop (6)

Round 2:

inc 6 (12)

Round 3-4:

sc 12 (2 rnds) (12)

Round 5:

dec 6 (6)

Info:

Break the yarn with a long rest to sew, fold in half, use the tapestry needle to sew 2 edges together.

β€” Legs (yarn B, make 2):

Round 1:

ch 6, start on the 2nd stitch from the hook, sc 4, (sc 3), continue to crochet on the other side of the foundation chain, sc 3, inc 1 (12)

Round 2:

inc 1, sc 3, inc 3, sc 3, inc 2 (18)

Round 3-4:

sc 18 (2 rnds) (18)

Round 5:

sc 5, dec 4, sc 5 (14)

Round 6:

sc 14 (14)

Round 7:

sc 3, dec 4, sc 3, change to yarn A (10)

Round 8:

dec 1, sc 2, inc 2, sc 2, dec 1 (10)

Round 9:

sc 4, inc 2, sc 4 (12)

Round 10:

dec 1, sc 3, inc 2, sc 3, dec 1 (12)

Round 11:

sc 5, inc 2, sc 5 (14)

Round 12:

dec 1, sc 4, inc 2, sc 4, dec 1 (14)

Round 13:

sc 6, inc 2, sc 6 (16)

Round 14:

dec 1, sc 5, inc 2, sc 5, dec 1 (16)

Round 15-18:

sc 16 (4 rnds), start stuffing firmly (16)

Round 19:

dec 8 (8)

Info:

Break the yarn, weave in the last 8 sts on the last rnd.

β€” Arms (yarn B, make 2):

Round 1:

ch 4, start on the 2nd stitch from the hook, sc 2, (sc 3), continue to crochet on the other side of the foundation chain, sc 1, inc 1 (8)

Round 2:

inc 1, sc 1, inc 3, sc 1, inc 2 (14)

Round 3-4:

sc 14 (2 rnds) (14)

Round 5:

sc 3, dec 4, sc 3 (10)

Round 6:

sc 3, dec 2, sc 3, change to yarn A (8)

Round 7:

sc 3, inc 2, sc 3 (10)

Round 8:

dec 1, sc 2, inc 2, sc 2, dec 1 (10)

Round 9:

sc 4, inc 2, sc 4 (12)

Round 10:

dec 1, sc 3, inc 2, sc 3, dec 1 (12)

Round 11-14:

sc 12 (4 rnds), start stuffing firmly (12)

Round 15:

dec 6 (6)

Info:

Break the yarn, weave in the last 6 sts on the last rnd.

β€” Tail (yarn B):

Round 1:

sc 5 in a magic loop (5)

Round 2:

inc 5 (10)

Round 3:

sc 10 (10)

Round 4:

dec 5, change to yarn A (5)

Round 5-11:

sc 5 (7 rnds) (5)

Info:

Break the yarn with a long rest to sew later, do not stuff.

β€” Mane (yarn D):

Round 1:

ch 73, start on the 2nd st from the hook, sc 72, ch 1, turn (72)

Round 2:

(BLO) dec 1, sc 69, inc 1, change to yarn E, do not cut yarn D (we will continue to crochet with yarn D later), ch 1, turn (72)

Round 3:

(FLO) inc 1, sc 69, dec 1, ch 1, turn (72)

Round 4:

(BLO) dec 1, sc 69, inc 1, change to yarn F, do not cut yarn E, ch 1, turn (72)

Round 5:

(FLO) inc 1, sc 69, dec 1, ch 1, turn (72)

Round 6:

(BLO) dec 1, sc 69, inc 1, change to yarn G, do not cut yarn F, ch 1, turn (72)

Round 7:

(FLO) inc 1, sc 69, dec 1, ch 1, turn (72)

Round 8:

(BLO) dec 1, sc 69, inc 1, turn (72)

Round 9:

(BLO) *ch 3, slst 1 in the next st*, repeat ** till the end (72)

Info:

Do not break yarn G, continue to crochet *ch 3, slst 1 in the next st* on all remaining sts on rnd 7, cut yarn G, change to yarn F. Continue to crochet *ch 3, slst 1 in the next st* on all remaining sts on rnd 6 & 5 with yarn F, cut yarn F, change to yarn E. Continue to crochet ** with each yarn color 2 rnds till the end (see Assembling part for more details).

Info:

Break yarn D with a really long rest, use the tapestry needle to sew 2 edges together to create a tube, do not stuff. Then sew 2 edges of the tube together to form a ring.

β€” Diamond Stand (yarn H):

Info:

Note: yarn H: black word, yarn I: red word

Round 1-10:

Repeat rnd 1-10 of the Head (60)

Round 11:

[sc 9, inc 1] 6x (66)

Round 12:

sc 5, inc 1, [sc 10, inc 1] 5x, sc 5 (72)

Round 13:

[sc 11, inc 1] 6x (78)

Round 14:

sc 6, inc 1, [sc 12, inc 1] 5x, sc 6 (84)

Round 15:

[sc 13, inc 1] 6x (90)

Round 16:

(BLO) sc 90 (90)

Round 17:

sc 90 (90)

Round 18:

sc 5, [sc 1, sc 9] 8x, sc 1, sc 4 (90)

Round 19:

sc 4, [sc 3, sc 7] 8x, sc 3, sc 3 (90)

Round 20:

sc 3, [sc 5, sc 5] 8x, sc 5, sc 2 (90)

Round 21:

sc 2, [sc 7, sc 3] 8x, sc 7, sc 1 (90)

Round 22:

sc 1, [sc 9, sc 1] 8x, sc 9 (90)

Round 23:

[inc 1, sc 1, sc 7, sc 1] 9x (99)

Round 24:

sc 4, [sc 5, sc 6] 8x, sc 5, sc 2 (99)

Round 25:

[sc 1, inc 1, sc 3, sc 3, sc 3] 9x (108)

Round 26:

sc 7, [sc 1, sc 11] 8x, sc 1, sc 4, break yarn I (108)

Round 27-28:

sc 108 (2 rnds) (108)

Round 29:

(BLO) sc 8, dec 1, [sc 16, dec 1] 5x, sc 8 (102)

Round 30:

[sc 15, dec 1] 6x (96)

Round 31:

sc 7, dec 1, [sc 14, dec 1] 5x, sc 7 (90)

Round 32:

[sc 13, dec 1] 6x (84)

Round 33:

sc 6, dec 1, [sc 12, dec 1] 5x, sc 6 (78)

Round 34:

[sc 11, dec 1] 6x (72)

Round 35:

sc 5, dec 1, [sc 10, dec 1] 5x, sc 5 (66)

Round 36:

[sc 9, dec 1] 6x (60)

Round 37:

sc 4, dec 1, [sc 8, dec 1] 5x, sc 4 (54)

Round 38:

[sc 7, dec 1] 6x (48)

Round 39:

sc 3, dec 1, [sc 6, dec 1] 5x, sc 3 (42)

Round 40:

[sc 5, dec 1] 6x (36)

Round 41:

sc 2, dec 1, [sc 4, dec 1] 5x, sc 2, start stuffing slightly, enough to make the stand a bit puffy (30)

Round 42:

[sc 3, dec 1] 6x (24)

Round 43:

sc 1, dec 1, [sc 2, dec 1] 5x, sc 1 (18)

Round 44:

[sc 1, dec 1] 6x (12)

Round 45:

dec 6 (6)

Info:

Break the yarn with a really long rest, use the tapestry needle to pull from the middle bottom to the middle front of the stand to make a concave each side (see Assembling part). Join yarn B on the last st of rnd 16, crochet slst till the end on the remaining sts. Turn the Stand upside down, join yarn B on the first st of rnd 29, crochet slst till the end on the remaining sts. Hide the remaining yarn.

β€” Heart Stand (-yarn H):

Info:

Note: yarn H: black word, yarn I: red word

Round 1-17:

Repeat rnd 1-17 of the Diamond Stand (90)

Round 18:

sc 1, [sc 2, sc 3] 17x, sc 2, sc 2 (90)

Round 19:

[sc 4, sc 1] 18x (90)

Round 20-22:

[sc 9, sc 1] 9x (3 rnds) (90)

Round 23:

[inc 1, sc 7, sc 2] 9x (99)

Round 24:

sc 3, [sc 5, sc 6] 8x, sc 5, sc 3 (99)

Round 25:

[sc 1, inc 1, sc 2, sc 3, sc 4] 9x (108)

Round 26:

sc 6, [sc 1, sc 11] 8x, sc 1, sc 5, break yarn I (108)

Round 27-45:

Repeat rnd 27-45 of the Diamond Stand (6)

Info:

Make the same as the Diamond Stand.

Assembly Instructions

  • Use the tapestry needle to sew the nose onto the head, positioning it carefully for a realistic lion expression.
  • Insert safety eyes between rounds 15 and 16, spacing them 12 stitches apart (counting from the inner edge of the eyes).
  • Use black thread to embroider the mouth 2 rounds below the nose.
  • Attach the 2 ears onto the head between rounds 8 and 9.
  • After crocheting all the mane rounds and creating loops on all remaining stitches, use the tapestry needle to sew the two long edges together to create a tube.
  • Sew the two edges of the mane tube together (matching same colors) to form a ring, then hide the remaining yarn.
  • Push the mane ring onto the head and use the tapestry needle to sew it securely in place all around.
  • Attach the legs onto the body, ensuring the lion can sit properly and maintain balance.
  • Attach the arms onto the body 2 rounds below the neck.
  • Attach the tail between rounds 45 and 46 of the body.
  • For the circus stand: use the tapestry needle to pull yarn from the middle bottom to the middle front of the stand to create a concave on each side, pull as tight as possible and repeat 2-3 times.
  • Join yarn B on the last stitch of round 16 of the stand and crochet slip stitches till the end on the remaining loops.
  • Turn the stand upside down, join yarn B on the first stitch of round 29, and crochet slip stitches till the end on the remaining loops.
  • Place the finished lion on top of the completed circus stand for display.

Important Notes

  • πŸ’‘This pattern creates the head and body as one continuous piece - stuff progressively as you work through the decrease rounds.
  • πŸ’‘When working the mane, do not cut yarns between color changes until instructed - you'll be working back on remaining loops with each color.
  • πŸ’‘The mane construction requires careful attention: first create all the loops on one side, then work back through remaining loops of each round in reverse order.
  • πŸ’‘Leave a very long yarn tail when finishing the mane to sew the tube edges together and then form the ring.
  • πŸ’‘For the circus stand colorwork, follow the color coding precisely (black text for yarn H, red text for yarn I) to create the proper diamond or heart pattern.
  • πŸ’‘The concave shaping on the stand is crucial - pull the yarn very tight from bottom to front and repeat 2-3 times to create proper dimension.
  • πŸ’‘If the stand remains too puffy after concave shaping, place a heavy book on top or press down with your hands to flatten.
  • πŸ’‘Work the decorative borders on rounds 16 and 29 of the stand using slip stitches on remaining loops for a polished finish.
  • πŸ’‘Position the legs carefully when attaching to ensure the lion sits stably on the stand.

This magnificent Circus Lion pattern was designed to be the crown jewel of any amigurumi collection! With two stunning color variations to choose from, an elaborate rainbow mane using advanced loop and tube techniques, and your choice of intricately patterned circus stands, this project combines artistic vision with technical mastery. The continuous head-and-body construction ensures perfect proportions, while the concave-shaping technique creates professional display bases. Whether you choose the vibrant Version 1 or the gentle Version 2 palette, this regal performer will command attention and admiration wherever displayed. A true showstopper for the advanced crocheter! 🦁πŸŽͺ✨

You ask,

we answer.

FAQs

How do I work the mane construction with multiple colors and remaining loops?

You'll work back and forth in rows, changing colors but NOT cutting them. After completing all the back-loop rows and creating loops on one side (round 9), you work back through the remaining front loops of each previous round in reverse order, using the corresponding yarn colors. The pattern includes detailed assembly photos showing this technique.

What's the difference between the Diamond Stand and Heart Stand?

Both stands use the same base construction through round 17, then differ in their colorwork pattern. The Diamond Stand creates geometric diamond shapes while the Heart Stand creates heart motifs. Choose based on your personal preference - both are equally beautiful!

How do I create the concave shaping on the circus stand?

After completing the stand, use your tapestry needle with the long yarn tail to pull from the middle bottom through to the middle front of the stand. Pull very tight to create an indentation on each side. Repeat this process 2-3 times for best results. The pattern includes step-by-step photos.

Can I make this pattern without the circus stand?

Yes! The lion is complete without the stand and will sit nicely on its own. However, the stand adds impressive display value and showcases your advanced skills, making it worth the extra effort.

Which version should I make - Version 1 or Version 2?

Version 1 uses bright yellow for the lion body with vibrant circus colors, creating a classic circus aesthetic. Version 2 uses skin color for a gentler, more natural look with pastel variations. Both are equally stunning - choose based on your color preferences or make both!