🧢 Beautiful ✨ Detailed πŸ’ Adorable

Circus Clown Amigurumi Pattern

Circus Clown Amigurumi Pattern
4.2β˜… Rating
8-10 Hours Time Needed
2.7K Made This
βœ‚οΈ

Intermediate Level

Ideal for those with basic knitting experience, featuring slightly more advanced stitches and techniques to expand your skills.

⏱️

All-Day Adventure

Requires 8-10 hours, ideal for a full day of immersive knitting.

🧸

Cute Companion

An adorable friend to cherish, handcrafted with love to bring comfort and joy for years to come.

About This Circus Clown Amigurumi Pattern

This delightful Circus Clown pattern brings together vibrant colors and playful details to create a truly special amigurumi friend. The clown features colorful rainbow hair made in orange and purple, a cheerful expression with embroidered eyes and rosy cheeks, and a classic circus outfit complete with striped overalls and decorative buttons. The pattern includes special techniques like spike stitches for the overalls texture and adorable shoe balls that add that perfect circus touch. Every detail, from the tiny hat to the carefully crafted hands, has been designed to capture the whimsical spirit of the circus.

Circus Clown Amigurumi Pattern crochet pattern - detailed view of completed project

With clear round-by-round instructions and helpful assembly guides, this pattern walks you through creating each component separately before bringing them all together. The finished clown stands beautifully on its own and makes a wonderful decorative piece or beloved toy.

Why You'll Love This Circus Clown Amigurumi Pattern

I absolutely love this pattern because it lets you work with such a fun rainbow of colors - there's something magical about watching those bright yarns come together into such a joyful character! The spike stitch technique used for the overalls adds a beautiful texture that makes the finished piece look really professional, and I find it's a great skill to practice. What really makes my heart happy is seeing those little details come to life - the pompom hair loops, the tiny cheeks, and that sweet little hat perched between the colorful hair tufts. It's one of those projects where every step brings a smile, and the end result is just pure happiness captured in yarn!

Circus Clown Amigurumi Pattern step 1 - construction progress Circus Clown Amigurumi Pattern step 2 - assembly progress Circus Clown Amigurumi Pattern step 3 - details and accessories Circus Clown Amigurumi Pattern step 4 - final assembly and finishing

Switch Things Up

I love experimenting with color combinations on this pattern! While the original uses bright circus colors, you could create a pastel version with soft pinks, blues, and yellows for a gentler look, or go bold with neon colors for an ultra-vibrant clown. The hair is particularly fun to customize - try making both pieces in rainbow gradient yarn for a truly spectacular effect, or use variegated yarn that shifts through multiple colors.

For a different character entirely, you could swap the clown nose for a regular skin-colored nose and change the color scheme to match a specific character or theme. I've even thought about making a winter version with white and silver yarn, adding a pompom to the hat for a festive holiday decoration.

The overalls are another great place to get creative - instead of the spike stitch texture, you could work them in simple stripes, polka dots using bobble stitches randomly placed, or even try tapestry crochet to add patterns or letters. If you want to make the clown fancier, consider adding a ruffled collar using the same technique as the collar in the Hot Air Balloon Boy pattern, or create a tiny bow tie from ribbon.

For kids, you might want to make the clown in softer, more muted tones and add a music box inside for a sweet lullaby friend. The possibilities are truly endless with this versatile pattern!

Common Mistakes & How to Fix Them

βœ— Not using stitch markers when working the leg construction with the third loop technique, which can cause misalignment βœ— Stuffing the head too firmly before attaching the hair pieces, making it difficult to sew them securely in place βœ— Forgetting to work the spike single crochet stitches in the correct row below for the overalls texture pattern βœ— Not leaving long enough yarn tails when finishing pieces like the hat and nose for secure attachment

Circus Clown Amigurumi Pattern

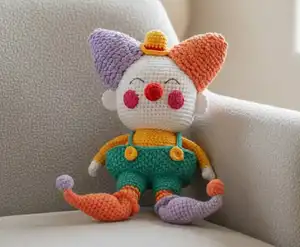
Bring the magic of the circus into your home with this adorable Circus Clown amigurumi pattern! Perfect for crochet enthusiasts who love creating colorful, whimsical characters, this pattern features a cheerful clown complete with vibrant rainbow hair, a cute little hat, and classic circus overalls. With detailed instructions for every piece from the bobbled shoes to the playful pompom details, you'll craft a charming companion that captures the joy and wonder of the big top. Whether you're making it as a special gift or adding to your handmade toy collection, this clown will bring smiles wherever it goes!

Intermediate 8-10 Hours

Materials Needed for Circus Clown Amigurumi Pattern

β€” Main Fabric

  • 01
    YarnArt Jeans 62 white (50g, 160m) - Color A
  • 02
    YarnArt Jeans 23 orange (50g, 160m) - Color B
  • 03
    YarnArt Jeans 89 purple (50g, 160m) - Color C
  • 04
    YarnArt Jeans 26 red (50g, 160m) - Color D
  • 05
    YarnArt Jeans 59 hot pink (50g, 160m) - Color E
  • 06
    YarnArt Jeans 35 yellow (50g, 160m) - Color F
  • 07
    Alize Cotton Gold 610 turquoise (100g, 330m) - Color G

β€” Tools Required

  • 01
    Crochet hook size 2.5mm
  • 02
    Tapestry needles
  • 03
    Brown thread for embroidery
  • 04
    Pins
  • 05
    Stitch markers
  • 06
    Scissors
  • 07
    Polyester fiberfill

Progress Tracker

0% Complete

β€” Head (yarn A):

Round 1:

sc 6 into a magic loop (6)

Round 2:

inc 6 (12)

Round 3:

[sc 1, inc 1] 6x (18)

Round 4:

sc 1, inc 1, [sc 2, inc 1] 5x, sc 1 (24)

Round 5:

[sc 3, inc 1] 6x (30)

Round 6:

sc 2, inc 1, [sc 4, inc 1] 5x, sc 2 (36)

Round 7:

[sc 5, inc 1] 6x (42)

Round 8:

sc 3, inc 1, [sc 6, inc 1] 5x, sc 3 (48)

Round 9:

[sc 7, inc 1] 6x (54)

Round 10:

sc 4, inc 1, [sc 8, inc 1] 5x, sc 4 (60)

Round 11-23:

sc 60 (13 rnds) (60)

Round 24:

[sc 8, dec 1] 6x (54)

Round 25:

[sc 7, dec 1] 6x (48)

Round 26:

[sc 6, dec 1] 6x (42)

Round 27:

[sc 5, dec 1] 6x (36)

Round 28:

[sc 4, dec 1] 6x (30)

Round 29:

[sc 3, dec 1] 6x (24)

Info:

Break the yarn with a long rest. Stuff firmly.

β€” Hairs (make 1 with yarn B, 1 with yarn C):

Round 1:

sc 6 into a magic loop (6)

Round 2:

BLO [sc 1, inc] 3x (9)

Round 3:

BLO [sc 2, inc] 3x (12)

Round 4:

BLO [sc 3, inc] 3x (15)

Round 5:

BLO [sc 4, inc] 3x (18)

Round 6:

BLO [sc 5, inc] 3x (21)

Round 7:

BLO [sc 6, inc] 3x (24)

Round 8:

BLO, sc 24 (24)

Round 9:

BLO [sc 7, inc] 3x (27)

Round 10:

BLO, sc 27 (27)

Round 11:

BLO [sc 8, inc] 3x (30)

Round 12:

BLO, sc 30 (30)

Round 13:

BLO [sc 9, inc] 3x (33)

Round 14:

BLO, sc 33 (33)

Info:

Break the yarn, join yarn B/C on the 1st of the 2nd rnd and continue crocheting *ch 3, slst 1 on the next st* on the remaining loop of all rnds (see Assembling Part).

β€” Ears (yarn A, make 2):

Round 1:

sc 6 into a magic loop (6)

Round 2:

inc 6 (12)

Round 3-4:

sc 12 (2 rnds) (12)

Info:

Break the yarn with a long rest to sew, use the tapestry needle to sew 2 edges together.

β€” Nose (yarn D):

Round 1-4:

Repeat rnd 1-4 of the Ear (12)

Round 5:

[sc 2, dec] 3x (9)

Info:

Break the yarn with a long rest to sew.

β€” Cheeks (yarn E, make 2):

Round 1:

sc 6 into a magic loop (6)

Round 2:

inc 6, slst on the 1st st of this rnd (12)

Info:

Break the yarn with a long rest to sew.

β€” Hat (yarn F):

Round 1-3:

Repeat rnd 1-3 of the Head (18)

Round 4-6:

sc 18 (3 rnds), change to yarn D (18)

Round 7-8:

sc 18 (2 rnds), change to yarn F (18)

Round 9:

FLO, inc 18 (36)

Info:

Break the yarn with a long rest to sew.

β€” Legs (make 1 with yarn B, 1 with yarn C):

Round 1:

sc 3 into a magic loop (3)

Round 2:

inc 3 (6)

Round 3:

sc 2, inc 2, sc 2 (8)

Round 4:

dec 1, sc 1, inc 2, sc 1, dec 1 (8)

Round 5:

sc 3, inc 2, sc 3 (10)

Round 6:

dec 1, sc 2, inc 2, sc 2, dec 1 (10)

Round 7:

sc 4, inc 2, sc 4 (12)

Round 8:

sc 5, inc 2, sc 5 (14)

Round 9:

sc 6, inc 2, sc 6 (16)

Round 10:

sc 7, inc 2, sc 7 (18)

Round 11:

sc 8, inc 2, sc 8 (20)

Round 12-13:

sc 20 (2 rnds) (20)

Round 14:

sc 9, sc 1 on the 3rd loop (see Assembling part), sc 10 (20)

Round 15:

dec 1, sc 6, dec 2, sc 6, dec 1 (16)

Round 16:

dec 1, sc 4, dec 2, sc 4, dec 1, start stuffing firmly (12)

Round 17:

FLO, dec 1, sc 3, inc 2, sc 3, dec 1 (12)

Round 18-19:

dec 1, sc 3, inc 2, sc 3, dec 1 (2 rnds) (12)

Round 20:

dec 1, sc 3, inc 1, slst on the remaining loops of the 10th st of rnd 14 (see Assembling part), inc 1, sc 3, dec 1 (12)

Round 21:

sc 6, skip the slst st of the previous rnd, sc 6 (12)

Round 22:

FLO, *ch 3, slst 1 on the next st*, repeat ** to the end, break yarn B/C, change to yarn E (12)

Round 23:

continue to crochet on the back loops of rnd 22, sc 12, change to yarn F (12)

Round 24-28:

sc 12 (change to yarn E/F each rnd) (5 rnds), change to yarn G (12)

Round 29:

[sc 1, inc 1] 6x (18)

Round 30-33:

sc 18 (4 rnds) (18)

Round 34:

sc 3, break the yarn (3)

Info:

Make the 2nd leg the same way but do not break the yarn, join with the 1st leg by slst 1 on the last st of the 1st leg, continue to crochet the body.

β€” Body (yarn G):

Round 35:

sc 18 (on the 1st leg), sc 18 (on the 2nd leg) (36)

Round 36:

[sc 5, inc 1] 6x (42)

Round 37:

BLO, sc 42 (42)

Round 38-41:

sc 42 (4 rnds), change to yarn F (42)

Round 42-46:

sc 42 (5 rnds) (42)

Round 47:

[sc 5, dec 1] 6x (36)

Round 48:

sc 36 (36)

Round 49:

[sc 4, inc 1] 6x (30)

Round 50:

sc 30 (30)

Round 51:

[sc 3, inc 1] 6x (24)

Round 52:

sc 24 (24)

Info:

Break the yarn with a long rest to sew later, stuff.

β€” Overalls:

Info:

Turn to the back side of the body, join yarn G on the 1st of the remaining loop of the 37th rnd (see Assembling Part), continue to crochet the overalls:

Round 1:

[sc 1, inc 1] 21x (63)

Round 2:

sc 63 (63)

Round 3:

[sc 1, spike sc 1] 31x, sc 1 (see Special Stitches at page 5 for Spike sc) (63)

Round 4:

[spike sc 1, sc 1] 31x, spike sc 1 (63)

Round 5-10:

repeat (rnd 3 & 4) 3 more times (6 rnds) (63)

Round 11:

ch 30, slst on the 23, slst on all remaining chains, continue to crochet on the overalls, [sc 1, spike sc 1] 3x, ch 30, slst on the 23, slst on all remaining chains, slst on the next st of the overalls

Info:

Break & hide the remaining yarn.

β€” Arms (yarn A, make 2):

Round 1:

sc 6 in a magic loop (6)

Round 2:

[sc 1, inc 1] 3x (9)

Round 3:

sc 4, Bobble 1, sc 4 (9)

Round 4:

sc 9, change to yarn F (9)

Round 5-18:

sc 9 (14 rnds) (9)

Info:

Break the yarn with a long rest, stuff slightly the lower part, use the tapestry needle to sew 2 edges together.

β€” Buttons (yarn F, make 2):

Round 1:

sc 9 in a magic loop (9)

Round 2:

slst 9 (9)

Info:

Break the yarn with a long rest.

β€” Shoe's Balls (make 1 with yarn B, 1 with yarn C):

Round 1-4:

Repeat rnd 1-4 of the Ear, start stuffing slightly (12)

Round 5:

dec 6 (6)

Info:

Break the yarn with a long rest, weave in the last 6 sts on the last rnd.

Assembly Instructions

  • Attach the hair pieces on each side of the head from the 3rd rnd to the 15th rnd, positioning them 6 sts apart from each other.
  • Attach the hat between the two hair pieces on top of the head.
  • Use brown thread to embroider the eyes at round 14, making 4 stitches for each eye with 4-5 sts distance between them.
  • Attach the nose 1 round below the eyes in the center of the face.
  • Attach the cheeks on each side of the nose at the same level.
  • Attach the head to the body, ensuring it sits securely and is well-stuffed.
  • Attach the arms to the sides of the body at the appropriate position.
  • Attach 2 buttons on the front side of the overalls for decoration.
  • Attach the shoe's balls on each leg to complete the clown's shoes.

Important Notes

  • πŸ’‘Use stitch markers when working the third loop technique on the legs to ensure proper placement and avoid confusion.
  • πŸ’‘Work spike single crochet stitches carefully, inserting your hook into the row below as instructed for the overalls texture.
  • πŸ’‘Stuff the head and body firmly to maintain the clown's shape, but don't overstuff the arms.
  • πŸ’‘Leave long yarn tails when finishing each piece to make assembly easier and more secure.
  • πŸ’‘When creating the hair loops, work consistently on the back loops only to create the proper curly texture.
  • πŸ’‘Pin all pieces in place before sewing to ensure correct positioning and symmetry.
  • πŸ’‘Change colors neatly when working the striped pants sections to maintain clean color transitions.

This charming Circus Clown pattern is designed to bring the wonder and whimsy of the circus right into your hands! With its playful rainbow hair, cheerful expression, and classic circus outfit complete with textured overalls and decorative details, this amigurumi captures all the joy and magic of the big top. The pattern combines fun color changes, special stitch techniques, and delightful finishing touches to create a truly memorable handmade friend. Perfect for display or play, this little clown is sure to brighten anyone's day! πŸŽͺ🧢✨

You ask,

we answer.

FAQs

What yarn weight is best for this pattern?

This pattern uses DK weight yarn (YarnArt Jeans and Alize Cotton Gold). Using the recommended yarn weight with a 2.5mm hook will give you the correct gauge and sizing for the pattern.

How do I work the spike single crochet stitch for the overalls?

Insert your hook from front to back in the row below instead of the current row, pull up a loop (it will be longer than normal), then complete the single crochet as usual. The pattern includes detailed photo instructions for this special stitch.

What is the third loop technique mentioned in the leg instructions?

The third loop is an additional loop that appears on certain stitches. The pattern includes detailed assembly photos showing exactly where to locate and crochet into this loop to create the shoe structure.

Can I make the hair in different colors?

Absolutely! While the pattern calls for orange and purple, you can use any color combination you like. Just make one hair piece in each of your chosen colors for a personalized clown.

How tall will the finished clown be?

The finished size depends on your tension and yarn choice, but using the recommended materials should produce a clown approximately 20-25cm tall, making it a perfect huggable size.