🧢 Beautiful ✨ Detailed πŸ’ Adorable

Cherry Babies Acorn Cradle Amigurumi Pattern

Cherry Babies Acorn Cradle Amigurumi Pattern
4.6β˜… Rating
4-5 Hours Time Needed
2.7K Made This
βœ‚οΈ

Intermediate Level

Ideal for those with basic knitting experience, featuring slightly more advanced stitches and techniques to expand your skills.

⏱️

Weekend Treat

Takes 5-7 hours, making it an enjoyable project to finish over a couple of days.

🧸

Tiny Treasure

Small, sweet, and gift-worthy creations that fit perfectly in the palm of your hand with detailed charm.

About This Cherry Babies Acorn Cradle Amigurumi Pattern

This enchanting Cherry Babies pattern brings together the sweetness of miniature dolls with the beauty of nature-inspired leaf work. You'll crochet two tiny cherry baby dolls complete with beige heads, crimson caps, and green bodies with little arms, then create an intricate two-layered leaf cradle to nestle them in. The pattern includes detailed instructions for making wire-wrapped petioles that connect the babies like real cherries, adding an authentic touch to your finished piece.

Cherry Babies Acorn Cradle Amigurumi Pattern crochet pattern - detailed view of completed project

Working in continuous rounds for the dolls and back-and-forth rows for the leaves, this pattern offers variety in technique while maintaining a manageable skill level. The finished set makes a wonderful gift for nature lovers or a charming addition to your own home decor.

Why You'll Love This Cherry Babies Acorn Cradle Amigurumi Pattern

I absolutely love how this pattern combines the cuteness of amigurumi with botanical beauty to create something truly unique. The tiny scale of the cherry babies makes them incredibly adorable, and seeing them nestled together in their handmade leaf cradle is just heartwarming. I enjoy the variety this pattern offers - you get to work on small continuous rounds for the dolls and then switch to the meditative back-and-forth rows for the leaves. The wire-wrapping technique for the petioles adds such an authentic touch that makes the finished piece look like real cherries. What I love most is that this makes an absolutely perfect gift that always receives amazed reactions, and it's a wonderful way to showcase your crochet skills in a small but impressive package.

Cherry Babies Acorn Cradle Amigurumi Pattern step 1 - construction progress Cherry Babies Acorn Cradle Amigurumi Pattern step 2 - assembly progress Cherry Babies Acorn Cradle Amigurumi Pattern step 3 - details and accessories Cherry Babies Acorn Cradle Amigurumi Pattern step 4 - final assembly and finishing

Switch Things Up

I love experimenting with this pattern by changing up the colors to create different berry varieties. Instead of crimson cherries, try using purple yarn for adorable grape babies, or bright red with tiny black seeds embroidered on for strawberry versions. You could even make blueberry babies with deep blue caps!

For a seasonal twist, I sometimes add tiny embroidered details to the caps - little white dots for a spotted mushroom look, or small flowers for a springtime feel. The leaf cradle can be made in autumn colors like golden yellow, burnt orange, or deep burgundy for a fall decoration that's absolutely stunning.

If you want to make these as ornaments, I recommend using a smaller hook (1.5mm) and thinner thread to create even tinier versions that are perfect for hanging. I've also experimented with making the leaf cradle slightly larger to hold three or four babies instead of just two - it makes a beautiful centerpiece!

For gift-giving, I love packaging these in a small clear box with a bit of moss or tissue paper to create a nature-inspired presentation. Sometimes I attach a small tag with the story of the cherry babies, which makes it extra special. The wire stems can be shaped into heart formations or other sweet poses before gifting.

Common Mistakes & How to Fix Them

βœ— Forgetting to stuff the head tightly before closing - always stuff firmly after round 9 to maintain proper head shape βœ— Losing track of rounds when working continuously - pull the initial thread between rounds 2 and 3 as a marker βœ— Not checking the leaf charts carefully - some rows have different starting and ending patterns that are easy to miss βœ— Wrapping the wire petiole too loosely - wrap coil by coil very tightly to prevent gaps and ensure durability

Cherry Babies Acorn Cradle Amigurumi Pattern

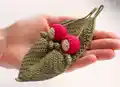
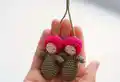
Create these absolutely adorable cherry baby dolls nestled in their cozy leaf cradle with this charming amigurumi pattern. Perfect for gift-giving or as a delightful decorative piece, this project combines tiny crocheted dolls with intricate leaf work to create a whimsical nature-inspired scene. Each cherry baby measures just 5.4 cm tall and sits perfectly in a handcrafted 13 cm leaf cradle, making this an enchanting project that showcases your crochet skills while creating something truly special and heartwarming.

Intermediate 4-5 Hours

Materials Needed for Cherry Babies Acorn Cradle Amigurumi Pattern

β€” Main Fabric

  • 01
    Alpina Lily cotton yarn in Beige (50g/175m)
  • 02
    Alpina Lily cotton yarn in Crimson (50g/175m)
  • 03
    NAKO Mia cotton yarn in Green (50g/170m)

β€” Tools Required

  • 01
    Crochet hook 2.0 mm
  • 02
    Wire 0.5 mm
  • 03
    Thin black thread for embroidery
  • 04
    Sewing needles
  • 05
    Pins
  • 06
    Tapestry needle
  • 07
    Scissors
  • 08
    Synthetic or organic stuffing
  • 09
    Stitch markers

Progress Tracker

0% Complete

β€” HEAD :

Round 1 :

6 sc into magic ring (6 sts)

Round 2 :

(inc) X 6 (12 sts)

Round 3 :

(1 sc, inc) X 6 (18 sts)

Round 4-7 :

sc around (18 sts) - 4 rounds

Round 8 :

(1 sc, dec) X 6 (12 sts)

Round 9 :

(dec) X 6 (6 sts)

Info :

After Round 9 stuff the head tightly, leave a tail. In remaining 6 sc sew 6 stitches from inside to outside in sequence, pull the yarn, secure and hide it.

β€” CAP :

Round 1 :

6 sc into magic ring (6 sts)

Round 2 :

(inc) X 6 (12 sts)

Round 3 :

(1 sc, inc) X 6 (18 sts)

Round 4-8 :

sc around (18 sts) - 5 rounds

Info :

Put the cap on the doll's head and work Round 10

Round 10 :

(1 sc, dec) X 6 (12 sts)

Info :

Make 1 sc and 1 sl st more. Leave a tail. Make clean fastening off by inserting the yarn into the first stitch after your last stitch, insert back into this last stitch and repeat, secure and hide inside.

β€” BODY & ARMS :

Info :

First make 2 arms

Arms Round 1 :

6 sc into magic ring (6 sts)

Arms Round 2-4 :

sc around (6 sts) - 3 rounds

Info :

Make 1 sl st more and leave short tail

Body Round 1 :

6 sc into magic ring (6 sts)

Round 2 :

(inc) X 6 (12 sts)

Round 3 :

(inc, 5 sc) X 2 (14 sts)

Round 4 :

(inc, 6 sc) X 2 (16 sts)

Round 5 :

(inc, 7 sc) X 2 (18 sts)

Round 6-7 :

sc around (18 sts) - 2 rounds

Round 8 :

(dec, 7 sc) X 2 (16 sts)

Round 9 :

(dec, 6 sc) X 2 (14 sts)

Round 10 :

(dec, 5 sc) X 2 (12 sts)

Info :

Now place one arm close to the body and join them together with 2 sc (these inner connecting sc will not be used in the next round). For the arm use its last stitch and the next following stitch. Work 4 sc and join the second arm with 2 sc, then 4 sc again.

Round 11 :

4 sc (arm), 4 sc (body), 4 sc (arm), 4 sc (body) (16 sts)

Round 12 :

(dec) X 8 (8 sts)

Info :

Make 1 sl st more and leave long tail for stitching. Make clean fastening off. Lightly stuff the body (not the arms).

β€” FACE :

Info :

Embroider the eyes with a few stitches using thin black thread

β€” LEAF-CRADLE BIG LEAF :

Row 1 :

2 ch, 1 dc, 1 sc into magic ring (4 sts), turn

Row 2 :

2 ch, (1 sc, 1 dc, 1 sc in one loop - called sds, counts as 3 stitches), 1 sc (6 sts)

Row 3 :

2 ch, 1 sc, sds, 2 sc (8 sts)

Row 4 :

2 ch, 2 sc, sds, 3 sc (10 sts)

Row 5 :

2 ch, 3 sc, sds, 4 sc (12 sts)

Row 6 :

2 ch, 4 sc, sds, 5 sc (14 sts)

Row 7 :

2 ch, 5 sc, sds, 6 sc (16 sts)

Row 8 :

2 ch, 6 sc, sds, 7 sc (18 sts)

Row 9 :

2 ch, 7 sc, sds, 8 sc (20 sts)

Row 10 :

2 ch, 8 sc, sds, 9 sc (22 sts)

Row 11 :

2 ch, 9 sc, sds, 10 sc (24 sts)

Row 12 :

2 ch, 10 sc, sds, 10 sc (25 sts)

Row 13 :

2 ch, 10 sc, sds, 11 sc (26 sts)

Row 14 :

2 ch, 11 sc, sds, 11 sc (27 sts)

Row 15 :

2 ch, 11 sc, sds, 12 sc (28 sts)

Row 16 :

2 ch, 12 sc, sds, 12 sc (29 sts)

Row 17 :

2 ch, 12 sc, sds, 13 sc (30 sts)

Row 18 :

2 ch, 13 sc, sds, 13 sc (31 sts)

Row 19-26 :

2 ch, 13 sc, sds, 12 sc, 1 dec (31 sts) - 8 rows

Row 27 :

2 ch, 13 sc, sds, 10 sc, 2 dec (30 sts)

Row 28 :

2 ch, 12 sc, sds, 10 sc, 2 dec (29 sts)

Row 29 :

2 ch, 12 sc, sds, 7 sc, 3 dec (27 sts)

Row 30 :

2 ch, 10 sc, sds, 7 sc, 3 dec (25 sts)

Row 31 :

2 ch, 10 sc, sds, 3 sc, 4 dec (22 sts)

Row 32 :

2 ch, 7 sc, sds, 3 sc, 4 dec (19 sts)

Info :

Make 1 ch more and leave short tail. Attach new yarn at finish end of leaf and work around with edging of sc. Make increases sometimes to keep edge from pulling. At sharp end make prong: in one loop work sc, ch, dc, ch, sc. Work chain of 15, connect round with sl st and make 2 sl st more. Leave tail and make clean fastening off.

β€” LEAF-CRADLE SMALL LEAF :

Row 1 :

2 ch, 1 sc, 1 dc, 2 sc into magic ring (6 sts), turn

Row 2 :

2 ch, 1 sc, sds, 2 sc (8 sts)

Row 3 :

2 ch, 2 sc, sds, 3 sc (10 sts)

Row 4 :

2 ch, 3 sc, sds, 4 sc (12 sts)

Row 5 :

2 ch, 4 sc, sds, 5 sc (14 sts)

Row 6 :

2 ch, 5 sc, sds, 6 sc (16 sts)

Row 7 :

2 ch, 6 sc, sds, 7 sc (18 sts)

Row 8 :

2 ch, 7 sc, sds, 8 sc (20 sts)

Row 9 :

2 ch, 8 sc, sds, 9 sc (22 sts)

Row 10 :

2 ch, 9 sc, sds, 10 sc (24 sts)

Row 11 :

2 ch, 10 sc, sds, 11 sc (26 sts)

Row 12 :

2 ch, 11 sc, sds, 12 sc (28 sts)

Row 13 :

2 ch, 10 sc, dec (13 sts)

Row 14 :

2 ch, 11 sc (13 sts)

Row 15 :

2 ch, 8 sc, dec (11 sts)

Row 16 :

2 ch, 8 sc (10 sts)

Row 17 :

2 ch, 5 sc, dec (8 sts)

Row 18 :

2 ch, 5 sc (7 sts)

Row 19 :

2 ch, 2 sc, dec (5 sts)

Row 20 :

2 ch, dec (3 sts)

Info :

Make 1 ch more and leave short tail. Attach new yarn at indicated point and work second side

Second Side Row 13 :

2 ch, 11 sc (13 sts)

Row 14 :

2 ch, 11 sc (13 sts)

Row 15 :

2 ch, dec, 8 sc (11 sts)

Row 16 :

2 ch, 8 sc (10 sts)

Row 17 :

2 ch, dec, 5 sc (8 sts)

Row 18 :

2 ch, 5 sc (7 sts)

Row 19 :

2 ch, dec, 2 sc (5 sts)

Row 20 :

2 ch, dec (3 sts)

Info :

Make 1 ch more and leave short tail. Work leaf in round with edging of sc. Leave long tail for stitching. Iron leaves gently through damp cloth.

Assembly Instructions

  • Place the head onto the body, pin it in place. Use a large thick needle to pierce through head and body to fix them together.
  • Carefully sew the head to the body with small stitches using the long tail left from the body.
  • Put smaller leaf on top of large leaf, pin it carefully. Sew them together with small stitches over the edge.
  • At beginning and finish of leaf assembly, sew firmly making several stitches on top of each other for security.
  • Make neat seam exactly in middle of leaf to create cradle shape.
  • Take 15 cm wire piece, hook it on one sc on top of doll and twist tightly. Bend wire tail to 5 cm length.
  • Wrap wire petiole with 80 cm green yarn very tightly, coil by coil. Tie both yarn tails together at end.
  • Connect both dolls' petioles by wrapping them together at 5 mm distance, then pull yarn tails through winding and secure.

Important Notes

  • πŸ’‘Use the initial thread pulled between rounds 2 and 3 as a marker to help count rounds accurately
  • πŸ’‘Be sure to check the leaf charts carefully as some rows start and end differently than others
  • πŸ’‘Stuff the head tightly but only lightly stuff the body - do not stuff the arms at all
  • πŸ’‘When working the sds (1 sc, 1 dc, 1 sc in one loop), remember this counts as three stitches total
  • πŸ’‘Iron the finished leaves gently through a damp cloth to help them hold their shape nicely
  • πŸ’‘Wrap the wire petiole very tightly coil by coil - loose wrapping will create gaps and look untidy

This enchanting Cherry Babies pattern brings the magic of nature into miniature form, creating adorable little dolls that look just like cherry fruits resting in their leaf cradle. The combination of continuous rounds for the dolls and back-and-forth leaf work makes this a wonderful skill-building project that's as enjoyable to make as it is to display. With careful attention to the wire-wrapped stems and detailed leaf construction, you'll create a charming keepsake that captures hearts and showcases your crochet artistry. This makes an absolutely perfect handmade gift for nature lovers, new parents, or anyone who appreciates whimsical handcrafted treasures. πŸ’πŸ§Άβœ¨

You ask,

we answer.

FAQs

What size will my finished cherry babies be?

Using the materials specified in the pattern (2.0mm hook with Alpina Lily and NAKO Mia yarns), each cherry baby doll will measure approximately 5.4 cm (2.1 inches) tall, and the leaf cradle will be about 13 cm (5.1 inches) high.

What does 'sds' mean in the leaf pattern?

The 'sds' is a shorthand for working 1 sc, 1 dc, and 1 sc all in one loop. This creates a small shell or fan effect and counts as three stitches total. It's used throughout the leaf pattern to create the natural leaf shape.

Can I make this without the wire petioles?

While the wire petioles add an authentic cherry stem appearance and allow you to pose the dolls, you could skip this step if preferred. However, the wire stems really bring the project to life and help display the cherries properly in their cradle, so they're highly recommended.

How do I keep track of rounds when working continuously?

The pattern suggests pulling the initial thread end out between rounds 2 and 3 to use as a marker. You can also use a stitch marker or contrasting yarn to mark the beginning of each round as you work.

Do I need to stuff all parts of the dolls?

No - you should stuff the head tightly for good shape, lightly stuff the body, but do not stuff the arms at all. This creates the proper proportions and allows the arms to remain flexible and natural-looking.