🧶 Beautiful ✨ Detailed 💝 Adorable

Capybara in Bath Amigurumi Pattern

Capybara in Bath Amigurumi Pattern
3.9★ Rating
4-5 Hours Time Needed
2.4K Made This
✂️

Intermediate Level

Ideal for those with basic knitting experience, featuring slightly more advanced stitches and techniques to expand your skills.

⏱️

Weekend Treat

Takes 5-7 hours, making it an enjoyable project to finish over a couple of days.

🧸

Cute Companion

An adorable friend to cherish, handcrafted with love to bring comfort and joy for years to come.

About This Capybara in Bath Amigurumi Pattern

This Capybara in Bath pattern brings together multiple elements to create a charming miniature scene. You'll crochet a relaxed capybara, a detailed wooden tub with hoops, water detail, and decorative orange slices. The pattern uses basic stitches worked in the round with color changes to achieve realistic details. Each component is crafted separately and then assembled to create the complete peaceful bath-time tableau.

Capybara in Bath Amigurumi Pattern crochet pattern - detailed view of completed project

The finished amigurumi measures about 9 cm tall when using the recommended materials. The pattern includes detailed instructions for creating texture on the wooden tub and positioning all elements for the most charming result.

Why You'll Love This Capybara in Bath Amigurumi Pattern

I absolutely love this pattern because it captures the internet's favorite relaxing animal in the most peaceful setting imaginable! The combination of different textures—from the smooth capybara to the ribbed wooden tub—makes this project incredibly satisfying to complete. I find the assembly process particularly rewarding as you watch all the separate pieces come together into a cohesive scene. The orange slice details add such a whimsical touch that never fails to make people smile. This pattern is perfect for challenging yourself with new techniques while creating something truly unique for your collection.

Capybara in Bath Amigurumi Pattern step 1 - construction progress Capybara in Bath Amigurumi Pattern step 2 - assembly progress Capybara in Bath Amigurumi Pattern step 3 - details and accessories Capybara in Bath Amigurumi Pattern step 4 - final assembly and finishing

Switch Things Up

I love customizing this pattern to make each capybara unique! One of my favorite variations is changing the color of the water to a soft turquoise or even adding sparkly yarn to give it a shimmering effect. You could also experiment with the orange accessories—try making lemons or limes instead for a fresh citrus variety.

For the wooden tub, I sometimes use a darker brown yarn to create an aged barrel look, or even add tiny painted details with fabric paint to enhance the wood grain effect. If you want to make it extra special, consider embroidering small flowers or leaves floating in the water.

Another fun idea is to adjust the size by using bulkier yarn and a larger hook to create a statement piece, or go micro with thread weight yarn for an adorable miniature version. I've even made seasonal versions—adding tiny holly leaves for Christmas or little flower petals for spring.

Don't be afraid to play with facial expressions too! You can position the eyes and muzzle slightly differently to give your capybara a sleepy look, a surprised expression, or even a content smile. The possibilities are endless, and that's what makes this pattern so enjoyable to revisit again and again!

Common Mistakes & How to Fix Them

✗ Crocheting too loosely can create visible gaps where stuffing shows through—use a smaller hook if needed to maintain tight tension throughout ✗ Forgetting to stuff the capybara before closing can make positioning difficult—pause at indicated points and add stuffing gradually for best results ✗ Misaligning the wooden tub hoops can affect the final appearance—pin everything in place before sewing and check from all angles first ✗ Not using a cardboard base for the tub bottom causes instability—always cut and glue cardboard circles as instructed for proper structure

Capybara in Bath Amigurumi Pattern

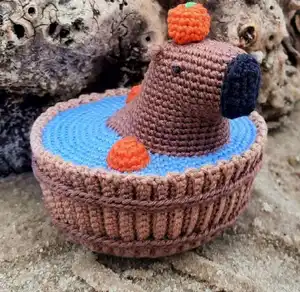
Create an adorable capybara relaxing in a wooden tub with this charming amigurumi pattern! This delightful design features a cozy capybara surrounded by water, complete with orange slices and a rustic wooden bath. Perfect for beginners and intermediate crocheters who want to craft something unique and heartwarming. The finished piece measures approximately 9 cm and makes a wonderful gift or decorative item. Bring this peaceful bath-time scene to life with detailed instructions and creative touches that capture the capybara's gentle nature.

Intermediate 4-5 Hours

Materials Needed for Capybara in Bath Amigurumi Pattern

— Main Fabric

  • 01
    YarnArt Begonia yarn (169 m/50 gr) in brown color for capybara body and tub hoops
  • 02
    YarnArt Begonia yarn in orange color for orange and orange halves
  • 03
    YarnArt Begonia yarn in beige color for wooden tub
  • 04
    YarnArt Begonia yarn in blue color for water detail
  • 05
    YarnArt Begonia yarn in black color for muzzle
  • 06
    Small amount of green yarn for orange leaf embroidery

— Tools Required

  • 01
    Crochet hook size 1.5 mm
  • 02
    Stuffing material (polyester fiberfill)
  • 03
    Yarn needle for sewing
  • 04
    Stitch markers
  • 05
    Scissors
  • 06
    Piece of cardboard for tub base
  • 07
    Glue for cardboard attachment
  • 08
    Embroidery needle for leaf details

Progress Tracker

0% Complete

— Head :

Row 1 :

Brown color, 8 ch st, inc in the second stitch from the hook in the back loop, in the back loops of the chain: 5sc, 4sc in the last loop of the chain, keep crocheting on the other side of the chain: 5sc, inc (18)

Row 2 :

(inc x 2, 5sc, inc x 2) x 2 (26)

Row 3 :

(1sc, inc x 2, 7sc, inc x 2, 1sc) x 2 (34)

Row 4 :

34sc (34)

Row 5 :

2sc, inc, 28sc, inc, 2sc (36)

Rows 6-8 :

36sc (36)

Row 9 :

2sc, inc x 2, 28sc, inc x 2, 2sc (40)

Row 10 :

40sc (40)

Row 11 :

16sc, invdec x 4, 16sc (36)

Row 12 :

1sc, inc, 14sc, invdec x 2, 14sc, inc, 1sc (36)

Row 13 :

3sc, inc, 12sc, invdec x 2, 12sc, inc, 3sc (36)

Info :

1 extra stitch before row 14

Row 14 :

4 ch st, inc in the second stitch from the hook in the back loop, in the back loops of the chain: 2sc, keep crocheting on the body: 2sc, inc, 30sc, inc, 2sc, on the other side of the chain: 2sc, inc (46)

Info :

Move the marker thread in the next stitch from the hook

Row 15 :

inc, 3sc, invdec, 34sc, invdec, 3sc, inc (46)

Row 16 :

inc x 2, 2sc, invdec x 2, 30sc, invdec x 2, 2sc, inc x 2 (46)

Row 17 :

(1sc, inc) x 2, 2sc, invdec, 30sc, invdec, 2sc, (inc, 1sc) x 2 (48)

Row 18 :

2sc, inc, 42sc, inc, 2sc, 1 sl st

Info :

Fasten off and cut the yarn, leave a long end for sewing

— Ears :

Info :

Attach the thread between 4th and 5th rows as shown in the photo. Then in one stitch make: 1 ch st, 1 hdc, 1 ch st, 1 sl st. Fasten off and cut the yarn, hide the end of the yarn. The second ear make in the same way.

— Muzzle :

Row 1 :

Black color, 6 ch st, inc in the second stitch from the hook in the back loop, in the back loops of the chain: 3sc, in the last loop of the chain: inc x 2, on the other side of the chain: 3sc, inc (14)

Row 2 :

(1sc, inc, 3sc, inc, 1sc) x 2 (18)

Row 3 :

1 sl st, inc, 5 hdc, inc, 2sc, inc, 5 hdc, inc, 1 sl st (22)

Info :

Fasten off and cut the yarn, leave a long end for sewing

— Water :

Row 1 :

Blue yarn, 6sc in MR (6)

Row 2 :

inc x 6 (12)

Row 3 :

(1sc, inc) x 6 (18)

Row 4 :

(1sc, inc, 1sc) x 6 (24)

Row 5 :

(3sc, inc) x 6 (30)

Row 6 :

(2sc, inc, 2sc) x 6 (36)

Row 7 :

(5sc, inc) x 6 (42)

Row 8 :

(3sc, inc, 3sc) x 6 (48)

Row 9 :

(7sc, inc) x 6 (54)

Row 10 :

(4sc, inc, 4sc) x 6 (60)

Row 11 :

(9sc, inc) x 6 (66)

Row 12 :

(5sc, inc, 5sc) x 6 (72)

Row 13 :

(11sc, inc) x 6 (78)

Row 14 :

(6sc, inc, 6sc) x 6 (84)

Row 15 :

(13sc, inc) x 6 (90)

Row 16 :

(7sc, inc, 7sc) x 6 (96)

Info :

Fasten off and cut the yarn, leave a long end for sewing

— Wooden Tub :

Row 1 :

Beige yarn, 15 ch st, 1sc in the second stitch from the hook, 13sc (14)

Rows 2-90 :

In back loops only: 1 ch st, turn, 14sc (14)

Row 91 :

Work on the long side of the detail: 1 ch st, (4sc, invdec, 4sc) x 9, 1 sl st in the beginning of the row

Info :

Keep crocheting in round to create the bottom part of the tub

Row 92 :

In back loops only: (7sc, invdec) x 9 (72)

Row 93 :

(3sc, invdec, 3sc) x 9 (63)

Row 94 :

(5sc, invdec) x 9 (54)

Row 95 :

(7sc, invdec) x 6 (48)

Row 96 :

(3sc, invdec, 3sc) x 6 (42)

Row 97 :

(5sc, invdec) x 6 (36)

Row 98 :

(2sc, invdec, 2sc) x 6 (30)

Row 99 :

(4sc, invdec, 4sc) x 3 (27)

Row 100 :

(7sc, invdec) x 3 (24)

Row 101 :

(1sc, invdec, 1sc) x 6 (18)

Row 102 :

invdec x 9 (9)

Info :

Pull the hole closed. Fasten off and cut the yarn, hide end of the yarn. Sew the open sides of the tub. Cut a circle out of the cardboard. Diameter of the circle should be a bit smaller than bottom part. Glue it to the wrong side of the detail.

— Tub Hoops :

Upper Hoop :

Brown yarn, Row 1: 2 ch st, 1sc in the second stitch from the hook. Rows 2-103: 1sc in the bottom part of the sc of the previous row (insert hook into the bottom part of the previous sc, yarn over and pull up a loop, yarn over and pull through two loops to finish). Fasten off and cut the yarn, leave a long end for sewing.

Bottom Hoop :

Brown yarn, Row 1: 2 ch st, 1sc in the second stitch from the hook. Rows 2-92: 1sc in the bottom part of the sc of the previous row. Fasten off and cut the yarn, leave a long end for sewing.

— Orange :

Row 1 :

Orange color, 6sc in MR (6)

Row 2 :

inc x 6 (12)

Rows 3-6 :

12sc (12)

Info :

Stuff the orange with stuffing material

Row 7 :

invdec x 6 (6)

Info :

Fasten off and cut the yarn, leave a long end for sewing. Embroider leaf on the orange with green yarn.

— Orange Halves :

Bigger Half (make 2 pieces) :

Orange yarn, Row 1: 6sc in MR (6). Row 2: inc x 6 (12). Row 3: 12sc (12). Fasten off and cut the yarn, leave a long end for sewing. Embroider leaf on one of the orange halves with green yarn.

Smaller Half (make 1 piece) :

Orange yarn, Row 1: 6sc in MR (6). Row 2: (1sc, inc) x 3 (9). Row 3: 9sc (9). Fasten off and cut the yarn, leave a long end for sewing.

Assembly Instructions

  • With black yarn make eyes using French knot stitch between 5th and 6th rows, with distance from the ear being 3 single crochets
  • With brown yarn embroider eyelids above the eyes for added character and expression
  • Stuff the capybara head firmly with stuffing material and sew the black muzzle to the front of the head
  • Cut a cardboard circle slightly smaller than the water detail and glue it to the wrong side for stability
  • Sew the capybara to the water detail as shown in pattern photos, adding additional stuffing if needed for proper positioning
  • Sew the whole orange to the capybara's head, then stuff the orange halves and position them near the capybara in the water
  • Stuff the wooden tub with filling material and carefully sew the water detail to the tub with the water edge sitting below the tub edge
  • Attach the upper brown hoop around the top of the tub and the bottom hoop lower down to complete the wooden barrel appearance

Important Notes

  • 💡Use tight tension throughout the project to prevent stuffing from showing through the stitches
  • 💡Always work in back loops only when instructed as this creates the ribbed texture effect on the wooden tub
  • 💡Use stitch markers consistently to track the beginning of rounds especially during color changes and shaping
  • 💡Cut cardboard circles slightly smaller than indicated measurements to ensure they fit properly inside the pieces
  • 💡Pin all components in place before final sewing to ensure proper positioning and balance of the finished piece
  • 💡Stuff pieces gradually and firmly but not overly tight to maintain the proper shape and proportions
  • 💡Keep yarn ends long when fastening off as they will be needed for assembly and sewing pieces together

This delightful Capybara in Bath pattern captures the peaceful essence of everyone's favorite relaxed rodent! The design combines multiple crocheting techniques including working in the round, color changes, and special texture stitches to create an adorable miniature scene. Perfect for expanding your amigurumi skills while creating something truly unique and charming. The finished piece makes a wonderful desk companion or gift for animal lovers. 🛁🧶 Happy crocheting! ✨

You ask,

we answer.

FAQs

Can I use different yarn weights for this pattern?

Yes, but using thinner or thicker yarn than specified will change the final size of your capybara. If you use thicker yarn with a larger hook, your finished piece will be bigger than 9 cm, and thinner yarn will make it smaller. Just make sure to adjust your hook size accordingly and maintain tight tension.

What does working in back loops only mean for the wooden tub?

Working in back loops only means you insert your hook through only the back loop of each stitch instead of under both loops. This technique creates the ribbed texture that gives the wooden tub its realistic barrel appearance. The pattern specifies when to use this technique.

Do I need to use cardboard for the base?

Yes, the cardboard is important for stability. It helps the tub and water detail maintain their shape and prevents the bottom from warping. Cut the cardboard circles slightly smaller than the pieces so they fit inside properly without showing.

How do I embroider the leaves on the oranges?

Use green yarn and a yarn needle to create simple leaf shapes on top of the oranges. You can make small straight stitches radiating from the center to create a star-like leaf pattern, or create a more detailed leaf shape depending on your preference.

Can I make the capybara poseable?

This pattern doesn't include wire for posing, but you could potentially add thin wire to the body before stuffing if you want more stability. However, the design is meant to be in a relaxed sitting position in the bath, so extensive posing isn't necessary.