🧢 Beautiful ✨ Detailed πŸ’ Adorable

Capybara Amigurumi Pattern

Capybara Amigurumi Pattern
4.7β˜… Rating
1.5-2 Hours Time Needed
2.4K Made This
βœ‚οΈ

Intermediate Level

Ideal for those with basic knitting experience, featuring slightly more advanced stitches and techniques to expand your skills.

⏱️

Bite-Sized Project

Complete in under 2 hoursβ€”quick, fun, and perfect for a little creative escape.

🧸

Cute Companion

An adorable friend to cherish, handcrafted with love to bring comfort and joy for years to come.

About This Capybara Amigurumi Pattern

This capybara pattern offers a clever construction technique that simplifies the amigurumi-making process. Instead of crocheting separate pieces and assembling them later, you'll create the head and body as one continuous piece while attaching the legs directly during specific rounds. This innovative approach reduces sewing time and creates a sturdy, well-proportioned capybara that sits perfectly on its own.

Capybara Amigurumi Pattern crochet pattern - detailed view of completed project

The pattern uses super bulky plush yarn for an extra soft and huggable finish, making it ideal for both decorative purposes and as a comforting companion. The adorable tangerine accessory adds a playful touch that captures the internet-famous capybara's gentle nature.

Why You'll Love This Capybara Amigurumi Pattern

I absolutely love how this pattern eliminates the tedious assembly process that usually comes with amigurumi projects! The technique of attaching legs as you crochet the body is genius and makes the whole experience flow smoothly from start to finish. I also appreciate how the plush yarn creates such a soft, cuddly texture that makes you want to squeeze your finished capybara. The embroidered facial features give each capybara its own unique personality, and adding that tiny tangerine accessory is just the cherry on top. It's incredibly satisfying to see this adorable creature come to life in just a couple of hours, and the end result always brings a smile to my face.

Capybara Amigurumi Pattern step 1 - construction progress Capybara Amigurumi Pattern step 2 - assembly progress Capybara Amigurumi Pattern step 3 - details and accessories Capybara Amigurumi Pattern step 4 - final assembly and finishing

Switch Things Up

I love experimenting with different color variations for this capybara pattern! While the original beige version is absolutely adorable, I've had so much fun creating capybaras in soft gray, warm brown, and even pastel colors for a more whimsical look. Each color choice completely transforms the personality of the finished piece.

I've also played around with different accessories beyond the tangerine. I've made tiny flower crowns using the same leaf technique, miniature watermelon slices, and even small hats crocheted separately and sewn on top. The possibilities are endless when it comes to personalizing your capybara!

For those who want to make their capybara extra special, I sometimes add small embroidered details like rosy cheeks using pink embroidery floss, or I create subtle texture on the body by working some rounds in the back loop only. These small modifications add character without changing the core pattern structure.

I've found that using different plush yarn brands can create interesting texture variations too. Some yarns are fluffier and create a more cloud-like finish, while others have a smoother appearance that shows the stitch definition more clearly. Don't be afraid to experiment with what you have in your stash!

Common Mistakes & How to Fix Them

βœ— Forgetting to stuff the body firmly before closing can result in a floppy capybara that won't sit properly on its own βœ— Not keeping track of stitch markers when attaching legs may cause uneven leg placement and an awkward stance for your finished piece βœ— Skipping the round shifts after attaching legs will throw off your stitch count and make the pattern impossible to follow correctly βœ— Pulling the magic ring too tight at the beginning can make it difficult to crochet into all stitches evenly around βœ— Not adjusting ear marker positions based on your tension can result in ears that are too close together or asymmetrically placed

Capybara Amigurumi Pattern

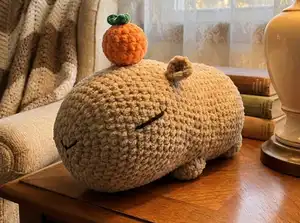
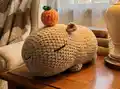
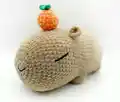
Create your own adorable capybara companion with this delightful crochet pattern! This charming design features a unique construction method where the head and body are worked as one continuous piece, with legs seamlessly attached during the crocheting process. Perfect for plush yarn lovers, this pattern creates a cuddly friend measuring approximately 8.7 inches long. Complete with tiny ears, embroidered facial features, and an optional tangerine accessory, this capybara will bring warmth and joy to any space.

Intermediate 1.5-2 Hours

Materials Needed for Capybara Amigurumi Pattern

β€” Main Fabric

  • 01
    Super bulky plush yarn Himalaya Dolphin Baby 120m/100g (131yds/100g) or analog, approximately 1 skein beige color 80317
  • 02
    Small amount of orange yarn for tangerine
  • 03
    Small amount of green yarn for tangerine leaves
  • 04
    Black fine yarn for eyes and nose (Yarnart Begonia black color 0999 or similar)

β€” Tools Required

  • 01
    4.5 mm (H-7 US) crochet hook
  • 02
    Stuffing
  • 03
    Crochet stitch markers
  • 04
    Big yarn needle
  • 05
    Small yarn needle
  • 06
    Scissors

Progress Tracker

0% Complete

β€” Leg (x 4) :

Round 1 :

crochet a MR with 6 Sc (6)

Round 2 :

Inc around (12)

Round 3 :

Sc around (12)

Info :

Fasten off. Leave a small tail.

β€” Ear (x 2) :

Round 1 :

crochet a MR with 6 Sc (6)

Info :

Don't close the ring, turn, Ch

Round 2 :

{Inc, Sc} x 3 (9)

Infos :

Fasten off. Sew the corners together. Leave sewing tail.

β€” Head-body :

Round 1 :

crochet a MR with 8 Sc (8)

Round 2 :

Inc around (16)

Round 3 :

{Sc 1, inc} x 8 (24)

Round 4 :

{Sc 2, inc} x 8 (32)

Round 5 :

{Sc 3, inc} x 8 (40)

Round 6 :

{Sc 4, inc} x 8 (48)

Round 7 :

Sc around (48)

Round 8 :

Sc 19, Inc, Sc 8, Inc, Sc 19 (50)

Round 9 :

Sc around (50)

Round 10 :

Sc 21, Inc, Sc 6, Inc, Sc 21 (52)

Round 11-13 :

Sc around (52) 3 Rnds

Round 14 :

Sc 23, Inc, Sc 4, Inc, Sc 23 (54)

Round 15-17 :

Sc around (54) 3 Rnds

Info :

In the next round we will mark the approximate position of the ears.

Round 18 :

Sc 6, Dec, Sc 4, Dec, Sc 9, Sc 1 {mark this St}, Sc 9, Sc 1 {mark this St}, Sc 10, Dec, Sc 4, Dec, Sc 2 (50)

Round 19 :

Sc 4, Dec, Sc 2, Dec, Sc 34, Dec, Sc 2, Dec (46)

Info :

Next, we will attach the legs. Start attaching from the stitch of the leg, as shown on the photo.

Round 20 :

Inc, Sc 2, Inc, Sc 2, Inc, Sc 33, Sc 6 together with 1st leg (49)

Info :

We shifted one stitch. Now from here we will count the beginning of the round. We continue to crochet.

Round 21 :

Sc, Inc, Sc, Sc 6 together with 2nd leg, Sc 13, Dec, Sc 4, Dec, Sc 13, Sc 6 of 1st leg (48)

Info :

And in the next round, we no longer take these 6 St into account, and we crochet the second half of the leg.

Round 22 :

Sc 4, Sc 6 of the 2nd leg, Sc 12, Dec, Sc 4, Dec, Sc 18 (46)

Round 23 :

Sc 9, Dec, Sc 28, Dec, Sc 5 (44)

Round 24 :

Sc 19, Dec, Sc 6, Dec, Sc 15 (42)

Round 25 :

Sc around (42)

Round 26 :

(Sc 6, Inc} x 6 (48)

Round 27-30 :

Sc around (48) 4 Rnds

Round 31 :

Sc 43, Sc 6 together with 3rd leg (48)

Info :

We shifted one stitch again. Now from here we will count the beginning of the round. We continue to crochet.

Round 32 :

Sc 4, Sc 6 together with 4th leg, Sc 32, Sc 6 of 3rd leg (48)

Round 33 :

Sc 4, Sc 6 of 4th leg, Sc 38 (48)

Info :

Stuff with filler.

Round 34 :

(Sc 4, Dec) x 8 (40)

Round 35 :

(Sc 3, Dec) x 8 (32)

Round 36 :

(Sc 2, Dec) x 8 (24)

Round 37 :

(Sc, Dec) x 8 (16)

Info :

Stuff firmly.

Round 38 :

Dec 8 (8)

Infos :

Tighten the hole, hide the thread inside. With threads from the legs, sew up the holes.

β€” Facial Features :

Ears Placement :

Since everyone has a different crocheting style and yarn thickness, a slight shift of stitches is possible. See if the markers are positioned equally from the center. Adjust the position if necessary. Sew the ears in place of the markers at a distance of approximately 10 stitches.

Left Eye :

From the left ear down 3 rounds, then to the left 5 stitches - here is the 1st dot of the eye. From this dot down 5 stitches and to the left 1 stitch - here is this is the 2nd dot of the eye. Embroider the eye with a thin black thread connecting these two dots. Make 2 stitches to make the eye more expressive.

Right Eye :

From the right ear down 3 rounds, then to the right 5 stitches - here is the 1st dot of the eye. From this dot down 5 stitches and to the right 1 stitch - here is this is the 2nd dot of the eye. Embroider the second eye in the same way as the first.

Nose :

Embroider the nose between the eyes using black thread.

β€” Tangerine :

Round 1 :

crochet a MR with 6 Sc (6)

Round 2 :

Inc around (12)

Round 3 :

(Sc 1, Inc) x 6 (18)

Round 4-6 :

Sc around (18) 3 Rnds

Round 7 :

(Sc 1, Dec) x 6 (12)

Info :

Stuff

Round 8 :

Dec around (6)

Info :

Fasten off, tighten the hole, leave the thread for sewing.

β€” Leaves :

Instructions :

Ch 4, Sl St in 1st Ch, Ch 4, Sl St in 1st Ch. Fasten off, wrap the center with thread and tie a knot.

Assembly Instructions

  • Sew the ears to the marked positions on the head, approximately 10 stitches apart and centered from the middle of the head.
  • Embroider the left eye starting from the left ear, counting down 3 rounds and to the left 5 stitches for the first dot, then creating the eye shape with black thread.
  • Embroider the right eye symmetrically to the left eye, following the same counting method from the right ear.
  • Embroider the nose between the eyes using black fine yarn to create a simple capybara expression.
  • Sew the leaves to the top of the tangerine, wrapping the center securely and hiding threads inside the tangerine.
  • Attach the completed tangerine accessory to the head of the capybara, positioning it naturally as if the capybara is holding it.
  • Use the remaining tail threads from the legs to close any small gaps where legs attach to the body for a clean finish.

Important Notes

  • πŸ’‘Use stitch markers diligently when attaching legs to ensure proper placement and avoid confusion during construction
  • πŸ’‘The round numbers shift after attaching each set of legs, so always count from the new starting point indicated
  • πŸ’‘Adjust ear marker positions based on your personal tension and yarn thickness to ensure symmetrical placement
  • πŸ’‘Stuff the body firmly but gradually as you work through the decreasing rounds for the best shape
  • πŸ’‘When embroidering facial features, use one continuous thread if possible to minimize the number of ends to weave in
  • πŸ’‘The pattern works best with super bulky plush yarn, but can be adapted to other yarn weights with hook size adjustments

This adorable Capybara pattern brings the internet's favorite gentle giant to life in the coziest way possible! With its innovative one-piece construction and clever leg-attachment technique, you'll breeze through this project in under two hours. The plush yarn creates an irresistibly soft texture that captures the capybara's calm, cuddly nature perfectly. Add the charming tangerine accessory for that extra touch of whimsy! 🧢 Happy crocheting! 🧡✨

You ask,

we answer.

FAQs

Can I use a different yarn weight for this pattern?

Yes, you can use different yarn weights, but you'll need to adjust your hook size accordingly. Keep in mind that using a different yarn weight will change the final size of your capybara. Super bulky plush yarn is recommended for the soft, cuddly texture that makes this pattern special.

What does it mean when the pattern says 'we shifted one stitch'?

When attaching the legs, the starting point of your rounds shifts by one stitch to accommodate the leg attachment. The pattern indicates where to begin counting for the new round, so follow the instructions carefully and use stitch markers to track your new starting position.

How do I prevent gaps where the legs attach to the body?

The pattern instructs you to leave small tails when fastening off the legs. Use these tails with a yarn needle to sew up any small gaps that appear where the legs connect to the body, ensuring a clean and professional finish.

Do I have to make the tangerine accessory?

No, the tangerine is an optional decorative element. Your capybara will be complete without it, but adding the tangerine gives it extra personality and charm. You could also create other small accessories if you prefer!

Why aren't my ears positioned correctly?

Everyone's crochet tension is slightly different, which can affect stitch placement. The pattern suggests checking that your markers are positioned equally from the center before sewing the ears. Adjust the marker positions as needed to achieve symmetrical ear placement that looks right for your specific piece.