Create an enchanting miniature world with this adorable Bunny's House crochet pattern! This comprehensive design features three sweet bunnies (standing, sitting, and baby), a charming carrot house complete with windows and greens, a cozy cabbage bed, a flower meadow with pathways, and delightful accessories including a basket with carrots and a wooden ladder. Perfect for bringing whimsical woodland charm to any space, this pattern combines detailed amigurumi techniques with creative home décor elements. Each bunny measures approximately 7-8cm tall, while the flower meadow spans 20cm in diameter, creating a captivating display piece that will delight crocheters and bunny lovers alike.
Progress Tracker
0% Complete
— Standing Bunny - Body-Head:
Body (With White yarn):
Start with body section
Round 1:
6sc in MR (Place row marker here)
Round 3:
(1sc, inc) *6 (18)
Round 4:
(2sc, inc) *6 (24)
Round 5:
(3sc, inc) *6 (30)
Round 6-8:
30sc (3 rounds) (30)
Round 9:
(1sc, dec) *6, 12sc (24)
Round 10-14:
24sc (5 rounds) (24)
Round 15:
(2sc, dec) *6 (18)
Round 16:
18sc (18) - Stuff with fiberfill in the process
Head:
Continue to head section
Round 18:
(5sc, inc) *6 (42)
Round 19-23:
42sc (5 rounds) (42)
Round 24:
(5sc, dec) *6 (36)
Round 25:
(4sc, dec) *6 (30)
Round 26-29:
30sc (4 rounds) (30)
Round 30:
(3sc, dec) *6 (24) - Stuff the head with fiberfill
Round 31:
(2sc, dec) *6 (18)
Round 32:
(1sc, dec) *6 (12)
Round 33:
6dec - Fasten off, cut the yarn, weave in the yarn ends
— Standing Bunny - Hind Legs (make 2):
With Pink yarn:
Start hind legs
Round 1:
Chain 6. Start in the second chain from the hook: inc, 3sc, 3sc in the last chain, 4sc (12)
Round 2:
Change color to White. 2inc, 3sc, 3inc, 3sc, inc (18)
Round 3:
8sc, (4-dc Bobble st, sc) *3, 4sc (18) - Stuff with fiberfill in the process
Round 4:
4sc, 6dec, 2sc (12)
Round 5:
(2sc, dec) *3 (9)
Round 6:
(1sc, dec) *3 (6)
Round 7-10:
6sc (4 rounds) (6) - Fasten off, cut the yarn, weave in the yarn ends
— Standing Bunny - Ears (make 2):
With White yarn:
Start ears
Round 1:
6sc in MR (Place row marker here)
Round 2:
(1sc, inc) *3 (9)
Round 4:
(2sc, inc) *3 (12)
Round 6:
(1sc, inc) *6 (18)
Round 7-10:
18sc (4 rounds) (18)
Round 11:
(1sc, dec) *6 (12)
Round 12-16:
12sc (5 rounds) (12)
Round 18:
6sc. Do not stuff. Leave a long tail for sewing
— Standing Bunny - Front Legs (make 2):
With White yarn:
Start front legs
Round 1:
6sc in MR (Place row marker here)
Round 2-3:
6sc (2 rounds) (6) - Stuff with fiberfill in the process
Round 5-8:
7sc (4 rounds) (7)
Round 9:
3sc, dec, 2sc (6) - Fasten off, cut the yarn, weave in the yarn ends
— Standing Bunny - Tail:
With White yarn:
Start tail
Round 1:
6sc in MR (Place row marker here)
Round 4:
6dec - Stuff with fiberfill. Leave a long tail for sewing
Infos:
Glue the eyes between rounds 23-24 at a distance of 6-8 sc. Fasten the legs and arms with a thread mount. Attach the legs and arms using a long needle and thread. Sew the tail to the body. Tighten cheeks. Sew the ears to the head. Embroider a nose with pink thread. Embroider the outlines of the nose, mouth and eyebrows with a black thread. Use pink pastel to paint the cheeks and the inside of the ears.
— Sitting Rabbit - Ears (make 2):
With Beige yarn:
Start ears
Round 1:
6sc in MR (Place row marker here)
Round 2:
(1sc, inc) *3 (9)
Round 4:
(2sc, inc) *3 (12)
Round 6:
(1sc, inc) *6 (18)
Round 7-9:
18sc (3 rounds) (18)
Round 10:
(1sc, dec) *6 (12)
Round 11-14:
12sc (4 rounds) (12)
Round 15:
6dec (6) - Do not stuff. Leave a long tail for sewing
— Sitting Rabbit - Body:
With Beige yarn:
Start body
Round 1:
6sc in MR (Place row marker here)
Round 3:
(1sc, inc) *6 (18)
Round 4:
(2sc, inc) *6 (24)
Round 5:
(3sc, inc) *6 (30)
Round 6-8:
30sc (3 rounds) (30)
Round 9:
(1sc, dec) *6, 12sc (24)
Round 10-14:
24sc (5 rounds) (24) - Stuff with fiberfill in the process
Round 15:
(2sc, dec) *6 (18)
Round 16:
(1sc, dec) *6 (12)
Round 17:
6dec - Leave a long tail for sewing
— Sitting Rabbit - Head:
With Beige yarn:
Start head
Round 1:
6sc in MR (Place row marker here)
Round 3:
(1sc, inc) *6 (18)
Round 4:
(2sc, inc) *6 (24)
Round 5:
(3sc, inc) *6 (30)
Round 6:
(4sc, inc) *6 (36)
Round 7:
(5sc, inc) *6 (42)
Round 8-10:
42sc (3 rounds) (42)
Round 11:
(5sc, dec) *6 (36)
Round 12:
(4sc, dec) *6 (30)
Round 13-16:
30sc (4 rounds) (30)
Round 17:
(3sc, dec) *6 (24) - Stuff the head with fiberfill
Round 18:
(2sc, dec) *6 (18)
Round 19:
(1sc, dec) *6 (12)
Round 20:
6dec - Fasten off, cut the yarn, weave in the yarn ends
— Sitting Rabbit - Front Legs (make 2):
With Beige yarn:
Start front legs
Round 1:
6sc in MR (Place row marker here)
Round 2-3:
6sc (2 rounds) (6) - Stuff with fiberfill in the process
Round 5-8:
7sc (4 rounds) (7)
Round 9:
3sc, dec, 2sc (6) - Fasten off, cut the yarn, weave in the yarn ends
— Sitting Rabbit - Hind Legs (make 2):
With Pink yarn:
Start hind legs
Round 1:
Chain 6. Start in the second chain from the hook: inc, 3sc, 3sc in the last chain, 4sc (12)
Round 2:
Change color to Beige. 2inc, 3sc, 3inc, 3sc, inc (18)
Round 3:
8sc, (4-dc Bobble st, sc) *3, 4sc (18) - Stuff with fiberfill in the process
Round 4:
4sc, 6dec, 2sc (12)
Round 5:
(2sc, dec) *3 (9)
Round 6:
(1sc, dec) *3 (6)
Round 7-9:
6sc (3 rounds) (6) - Fasten off, cut the yarn, weave in the yarn ends
— Sitting Rabbit - Tail:
With Beige yarn:
Start tail
Round 1:
6sc in MR (Place row marker here)
Round 4:
6dec - Stuff with fiberfill. Leave a long tail for sewing
Infos:
Tighten cheeks. Sew the head to the body. Fasten the legs and arms with a thread mount. Attach the front legs and hind legs using a long needle and thread. Sew the tail to the body. Sew the ears to the head. Embroider a nose with a pink thread. Embroider the outlines of the nose, mouth and eyebrows with a black thread. Glue eyes between rounds 10-11 at a distance of 6-8 sc. Use pink pastel to paint the cheeks and the inside of the ears.
— Baby Bunny - Ears (make 2):
With Gray yarn:
Start ears
Round 1:
6sc in MR (Place row marker here)
Round 3:
(1sc, inc) *3 (9)
Round 5:
(2sc, inc) *3 (12)
Round 6-7:
12sc (2 rounds) (12)
Round 8:
6dec (6) - Do not stuff. Leave a long tail for sewing
— Baby Bunny - Hind Legs (make 2):
With Pink yarn:
Start hind legs
Round 1:
8sc in MR (Place row marker here)
Round 2:
Change color to Gray. 8sc (8)
Round 3:
2sc, 2dec, 2sc (6) - Stuff with fiberfill in the process
Round 4-7:
6sc (4 rounds) - Fasten off, cut the yarn, weave in the yarn ends
— Baby Bunny - Front Legs (make 2):
With Gray yarn:
Start front legs
Round 1:
6sc in MR (Place row marker here)
Round 2-6:
6sc (5 rounds) (6) - Stuff with fiberfill in the process. Fasten off, cut the yarn, weave in the yarn ends
— Baby Bunny - Body-Head:
Body (With Gray yarn):
Start body section
Round 1:
6sc in MR (Place row marker here)
Round 3:
(1sc, inc) *6 (18)
Round 4-7:
18sc (4 rounds) (18)
Round 8:
(1sc, dec) *6 (12)
Round 9-11:
12sc (3 rounds) - Stuff with fiberfill in the process
Head:
Continue to head section
Round 13-15:
24sc (3 rounds) (24)
Round 16:
(2sc, dec) *6 (18)
Round 17-19:
18sc (3 rounds)
Round 20:
(1sc, dec) *6 (12) - Stuff the head with fiberfill
Round 21:
6dec - Fasten off, cut the yarn, weave in the yarn ends
— Baby Bunny - Tail:
With Gray yarn:
Start tail
Round 1:
6sc in MR (Place row marker here)
Round 2:
(1sc, inc) *3 (9)
Round 4:
(1sc, dec) *3 (6) - Stuff with fiberfill. Leave a long tail for sewing
Infos:
Fasten the legs and arms with a thread mount. Attach the front legs and hind legs using a long needle and thread. Sew the tail to the body. Sew the ears to the head. Embroider a nose with a pink thread. Embroider a mouth and eyes with a black thread. Use pink pastels to paint the cheeks and the inside of the ears.
— Newborn Envelope:
With White yarn (Work in rows):
Start envelope
Row 1:
Chain 13. From the second chain on the hook: 12sc, turn (12)
Row 2-36:
ch1, 12sc, turn (35 rows) (12)
Row 37:
ch1, dec, 8sc, dec, turn (10)
Row 38:
ch1, 10sc, turn (10)
Row 39:
ch1, dec, 6sc, dec, turn (8)
Row 40:
ch1, 8sc, turn (8)
Row 41:
ch1, dec, 4sc, dec, turn (6)
Row 42:
ch1, 6sc - Fasten off, cut the yarn, weave in the yarn ends
Info:
Fold the envelope in half and crochet around with pink yarn, connecting the part on the sides: ch1, (sc, 3dc in one stitch) *26. Cut the yarn and fasten off. Put the bunny into the envelope
— Cabbage Bed:
With Green yarn:
Start cabbage bed
Round 1:
6sc in MR (Place row marker here)
Round 3:
(1sc, inc) *6 (18)
Round 4:
(2sc, inc) *6 (24)
Round 5:
(3sc, inc) *6 (30)
Round 6:
(4sc, inc) *6 (36)
Round 7:
(5sc, inc) *6 (42)
Round 8:
(6sc, inc) *6 (48)
Round 9-11:
48sc (3 rounds) (48)
Round 12:
(7sc, inc) *6 (54)
Round 13-19:
54sc (7 rounds) (54) - Fasten off, cut the yarn, weave in the yarn ends
— Cabbage Bed - Inner (small) Leaves (make 4):
With Green yarn (Work in rows):
Start inner leaves
Row 2:
ch1, 2sc, 3sc inc, 2sc, turn (7)
Row 3:
ch1, sc, inc, sc, 3sc inc, sc, inc, sc, turn (11)
Row 4:
ch1, 2sc, inc, 2sc, 3sc inc, 2sc, inc, 2sc, turn (15)
Row 5:
ch1, 3sc, inc, 3sc, 3sc inc, 3sc, inc, 3sc, turn (19)
Row 6:
ch1, 4sc, inc, 4sc, 3sc inc, 4sc, inc, 4sc, turn (23) - Leave a long tail for sewing
— Cabbage Bed - Outer (large) Leaves (make 4):
With Green yarn:
Start outer leaves
Round 1:
6sc in MR (Place row marker here)
Round 3:
(1sc, inc) *6 (18)
Round 4:
(2sc, inc) *6 (24)
Round 5:
(3sc, inc) *6 (30)
Round 6:
(4sc, inc) *6 (36)
Round 7:
(5sc, inc) *6 (42)
Round 8:
(6sc, inc) *6 (48)
Round 9:
(7sc, inc) *6 (54)
Round 10:
(8sc, inc) *6 (60) - Leave a long tail for sewing
Info:
Sew the inner leaves at an equal distance approximately in rounds 14-15. Sew the outer leaves starting from the base of the bed. Large leaves should cover the spaces between small leaves.
— Cabbage - Cabbage Core:
With White yarn:
Start cabbage core
Round 1:
6sc in MR (Place row marker here)
Round 3:
(1sc, inc) *6 (18)
Round 4:
(2sc, inc) *6 (24)
Round 5:
(3sc, inc) *6 (30)
Round 6:
(4sc, inc) *6 (36)
Round 7:
(5sc, inc) *6 (42)
Round 8-13:
42sc (6 rounds) (42)
Round 14:
(5sc, dec) *6 (36)
Round 15:
(4sc, dec) *6 (30)
Round 16:
(3sc, dec) *6 (24)
Round 17:
(2sc, dec) *6 (18)
Round 18:
(1sc, dec) *6 (12) - Stuff with fiberfill
Round 19:
6dec - Fasten off, cut the yarn, weave in the yarn ends
— Cabbage - Inner (small) Leaves (make 3):
With Green yarn (Work in rows):
Start inner leaves
Row 2:
ch1, 2sc, 3sc inc, 2sc, turn (7)
Row 3:
ch1, sc, inc, sc, 3sc inc, sc, inc, sc, turn (11)
Row 4:
ch1, 2sc, inc, 2sc, 3sc inc, 2sc, inc, 2sc, turn (15)
Row 5:
ch1, 3sc, inc, 3sc, 3sc inc, 3sc, inc, 3sc, turn (19)
Row 6:
ch1, 4sc, inc, 4sc, 3sc inc, 4sc, inc, 4sc, turn (23) - Leave a long tail for sewing
— Cabbage - Outer (large) Leaves (make 4):
With Green yarn:
Start outer leaves
Round 1:
6sc in MR (Place row marker here)
Round 3:
(1sc, inc) *6 (18)
Round 4:
(2sc, inc) *6 (24)
Round 5:
(3sc, inc) *6 (30)
Round 6:
(4sc, inc) *6 (36)
Round 7:
(5sc, inc) *6 (42)
Round 8:
(6sc, inc) *6 (48) - Leave a long tail for sewing
Info:
Sew the inner leaves at an equal distance approximately in rounds 15-16 to the cabbage core. Sew the outer leaves starting from the base. Large leaves should cover the spaces between small leaves.
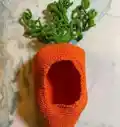
— Carrot House:
With Orange yarn:
Start carrot house
Round 1:
6sc in MR (Place row marker here)
Round 3:
(1sc, inc) *6 (18)
Round 5:
(2sc, inc) *6 (24)
Round 7:
(3sc, inc) *6 (30)
Round 8:
(4sc, inc) *6 (36)
Round 10:
(5sc, inc) *6 (42)
Round 12:
(6sc, inc) *6 (48)
Round 13-14:
48sc (2 rounds) (48)
Round 15:
(7sc, inc) *6 (54)
Round 17:
(8sc, inc) *6 (60)
Round 19:
(9sc, inc) *6 (66)
Round 20:
(10sc, inc) *6 (72)
Round 22:
(11sc, inc) *6 (78)
Round 23:
(12sc, inc) *6 (84)
Round 24-25:
84sc (2 rounds) (84)
Info:
Skip stitches for the door. Before skipping, make ch1 and push the part inside the loop (to get a knot). Fix all yarn tails at the end.
Round 26:
10sc, skip 10sc, 64sc (74)
Round 27:
8sc, dec, skip distance for the door, dec, 62sc (72)
Round 28:
7sc, dec, skip distance for the door, dec, 61sc (70)
Round 29:
6sc, dec, skip distance for the door, dec, 60sc (68)
Round 30:
5sc, dec, skip distance for the door, dec, 59sc (66)
Round 31-38:
6sc, skip distance for the door, 60sc (8 rounds) (66)
Round 39:
5sc, inc, skip distance for the door, inc, 59sc (68)
Round 40:
6sc, inc, skip distance for the door, inc, 60sc (70)
Round 41:
7sc, inc, skip distance for the door, inc, 61sc (72)
Round 42:
8sc, inc, skip distance for the door, inc, 62sc (74)
Round 43:
10sc, skip distance for the door, 64sc (74)
Round 44:
10sc, ch10, 64sc (84)
Round 45:
10sc, 10sc on the chain, 64sc (84)
Round 46-50:
84sc (5 rounds) (84)
Round 51:
(12sc, dec) *6 (78)
Round 52:
(11sc, dec) *6 (72)
Round 53:
(10sc, dec) *6 (66)
Round 54:
(9sc, dec) *6 (60)
Round 55:
(8sc, dec) *6 (54)
Round 56:
(7sc, dec) *6 (48)
Round 57:
(6sc, dec) *6 (42)
Round 58:
(5sc, dec) *6 (36)
Round 59:
(4sc, dec) *6 (30)
Round 60:
(3sc, dec) *6 (24)
Round 61:
(2sc, dec) *6 (18)
Round 62:
BLO (1sc, dec) *6 (12)
Round 63:
BLO 6dec - Cut the yarn
Info:
Attach the Orange yarn to the corner of the door and crochet around: 54 sc, cut the yarn.
— Carrot House - Greens:
Greens Instructions:
Attach the green yarn to front loops of the last round of the carrot (round 63), work in a spiral (from round 63 to 64): (sl st into front loop, ch45, from the second chain: 6sl st, 1st leaf (ch7, from the second chain: 6 sl st), return to the green – 4sl st, 2nd leaf (ch7, from the second chain: 6 sl st), on the green – 4sl st, 3rd leaf (ch7, from the second chain: 6 sl st), on the green – 6sl st, 4th leaf (ch7, from the second chain: 6 sl st), on the green– 6sl st, 5th leaf (ch7, from the second chain: 6 sl st), on the green– 6sl st, 6th leaf (ch7, from the second chain: 6 sl st), on the green – 6sl st, 7th leaf (ch7, from the second chain: 6 sl st), on the green – 6sl st, sl st into front loop)* 14. Cut the yarn and fasten off.
— Carrot House - Window:
With White yarn:
Start window
Round 1:
6sc in MR (Place row marker here)
Round 3:
(1sc, inc) *6 (18)
Round 4:
(2sc, inc) *6 (24)
Round 5:
Change color to Green. (3sc, inc) *6 (30). Leave a long tail for sewing
Info:
Sew the window to the carrot house and embroider the partition at the window. Use black acrylic paint to draw stripes on the carrot house.
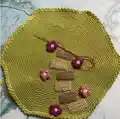
— Ladder - Steps (make 3):
With Brown yarn:
Start steps
Round 1:
6sc in MR (Place row marker here)
Round 2-11:
6sc (11 rounds) (6) - Stuff with fiberfill in the process. Leave a long tail for sewing
— Ladder - Base (make 2):
With Brown yarn:
Start base
Round 1:
6sc in MR (Place row marker here)
Round 2-30:
6sc (29 rounds) (6) - Fasten off, cut the yarn, weave in the yarn ends
Info:
Sew the steps to the base.
— Flower Meadow:
With Light Green yarn:
Start flower meadow
Round 1:
6sc in MR (Place row marker here)
Round 3:
(1sc, inc) *6 (18)
Round 4:
(2sc, inc) *6 (24)
Round 5:
(3sc, inc) *6 (30)
Round 6:
(4sc, inc) *6 (36)
Round 7:
(5sc, inc) *6 (42)
Round 8:
(6sc, inc) *6 (48)
Round 9:
(7sc, inc) *6 (54)
Round 10:
(8sc, inc) *6 (60)
Round 11:
(9sc, inc) *6 (66)
Round 12:
(10sc, inc) *6 (72)
Round 13:
(11sc, inc) *6 (78)
Round 14:
(12sc, inc) *6 (84)
Round 15:
(13sc, inc) *6 (90)
Round 16:
(14sc, inc) *6 (96)
Round 17:
(15sc, inc) *6 (102)
Round 18:
(16sc, inc) *6 (108)
Round 19:
(17sc, inc) *6 (114)
Round 20:
(18sc, inc) *6 (120)
Round 21:
(19sc, inc) *6 (126)
Round 22:
(20sc, inc) *6 (132)
Round 23:
(21sc, inc) *6 (138)
Round 24:
(22sc, inc) *6 (144)
Round 25:
(23sc, inc) *6 (150)
Round 26:
(24sc, inc) *6 (156)
Round 27:
(25sc, inc) *6 (162)
Round 28:
(26sc, inc) *6 (168)
Round 29:
(27sc, inc) *6 (174)
Round 30:
(28sc, inc) *6 (180)
Round 31:
(29sc, inc) *6 (186)
Round 32:
(30sc, inc) *6 (192)
Round 33:
(31sc, inc) *6 (198)
Round 34:
(32sc, inc) *6 (204)
Round 35:
(33sc, inc) *6 (210)
Round 36:
(34sc, inc) *6 (216)
Round 37:
(35sc, inc) *6 (222)
Round 38:
(1sc, 3dc in the one stitch) *111 - Fasten off, cut the yarn, weave in the yarn ends
— Flower Meadow - Track (make 6):
Info:
Crochet 3 pieces in Beige color and 3 pieces in Light Brown color. Work in rows.
Row 1:
Chain 11. Start from the second chain on the hook: 10sc, turn (10)
Row 2-5:
ch1, 10sc, turn (4 rows) (10) - Leave a long tail for sewing
Info:
Sew the pieces of the track to the clearing, alternating beige with brown.
— Flower (Make 5):
Info:
Crochet 3 purple flowers with a white center and 2 pink flowers with a white center.
Round 1:
5sc in MR (Place row marker here)
Round 2:
Change color. 5inc (10)
Round 3:
(4-tr cluster, ch1, sc) *5 - Leave a long tail for sewing
— Flower - Leaves (make 9):
With Green yarn:
Start leaves
Row 1:
Chain 7, from the second chain from the hook: sl st, sc, 2dc, sc, (sc, dc, sc) in the last chain, sc, 2dc, sc, sl st - Leave a long tail for sewing
Info:
Sew flowers near the track. Sew the leaves to the flowers.
— The Basket / Carrot Basket:
With Brown yarn:
Start basket
Round 1:
6sc in MR (Place row marker here)
Round 3:
(1sc, inc) *6 (18)
Round 4:
(2sc, inc) *6 (24)
Round 5:
(3sc, inc) *6 (30)
Round 6:
(4sc, inc) *6 (36)
Round 7:
(5sc, inc) *6 (42)
Round 8-9:
42sc (2 rounds) (42)
Round 10:
(6sc, inc) *6 (48)
Round 11-16:
48sc (6 rounds) (48)
Round 17:
12sc, ch22 (skip 12 stitches), 12sc, ch22 (skip 12 stitches) (68)
Round 18:
68sl st - Fasten off, cut the yarn, weave in the ends
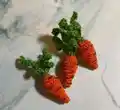
— Carrots (make 3):
With Orange yarn:
Start carrots
Round 1:
6sc in MR (Place row marker here)
Round 3:
(1sc, inc) *3 (9)
Round 5:
(2sc, inc) *3 (12)
Round 7:
(3sc, inc) *3 (15)
Round 8-10:
15sc (3 rounds) (15) - Stuff with fiberfill in the process
Round 11:
(3sc, dec) *3 (12)
Round 12:
6dec - Fasten off, cut the yarn, weave in the ends
Carrot Tops:
Crochet the tops in green (3 pieces per carrot): ch16, from the second chain from the hook: 15sc. Leave a long tail for sewing
Infos:
Sew the tops to the carrot. Use black acrylic paint to draw stripes on the carrot. Put the carrot in the basket.
This enchanting Bunny's House pattern creates a complete miniature world that will captivate hearts and inspire imagination! Designed with meticulous attention to detail, this comprehensive pattern brings together adorable amigurumi bunnies with their whimsical carrot house, cozy cabbage bed, and charming flower meadow. Each element works together to tell a delightful woodland story that's perfect for display or imaginative play. The combination of simple techniques with creative construction makes this an engaging project that keeps you excited from start to finish. 🐰🥕🌸 Happy crocheting! 🧶✨