🧢 Beautiful ✨ Detailed πŸ’ Adorable

Bunny-Carrot Amigurumi Pattern

Bunny-Carrot Amigurumi Pattern
4.5β˜… Rating
6-8 Hours Time Needed
2.5K Made This
βœ‚οΈ

Intermediate Level

Ideal for those with basic knitting experience, featuring slightly more advanced stitches and techniques to expand your skills.

⏱️

Weekend Treat

Takes 5-7 hours, making it an enjoyable project to finish over a couple of days.

🐰

Whimsical Buddy

Playful characters full of personality, designed to spark imagination and become cherished playtime favorites.

About This Bunny-Carrot Amigurumi Pattern

This Bunny-Carrot pattern brings together creativity and functionality in the most adorable way! Your bunny friend features a soft gray body with pink details, complete with expressive embroidered features and posable limbs attached with thread joints. What makes this pattern truly special are the dual-colored ears that transform into a carrot disguise, secured with buttons and loops for interactive play. The addition of leafy greens at the top completes the clever vegetable transformation.

Bunny-Carrot Amigurumi Pattern crochet pattern - detailed view of completed project

With clear round-by-round instructions and helpful assembly photos, you'll create a 14-16 cm treasure that's both cuddly and captivating. The pattern guides you through embroidery details, thread mounting techniques, and the unique ear-closing mechanism that makes this bunny truly one-of-a-kind.

Why You'll Love This Bunny-Carrot Amigurumi Pattern

I absolutely love this pattern because it's unlike any amigurumi I've made before! The clever design of having the bunny hide inside carrot-shaped ears is pure genius and adds such a playful element. I enjoy how the thread-jointed limbs give the bunny personality and posability, making each one unique. The combination of embroidery details and dimensional construction keeps the project interesting from start to finish. What really captured my heart is how the button closure system adds both functionality and charm, creating an interactive toy that children and adults alike will adore. This pattern challenges your skills while remaining totally achievable and fun throughout the entire process!

Bunny-Carrot Amigurumi Pattern step 1 - construction progress Bunny-Carrot Amigurumi Pattern step 2 - assembly progress Bunny-Carrot Amigurumi Pattern step 3 - details and accessories Bunny-Carrot Amigurumi Pattern step 4 - final assembly and finishing

Switch Things Up

I love experimenting with color variations for this pattern to create different bunny personalities! Instead of gray, try making a brown chocolate bunny or even a cream-colored one for variety. You could swap the pink accents for blue or yellow to create boy bunnies or match different nursery themes.

For a seasonal twist, I've made Halloween versions using black and orange (perfect since the ears are already orange carrots!), and holiday bunnies with red and green combinations. The carrot ears could also become different vegetables - imagine purple eggplant ears or green lettuce ears for a whole garden collection!

I sometimes add small details like embroidered flowers on the ears or tiny felt patches for extra character. You could also experiment with the greens by making them fuller or sparser depending on your aesthetic preference. The button placement offers another customization opportunity - try decorative buttons that match your theme or add small charms between buttons for extra flair. These small changes make each bunny unique while following the same wonderful pattern structure!

Common Mistakes & How to Fix Them

βœ— Forgetting to stuff the body and head gradually as you work can make it difficult to achieve proper shaping and firmness later on βœ— Placing safety eyes too close together or at the wrong rounds will affect the bunny's facial expression so always count carefully between rounds βœ— Not leaving long enough tails for sewing pieces together leads to frustration during assembly so leave at least twelve inches for easier attachment βœ— Skipping the thread mounting technique for limbs and sewing them directly will result in stiff non-posable arms and legs without movement flexibility βœ— Misaligning the dual-colored ear pieces when crocheting them together creates uneven edges that won't close properly around the bunny's body

Bunny-Carrot Amigurumi Pattern

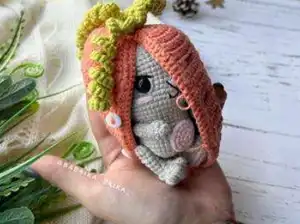
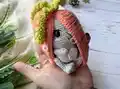
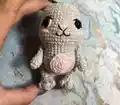
Create an enchanting bunny that zips itself inside a cozy carrot with this delightful amigurumi pattern! This unique design features an adorable gray bunny with pink accents that cleverly conceals itself within orange carrot-shaped ears with decorative button closures. Perfect for gifting or adding whimsy to your handmade collection, this 14-16 cm creation combines playful design with practical crochet techniques. The pattern includes detailed instructions for creating the bunny's sweet embroidered face, thread-jointed limbs for posability, and charming carrot greens to complete the vegetable disguise.

Intermediate 6-8 Hours

Materials Needed for Bunny-Carrot Amigurumi Pattern

β€” Main Fabric

  • 01
    Sport weight 4ply Yarn Art Jeans in Orange (N23)
  • 02
    Sport weight 4ply Yarn Art Jeans in Light Green (N29)
  • 03
    Sport weight 4ply Yarn Art Jeans in Gray (N49)
  • 04
    Sport weight 4ply Yarn Art Jeans in Black (N53)
  • 05
    Sport weight 4ply Yarn Art Jeans in White (N62)
  • 06
    Sport weight 4ply Yarn Art Jeans in Pink (N74)

β€” Tools Required

  • 01
    1.75 mm crochet hook
  • 02
    Safety eyes 10 mm
  • 03
    5 buttons for ear closure
  • 04
    Sewing pins
  • 05
    Stuffing material or fiberfill
  • 06
    Needle for sewing pieces together
  • 07
    Long needle for thread mounting limbs
  • 08
    Embroidery thread in pink, white, and black
  • 09
    Scissors
  • 10
    Stitch markers or row markers

Progress Tracker

0% Complete

β€” Body-Head :

Body (Gray yarn) :

Round 1 :

6 sc in MR

Info :

Place row marker here

Round 2 :

6 inc (12)

Round 3 :

(1 sc, inc) *6 (18)

Round 4 :

(2 sc, inc) *6 (24)

Round 5 :

(3 sc, inc) *6 (30)

Round 6 :

(4 sc, inc) *6 (36)

Round 7 :

(5 sc, inc) *6 (42)

Round 8-10 :

42 sc (3 rounds) (42)

Round 11 :

(2 sc, dec) *6, 18 sc (36)

Round 12-16 :

36 sc (5 rounds) (36)

Info :

Stuff with fiberfill in the process

Head :

Round 17 :

(1 sc, inc) *18 (54)

Round 18-21 :

54 sc (4 rounds) (54)

Round 22 :

(7 sc, dec) *6 (48)

Round 23 :

(6 sc, dec) *6 (42)

Round 24-28 :

42 sc (5 rounds) (42)

Info :

Insert the eyes between rounds 23-24 at a distance of 10-12 sc

Round 29 :

(5 sc, dec) *6 (36)

Round 30 :

(4 sc, dec) *6 (30)

Round 31 :

(3 sc, dec) *6 (24)

Info :

Stuff the head with fiberfill

Round 32 :

(2 sc, dec) *6 (18)

Round 33 :

(1 sc, dec) *6 (12)

Round 34 :

6 dec

Info :

Fasten off, cut the yarn, weave in the ends

β€” Embroidery Details :

Infos :

Embroider the nose with pink thread. Embroider the whites of the eyes with white thread. Embroider the upper eyelids and the outline of the nose with black thread. Embroider the cheeks with pink thread. Embroider the mouth with black thread.

β€” Tummy (Pink yarn) :

Round 1 :

6 sc in MR

Info :

Place row marker here

Round 2 :

6 inc (12)

Round 3 :

(1 sc, inc) *6 (18)

Info :

Leave a long tail for sewing. Pin the tummy in the center of the body with pins. Sew the tummy to the body.

β€” Legs (make 2, Pink yarn) :

Round 1 :

Chain 6. Start in the second chain from the hook: inc, 3 sc, 3 sc in the last chain, 4 sc (12)

Info :

Place row marker here

Round 2 :

Change color to Gray. 2 inc, 3 sc, 3 inc, 3 sc, inc (18)

Round 3 :

8 sc, (4-dc Bobble st, sc) *3, 4 sc (18)

Info :

Stuff with fiberfill in the process

Round 4 :

4 sc, 6 dec, 2 sc (12)

Round 5 :

(2 sc, dec) *3 (9)

Round 6 :

(1 sc, dec) *3 (6)

Round 7-11 :

6 sc (5 rounds) (6)

Info :

Fasten off, cut the yarn, weave in the yarn ends. Fasten the legs with a thread mount. Attach the legs using a long needle and thread.

β€” Arms (make 2, Gray yarn) :

Round 1 :

6 sc in MR

Info :

Place row marker here

Round 2 :

(1 sc, inc) *3 (9)

Round 3 :

9 sc (9)

Info :

Stuff with fiberfill in the process

Round 4 :

(1 sc, dec) *3 (6)

Round 5-8 :

6 sc (4 rounds) (6)

Info :

Fasten off, cut the yarn, weave in the yarn ends. Fasten the arms with a thread mount. Attach the arms using a long needle and thread.

β€” Tail (Pink yarn) :

Round 1 :

6 sc in MR

Info :

Place row marker here

Round 2 :

6 inc (12)

Round 3 :

12 sc (12)

Round 4 :

6 dec

Info :

Stuff with fiberfill. Leave a long tail for sewing. Sew the tail to the body.

β€” Ears (make 2 Gray pieces and 2 Orange pieces) :

Info :

Work in rows

Row 1 :

4 sc in MR, turn (4)

Row 2 :

ch 1, 4 inc, turn (8)

Row 3 :

ch 1, (1 sc, inc) *4, turn (12)

Row 4 :

ch 1, (2 sc, inc) *4, turn (16)

Row 5 :

ch 1, (3 sc, inc) *4, turn (20)

Row 6 :

ch 1, 20 sc, turn (20)

Row 7 :

ch 1, (4 sc, inc) *4, turn (24)

Row 8 :

ch 1, 24 sc, turn (24)

Row 9 :

ch 1, (5 sc, inc) *4, turn (28)

Row 10-28 :

ch 1, 28 sc, turn (19 rows) (28)

Row 29 :

ch 1, (5 sc, dec) *4, turn (24)

Row 30 :

ch 1, 24 sc, turn (24)

Row 31 :

ch 1, (4 sc, dec) *4, turn (20)

Row 32 :

ch 1, 20 sc, turn (20)

Row 33 :

ch 1, (3 sc, dec) *4, turn (16)

Row 34 :

ch 1, 16 sc, turn (16)

Row 35 :

ch 1, (2 sc, dec) *4, turn (12)

Row 36 :

ch 1, 12 sc, turn (12)

Row 37 :

ch 1, (1 sc, dec) *4, turn (8)

Row 38 :

ch 1, 4 dec, turn (4)

Row 39 :

ch 1, 2 dec

Info :

Cut and fasten the yarn for Gray piece. Continue crocheting on the Orange part.
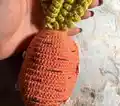
β€” Connecting Gray and Orange Ear Parts :

Round 1 :

Crochet with Orange yarn through both pieces (do not turn): sl st, ch 1, 84 sc (84)

Round 2 :

84 sc, sl st

Info :

Cut the yarn, weave in the ends. Embroider the stripes on the orange part with black thread.
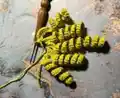
β€” Greens (Light Green yarn) :

Row 1 :

ch 31, from the second chain: 30 inc (60)

Row 2 :

ch 41, from the second chain: 40 inc (80)

Row 3 :

ch 51, from the second chain: 50 inc (100)

Row 4 :

ch 41, from the second chain: 40 inc (80)

Row 5 :

ch 31, from the second chain: 30 inc (60)

Info :

Leave a long tail for sewing. Sew the greens to the junction of the orange parts.

Assembly Instructions

  • Pin the pink tummy to the center of the gray body and sew securely in place using the long tail left from crocheting.
  • Attach both legs to the bottom of the body using thread mounting technique with a long needle, ensuring they are positioned symmetrically.
  • Attach both arms to the sides of the body using thread mounting technique, positioning them at approximately rounds 24-25 for natural placement.
  • Sew the fluffy pink tail to the back of the body at the appropriate position using the long tail left from crocheting.
  • Attach each dual-colored ear to the center top of the head, ensuring they align perfectly to close around the bunny when folded.
  • Sew five buttons at equal intervals along the edge of the first ear for the closure mechanism.
  • Create corresponding loops on the edge of the second ear opposite each button position to complete the interactive closing feature.
  • Attach the light green leafy greens to the junction where the gray and orange ear parts meet to complete the carrot top appearance.

Important Notes

  • πŸ’‘Use stitch markers consistently to track your rounds especially during the head shaping and when working the long ear pieces in rows
  • πŸ’‘Stuff the body and head gradually as you work rather than waiting until the end for better shaping and even distribution
  • πŸ’‘Thread mounting for the limbs requires a long sturdy needle and strong thread to ensure the joints are secure and posable
  • πŸ’‘When embroidering facial features use the photos as guides for placement to achieve the sweet expression shown in the pattern
  • πŸ’‘Pin all ear pieces and greens in place before sewing to ensure symmetry and proper alignment for the carrot disguise feature
  • πŸ’‘The button and loop closure system should be tested for fit before final stitching to ensure the bunny closes smoothly inside the ears
  • πŸ’‘Count your stitches carefully when working the ear pieces in rows as accurate stitch counts are essential for proper ear shaping

This enchanting Bunny-Carrot pattern brings whimsy and interactivity together in one adorable design! The clever concept of a bunny hiding inside carrot-shaped ears secured with buttons makes this a truly unique amigurumi project. With detailed embroidery instructions, thread-jointed limbs for posability, and charming carrot greens, every element adds personality and charm. Perfect for gifting to children or collectors who appreciate creative handmade treasures! 🐰πŸ₯• Happy crocheting! 🧢✨

You ask,

we answer.

FAQs

What does thread mounting mean and why is it used for the limbs?

Thread mounting is a technique where you attach limbs by threading strong thread through the body and both limbs simultaneously, creating a secure joint that allows the arms and legs to rotate and pose. This method gives your bunny more personality and durability compared to simply sewing limbs onto the surface.

Can I use different yarn weights for this pattern?

While you can experiment with different yarn weights, using sport weight 4ply yarn as specified will give you the correct 14-16 cm size. If you use thicker yarn with an appropriately larger hook, your bunny will be bigger, and you'll need to adjust the safety eye size accordingly. Thinner yarn will create a smaller bunny.

How do I make sure the button and loop closure works properly?

Before sewing buttons permanently, pin them in place and create temporary loops to test the fit. The ears should wrap comfortably around the bunny's body without being too tight or loose. Space buttons evenly and ensure loops are sized correctly to secure over each button smoothly.

What's the best way to embroider the facial features?

Use embroidery floss or split your yarn into thinner strands for more detailed work. Insert your needle from the back of the head where it will be hidden, and follow the pattern photos closely for placement. Take your time with the nose outline and eyelids as these define the bunny's expression most prominently.

Why are the ears worked in rows instead of rounds?

Working in rows creates the flat elongated ear shape needed for this design. This construction method allows you to create two separate flat pieces (gray and orange) that are then joined together, giving you the dual-colored carrot-ear effect essential to this pattern's unique concealing feature.