🧶 Beautiful ✨ Detailed 💝 Adorable

Bulbasaur Amigurumi Pattern

Bulbasaur Amigurumi Pattern
4.4★ Rating
3-4 Hours Time Needed
3.5K Made This
✂️

Beginner Friendly Level

Perfect for those just starting their sewing journey, with clear instructions and simple techniques

⏱️

Weekend Treat

Takes 5-7 hours, making it an enjoyable project to finish over a couple of days.

🧸

Cute Companion

An adorable friend to cherish, handcrafted with love to bring comfort and joy for years to come.

About This Bulbasaur Amigurumi Pattern

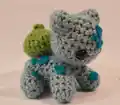
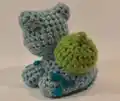
This Bulbasaur amigurumi pattern is designed to capture the charm of the beloved Generation 1 Pokémon starter with simple, beginner-friendly techniques. The pattern guides you through creating each component separately before assembling them into a complete plushie. With its recognizable teal coloring, triangular markings, and iconic bulb pod, this Bulbasaur will be instantly recognizable to fans of all ages.

Bulbasaur Amigurumi Pattern crochet pattern - detailed view of completed project

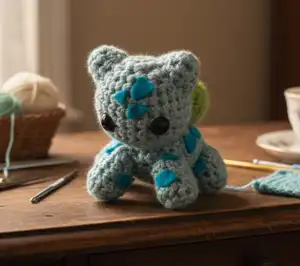
The finished amigurumi stands at approximately 4-5 inches tall, making it the perfect size for display or cuddles. All pieces are worked in continuous rounds with straightforward increases and decreases.

Why You'll Love This Bulbasaur Amigurumi Pattern

I absolutely love this pattern because it transforms basic crochet skills into something truly magical for Pokémon enthusiasts. There's something incredibly satisfying about watching Bulbasaur come to life stitch by stitch, from his sweet little face to that iconic bulb on his back. I find the separate construction method makes it easy to work on different parts during short crafting sessions, and the simple shaping techniques build confidence without overwhelming beginners. The customization possibilities with the felt markings let you add your own creative touch while staying true to the character. Most importantly, the joy on someone's face when they receive this handmade Pokémon companion makes every stitch worthwhile.

Bulbasaur Amigurumi Pattern step 1 - construction progress Bulbasaur Amigurumi Pattern step 2 - assembly progress Bulbasaur Amigurumi Pattern step 3 - details and accessories Bulbasaur Amigurumi Pattern step 4 - final assembly and finishing

Switch Things Up

I love experimenting with this Bulbasaur pattern to create unique variations that reflect different artistic styles and personal preferences. Try using variegated yarn for the body to create a tie-dye or ombré effect that gives Bulbasaur a magical, shiny Pokémon appearance. You could also enlarge the pattern by using bulky weight yarn with a larger hook to create a cuddly oversized version perfect for hugging.

For a seasonal twist, I've made autumn-themed Bulbasaurs using burnt orange and deep red tones for the pod, transforming it into a fall harvest look. You can even create a whole evolution line by modifying the pod design—add felt flower petals for Ivysaur or create a larger bloomed flower for Venusaur. Consider embroidering the eyes instead of using safety components if you're gifting to very young children, and experiment with different felt pattern placements to give each Bulbasaur its own personality.

I've also found that adding small details like embroidered claws on the feet or blush marks on the cheeks brings extra character to the design. The beauty of this pattern is its versatility—you can stay true to the original design or let your creativity flourish with color combinations and embellishments that make your Bulbasaur truly one of a kind.

Common Mistakes & How to Fix Them

✗ Forgetting to place safety eyes before fully stuffing the head, making it difficult to position them correctly and securely ✗ Overstuffing the body and limbs which creates an unnatural, rigid shape instead of the soft, rounded Bulbasaur silhouette ✗ Not counting stitches carefully during increase and decrease rows, resulting in lopsided or misshapen body parts that won't assemble properly ✗ Attaching the pod too high or too low on the back, throwing off Bulbasaur's iconic proportions and overall appearance

Bulbasaur Amigurumi Pattern

Bring your favorite Pokémon starter to life with this adorable Bulbasaur crochet pattern! Perfect for Pokémon fans and crochet enthusiasts alike, this charming amigurumi features Bulbasaur's iconic teal body, distinctive ears, and signature bulb pod on its back. The pattern includes detailed instructions for creating the head, body, ears, pod, and all four limbs, complete with fabric markings to capture Bulbasaur's authentic look. This delightful project makes a wonderful gift for Pokémon collectors or a sweet addition to your handmade plushie collection.

Beginner Friendly 3-4 Hours

Materials Needed for Bulbasaur Amigurumi Pattern

— Main Fabric

  • 01
    Worsted weight yarn in green color
  • 02
    Worsted weight yarn in light teal or aqua color

— Tools Required

  • 01
    3.5mm crochet hook
  • 02
    Scissors
  • 03
    Tapestry needle
  • 04
    Glue gun or fabric glue
  • 05
    Dark teal felt
  • 06
    10mm safety eyes (1 pair)
  • 07
    Polyfil or soft stuffing

Progress Tracker

0% Complete

— Head :

Info :

Using the light teal yarn

Row 1 :

CH 2, SC 8 in first stitch (8 stitches) - Alternatively, SC 8 into a magic circle

Row 2 :

INC x 8 (16 stitches)

Row 3 :

*SC, INC* x 8 (24 stitches)

Row 4-6 :

SC x 24 (24 stitches)

Row 7 :

*SC x 9*, INC, *SC x 4*, INC, *SC x 9* (26 stitches)

Info :

Place eyes 5 stitches apart (in between each of the increases)

Row 8 :

SC x 26 (26 stitches)

Row 9 :

*SC x 2*, DEC x 11*, *SC x 2* (15 stitches)

Info :

Stuff as much of the head as you can

Row 10 :

*SC x 4*, *DEC x 3*, *SC x 5*

Info :

Finish stuffing head, FO with SlSt

— Body :

Row 1 :

CH 2, SC 6 in first stitch (6 stitches) - Alternatively, SC 6 into a magic circle

Row 2 :

INC x 6 (12 stitches)

Row 3 :

*SC, INC* x 6 (18 stitches)

Row 4-6 :

SC x 18 (18 stitches)

Row 7 :

*SC x 5*, INC, *SC x 6*, INC, *SC x 5* (20 stitches)

Row 8-10 :

SC x 20 (20 stitches)

Row 11 :

DEC to close, stuffing the body as you go. FO with a SlSt

Info :

Sew head onto body (row 1 is the front of the body, and the increases done face upwards)

— Ears :

Row 1 :

CH 2, SC 6 in first stitch (6 stitches) - Alternatively, SC 6 into a magic circle

Row 2 :

*SC, INC* x 3

Row 3 :

*SC 2, INC* x 3

Info :

FO with SlSt, then sew ears onto head

— Pod :

Row 1 :

CH 12, join the ends into a loop with a SlSt (You're just making a crochet ring with 12 stitches around) (12 stitches)

Row 2 :

INC x 12 (24 stitches)

Row 3-4 :

SC x 24 (24 stitches)

Row 5 :

*SC 4, DEC* x 4 (20 stitches)

Row 6 :

DEC x 10 (10 stitches)

Row 7 :

DEC x 5 (5 stitches)

Row 8 :

SC 4, SlSt, FO

Info :

Stuff pod from the bottom, then sew pod to the back of your Bulbasaur

— Arms and Legs :

Row 1 :

CH 2, SC 10 in first stitch (10 stitches) - Alternatively, SC 10 into a magic circle

Row 2-5 :

SC x 10 (10 stitches)

Info :

FO with SlSt. Stuff legs lightly and sew them onto body

— Markings :

Info :

Cut out triangles and other angled shapes of varying sizes from dark teal felt and using fabric glue or hot glue gun, fasten them to your Bulbasaur

Assembly Instructions

  • Sew the completed head onto the body with row 1 facing forward and the increases facing upward for proper orientation.
  • Attach the ears to the sides of the head using the pattern photos as a placement guide for symmetrical positioning.
  • Stuff the pod firmly from the bottom opening before sewing it securely to the back center of the body.
  • Lightly stuff all four legs and position them evenly on the underside of the body before sewing them in place.
  • Cut various sized triangular and angled shapes from dark teal felt to create Bulbasaur's distinctive markings.
  • Use fabric glue or a hot glue gun to carefully attach the felt markings across the body and pod.

Important Notes

  • 💡Insert safety eyes between the increases in Row 7 before completing Row 9, as they cannot be added after stuffing
  • 💡Use continuous rounds throughout the pattern without joining, and use a stitch marker to track round beginnings
  • 💡Stuff all pieces moderately but not too firmly to maintain the soft, rounded Bulbasaur shape
  • 💡Keep the pod opening at the bottom accessible for stuffing before final attachment to the body
  • 💡Pin all limbs and features in place before sewing to ensure balanced, symmetrical placement

This charming Bulbasaur pattern brings the beloved Pokémon starter to life with simple crochet techniques perfect for beginners and experienced crafters alike. The separate construction method makes it easy to work on individual pieces at your own pace before assembling your finished amigurumi. With its iconic teal coloring, adorable ears, and signature bulb pod, this pattern captures everything fans love about Bulbasaur in huggable plushie form. 🧶 Happy crocheting and may your Bulbasaur be the first of many Pokémon adventures! 🌱✨

You ask,

we answer.

FAQs

What size will the finished Bulbasaur be?

The completed Bulbasaur amigurumi measures approximately 4-5 inches tall, making it a perfect desk companion or display piece.

Can I use a different yarn weight for this pattern?

While worsted weight yarn is recommended, you can use a different weight with an appropriately sized hook. Just note that this will change the finished size of your Bulbasaur.

When should I attach the safety eyes?

Insert the safety eyes after completing Row 7, placing them 5 stitches apart between the increases, before you begin decreasing and stuffing the head.

Do I need to stuff the pod firmly?

Yes, stuff the pod from the bottom opening with moderate firmness to help it maintain its bulb shape and stand upright on Bulbasaur's back.

How do I create the dark markings on Bulbasaur?

Cut various sized triangles and angular shapes from dark teal felt, then attach them to the body and pod using fabric glue or a hot glue gun for a secure hold.