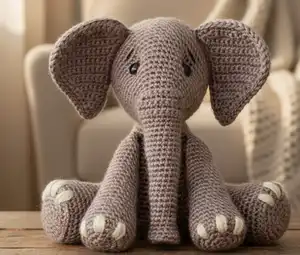
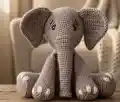
Create your own adorable Bubba the elephant with this detailed amigurumi pattern! Standing at approximately 7.9 inches tall, Bubba features charming details including embroidered eyebrows, expressive eyes, lovely big ears, and a fluffy brushed tail. This comprehensive pattern guides you through creating a cuddly elephant companion using worsted weight yarn and includes special techniques for shaping the trunk, assembling intricate ear pieces, and adding personality through embroidered details that bring Bubba to life.
Progress Tracker
0% Complete
— Trunk - Head :
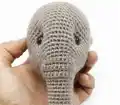
Info :
With Dark Beige/Grey. The trunk and head are worked in one piece, starting with the trunk
Round 1 :
6 sc in a magic ring (6)
Round 2 :
[1 inc] x 6 (12)
Round 3 :
[3 sc, 1 inc] x 3 (15)
Round 4 :
[3 sc, 1 dec] x 3 - WORK THIS ROUND THROUGH BACK LOOPS ONLY (12)
Round 5-10 :
12 sc - 6 rounds (12)
Info :
Start stuffing the trunk and keep doing it as you go, but do not push too much stuffing inside to keep trunk slightly flexible. Be careful when stuffing the beginning of the trunk so it remains sunk
Round 11 :
[5 sc, 1 inc] x 2 (14)
Round 12-15 :
14 sc - 4 rounds (14)
Round 16 :
[6 sc, 1 inc] x 2 (16)
Round 17-20 :
16 sc - 4 rounds (16)
Round 21 :
[7 sc, 1 inc] x 2 (18)
Round 22-25 :
18 sc - 4 rounds (18)
Round 26 :
[8 sc, 1 inc] x 2 (20)
Round 27-28 :
20 sc - 2 rounds (20)
Info :
Stop here, now we are going to start working for rows. From where you stopped on R28, make a chain, turn your piece and work
Info :
Stop once you have finished the 12 sc (we leave without working the remaining 8 stitches), and continue working for rows
Row 2 :
1 ch, turn, 1 dec, 8 sc, 1 dec (10)
Row 3 :
1 ch, turn, 10 sc (10)
Row 4 :
1 ch, turn, 1 dec, 6 sc, 1 dec (8)
Row 5 :
1 ch, turn, 8 sc (8)
Row 6 :
1 ch, turn, 1 dec, 4 sc, 1 dec (6)
Info :
We are going to work the first round along the edges of the rows we just made, in the R28 stitches of the trunk we left without working and in the row 6 stitches. Work in a continuous spiral again
Round 1 :
24 sc (5 sc along the edges from R6 to R1, 8 sc in the R28 stitches of the trunk we left without working, 5 sc along the edges from R1 to R6, 6 sc in the stitches of R6) (24)
Round 2 :
[3 sc, 1 inc] x 6 (30)
Round 4 :
2 sc, [1 inc, 4 sc] x 5, 1 inc, 2 sc (36)
Round 5 :
[5 sc, 1 inc] x 6 (42)
Round 6 :
3 sc, [1 inc, 6 sc] x 5, 1 inc, 3 sc (48)
Round 7-8 :
48 sc - 2 rounds (48)
Info :
Stop here and mark the nº 35 stitch you made on R8 and continue. Remember to start stuffing normally from now on
Info :
Stop here and mark the nº 3 stitch you made on R9. Bubba's eyes will be placed later in the marked stitches. There will be 15 stitches between the two marked stitches
Round 11 :
[7 sc, 1 inc] x 6 (54)
Info :
Stop here and install the safety eyes into the marked stitches and continue with the head
Round 13-20 :
54 sc - 8 rounds (54)
Round 21 :
[7 sc, 1 dec] x 6 (48)
Round 22 :
3 sc, [1 dec, 6 sc] x 5, 1 dec, 3 sc (42)
Round 23 :
[5 sc, 1 dec] x 6 (36)
Round 24 :
2 sc, [1 dec, 4 sc] x 5, 1 dec, 2 sc (30)
Round 25 :
[3 sc, 1 dec] x 6 (24)
Round 26 :
1 sc, [1 dec, 2 sc] x 5, 1 dec, 1 sc (18)
Round 27 :
[1 sc, 1 dec] x 6 (12)
Info :
Cut the yarn leaving a long tail and close the hole using the yarn needle through front loops, pull tight, secure with knot and hide end inside head
— Eye Expression :
Info :
Cut a long piece of yarn (same color as head), thread yarn needle and insert it through edge of left eye between rounds 8-9 of the head horizontally towards same place in right eye. Pull out leaving a tail. Wrap yarn over one stitch up between rounds 9-10, push needle horizontally towards same place in left side of head above edge of eye. Wrap yarn over one stitch and repeat. Cut yarn leaving similar tail. Pull both tails gently at same time to sink eyes into head. Secure with 2 knots at edge of eye and hide tails inside head
— Eyebrows Embroidery :
Info :
Eyebrows will be placed between rounds 11-12 of the head. Each one will be embroidered over 4 holes. Cut long Black yarn piece, thread yarn needle and insert through hole 1, pull out at opposite side of head through hole 2 leaving tail. Insert needle through hole 3 and pull out through hole 1 for right eyebrow. Insert needle through hole 4 and pull out through hole 1 for left eyebrow. Tie two tails together with 2 knots and hide inside head
— Ears (Right Ear - 1st Piece) :
Info :
With Dark Beige/Grey. Do not stuff. The ears are worked for rows. Each ear is made of 2 pieces that will be joined later. Make foundation chain with 2 ch. Starting in 2nd chain from hook
Row 2 :
1 ch, turn, 1 inc, 1 sc (3)
Row 3 :
1 ch, turn, 2 sc, 1 inc (4)
Row 4 :
1 ch, turn, 1 inc, 3 sc (5)
Row 5 :
1 ch, turn, 4 sc, 1 inc (6)
Row 6 :
1 ch, turn, 1 inc, 5 sc (7)
Row 7 :
1 ch, turn, 6 sc, 1 inc (8)
Row 8 :
1 ch, turn, 1 inc, 7 sc (9)
Row 9 :
1 ch, turn, 8 sc, 1 inc (10)
Row 10 :
1 ch, turn, 10 sc (10)
Row 11 :
1 ch, turn, 9 sc, 1 inc (11)
Row 12-13 :
1 ch, turn, 11 sc - 2 rows (11)
Row 14 :
1 ch, turn, 1 dec, 8 sc, 1 inc (11)
Row 15 :
1 ch, turn, 11 sc (11)
Row 16 :
1 ch, turn, 1 dec, 8 sc, 1 inc (11)
Row 17 :
1 ch, turn, 1 inc, 8 sc, 1 dec (11)
Row 18 :
1 ch, turn, 1 dec, 7 sc - LEAVE WITHOUT WORKING THE 2 REMAINING STITCHES (8)
Row 19 :
1 ch, turn, 1 dec, 4 sc, 1 dec (6)
Row 20 :
1 ch, turn, 1 dec, 4 sc + 1 sc + 2 sc (8)
Info :
Do not fasten off, we are going to continue working around the ear's shape. Mark with stitch marker the last stitch you made on R20
Shape :
17 sc, 1 inc, 19 sc, 8 sc (46)
Info :
Cut yarn leaving tail and pull out through last stitch. Finish with invisible join. Mark the last stitch made on shape's round to guide joining pieces together
— Right Ear (2nd Piece) :
Info :
Make another piece just like 1st one until R20 (included). Stop before working the shape. Turn your work without making a chain
Shape :
8 sc, 19 sc, 1 inc, 17 sc (46)
Info :
DO NOT FASTEN OFF. Place second piece on top of first one, right sides facing out. Join the 46 stitches of both pieces with slip stitch round using back loops only from both pieces. Start in next stitch from where you stopped on 2nd piece and in marked stitch on 1st piece. Mark first sl to know where to finish round. Once finished, fasten off making another sl in first sl of round. Cut yarn leaving long tail for sewing
— Left Ear (1st Piece) :
Info :
Repeat same instructions as right ear until R20 (included), stop before working piece's shape. Before turning work, mark next hole from where you stopped. Turn work
Shape :
8 sc, 19 sc, 1 inc, 17 sc (46)
Info :
Once you reach stitch marker, remove it and make last stitch of shape's round here. Cut yarn leaving tail and pull out through last stitch. Finish with invisible join. Mark the false stitch to guide joining pieces together
— Left Ear (2nd Piece) :
Info :
Repeat same instructions until R20 (included), stop before working shape
Shape :
17 sc, 1 inc, 19 sc, 8 sc (46)
Info :
DO NOT FASTEN OFF. Join 46 stitches of both pieces with slip stitch round using back loops only. Place 2nd piece on top of 1st piece. Start in 2nd piece next stitch and in 1st piece marked stitch. Mark first sl. Complete shape's round, fasten off making sl into first sl. Cut yarn leaving long tail for sewing
— Body :
Info :
With Dark Beige/Grey
Round 1 :
6 sc in a magic ring (6)
Round 2 :
[1 inc] x 6 (12)
Round 3 :
[1 sc, 1 inc] x 6 (18)
Round 4 :
1 sc, [1 inc, 2 sc] x 5, 1 inc, 1 sc (24)
Round 5 :
[3 sc, 1 inc] x 6 (30)
Round 6 :
2 sc, [1 inc, 4 sc] x 5, 1 inc, 2 sc (36)
Round 7 :
[5 sc, 1 inc] x 6 (42)
Round 8 :
3 sc, [1 inc, 6 sc] x 5, 1 inc, 3 sc (48)
Round 9 :
[7 sc, 1 inc] x 6 (54)
Round 10-15 :
54 sc - 6 rounds (54)
Round 16 :
[7 sc, 1 dec] x 6 (48)
Round 17-19 :
48 sc - 3 rounds (48)
Round 20 :
3 sc, [1 dec, 6 sc] x 5, 1 dec, 3 sc (42)
Round 21-23 :
42 sc - 3 rounds (42)
Round 24 :
[5 sc, 1 dec] x 6 (36)
Round 25-27 :
36 sc - 3 rounds - Start stuffing (36)
Round 28 :
2 sc, [1 dec, 4 sc] x 5, 1 dec, 2 sc (30)
Round 29-30 :
30 sc - 2 rounds (30)
Round 31 :
[3 sc, 1 dec] x 6 (24)
Info :
Finish with sl and cut yarn leaving long tail for sewing
— Arms :
Info :
With Dark Beige/Grey. Make two
Round 1 :
6 sc in a magic ring (6)
Round 2 :
[1 inc] x 6 (12)
Round 3 :
[1 sc, 1 inc] x 6 (18)
Round 4 :
1 sc, [1 inc, 2 sc] x 5, 1 inc, 1 sc (24)
Round 5 :
24 sc - WORK THIS ROUND THROUGH BACK LOOPS ONLY (24)
Round 6-10 :
24 sc - 5 rounds (24)
Round 11 :
[6 sc, 1 dec] x 3 (21)
Round 12-15 :
21 sc - 4 rounds - Start stuffing (21)
Round 16 :
[5 sc, 1 dec] x 3 (18)
Round 17-20 :
18 sc - 4 rounds (18)
Round 21 :
[4 sc, 1 dec] x 3 (15)
Round 22-27 :
15 sc - 6 rounds - Stop stuffing at R25 approx (15)
Round 28 :
[3 sc, 1 dec] x 3 (12)
Info :
Fasten off and cut yarn leaving tail for sewing. Close the arm by folding in half, place yarn to the back before start, and from where you stopped in R29 crochet 6 sc through stitches of both parts
— Legs :
Info :
With Dark Beige/Grey. Make two
Round 1 :
6 sc in a magic ring (6)
Round 2 :
[1 inc] x 6 (12)
Round 3 :
[1 sc, 1 inc] x 6 (18)
Round 4 :
1 sc, [1 inc, 2 sc] x 5, 1 inc, 1 sc (24)
Round 5 :
[3 sc, 1 inc] x 6 (30)
Round 6 :
2 sc, [1 inc, 4 sc] x 5, 1 inc, 2 sc (36)
Round 7 :
36 sc - WORK THIS ROUND THROUGH BACK LOOPS ONLY (36)
Round 8-9 :
36 sc - 2 rounds (36)
Round 10 :
5 sc, [1 dec, 10 sc] x 2, 1 dec, 5 sc (33)
Round 12 :
[9 sc, 1 dec] x 3 (30)
Round 14 :
4 sc, [1 dec, 8 sc] x 2, 1 dec, 4 sc (27)
Round 16 :
[7 sc, 1 dec] x 3 (24)
Round 17-18 :
24 sc - 2 rounds (24)
Round 19 :
[3 sc, 1 inc] x 6 (30)
Round 20-22 :
30 sc - 3 rounds (30)
Info :
Fasten off and cut yarn leaving long tail for sewing. Stuff the legs
— Tail :
Info :
With Dark Beige/Grey. Do not stuff
Round 1 :
6 sc in a magic ring (6)
Round 2-9 :
6 sc 8 rounds (6)
Round 10 :
[2 sc, 1 inc] x 2 (8)
Round 12 :
[3 sc, 1 inc] x 2 (10)
Info :
Close the tail the same way as arms. Fold it in half and from where you stopped at R13 crochet 5 sc through stitches of both parts. Optional: Brush tail bottom carefully with wire pet brush or velcro hook part until fluffy as desired. Trim extra long fibers if necessary. Alternative: Cut cotton pieces same color and tie them at tail bottom, then trim to desired shape
This charming Bubba the elephant pattern brings together intermediate crochet techniques with delightful finishing details to create a truly special handmade companion. From the innovative trunk-and-head construction to the intricate two-piece ear assembly and those adorable embroidered eyebrows, every element is designed to teach you valuable skills while crafting something absolutely precious. The optional brushed tail adds that extra touch of magic that makes Bubba stand out from ordinary amigurumi projects. Whether you're making him for yourself, as a heartfelt gift, or to brighten a child's day, Bubba is sure to become a treasured friend. Happy crocheting and enjoy watching your elephant come to life stitch by stitch! 🐘💕🧶