🧢 Beautiful ✨ Detailed πŸ’ Adorable

Boho Chic Mash Bag Crochet Pattern

Boho Chic Mash Bag Crochet Pattern
4.9β˜…Rating
5-7 HoursTime Needed
3.4KMade This
βœ‚οΈ

Intermediate Level

Ideal for those with basic crocheting experience, featuring slightly more advanced stitches and techniques to expand your skills.

⏱️

Weekend Treat

Takes 5-7 hours, making it an enjoyable project to finish over a couple of days.

🏑

Cozy Accent

A warm touch for your space that transforms ordinary corners into inviting nooks filled with handmade charm.

About This Boho Chic Mash Bag Crochet Pattern

Boho Chic Mash Bag Crochet Pattern crochet pattern - detailed view

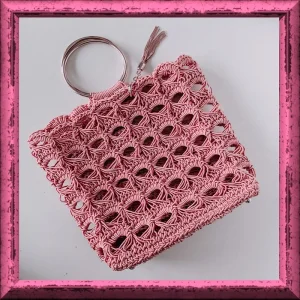
Perfect for anyone who loves modern, boho-chic accessories. It makes an unforgettable gift for a fashion-forward friend, or a gorgeous statement piece to elevate your own summer wardrobe.

Why You'll Love This Boho Chic Mash Bag Crochet Pattern

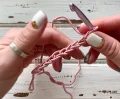
I absolutely fell in love with this design because of how clever the construction is. Using a simple plastic card to keep all your loops perfectly even is such a brilliant, satisfying hack! It feels less like standard crocheting and more like magic weaving.

Boho Chic Mash Bag Crochet Pattern step 1 Boho Chic Mash Bag Crochet Pattern step 2 Boho Chic Mash Bag Crochet Pattern step 3 Boho Chic Mash Bag Crochet Pattern step 4

Switch Things Up

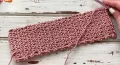
There is something so incredibly satisfying about watching a bag take shape from simple cord, isn't there? When I first tried this pattern, I was blown away by how easy it was to get that intricate, high-end boutique look using a simple plastic card from my wallet. It is a total game-changer for keeping those gorgeous loops perfectly uniform.

If you want to customize your bag, try experimenting with different cord materials. A natural jute cord gives a rustic, beachy vibe that is absolutely perfect for summer trips to the farmer's market. On the other hand, a sleek polyester cord in a vibrant jewel tone or metallic finish turns this into an elegant evening accessory.

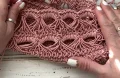
Don't skip the steaming step! It feels like magic when the heat hits the cord and the loops instantly relax into their beautiful, open arch shapes. Take your time, enjoy the rhythmic flow of the loops, and prepare for everyone to ask where you bought your gorgeous bag!

Common Mistakes & How to Fix Them

βœ— If you do not keep your tension consistent when pulling the loops over the plastic card, some stitches will sag and ruin the neat, aligned look of the mesh arcs.βœ— When joining the circular handles to the top edge, failing to align them exactly in the center of the 16 arcs will cause the bag to hang lopsidedly when carried.βœ— Forgetting to work into both the back loop and the back bump (jumper) on Row 1 of the walls will leave the bottom of your bag weak and prone to stretching out.βœ— If you do not melt the ends of your polyester or soutache cord with a lighter, the woven cord will quickly unravel and cause your joins to completely fall apart.

Boho Chic Mash Bag Crochet Pattern

Get ready to create your new favorite accessory with this stunning Mash Bag! Using a clever card-loop technique, you will craft a gorgeous, textured bag that looks like intricate macrame but is pure crochet magic. It is the perfect blend of modern style and retro market bag vibes, ready for your next weekend outing or farmer's market run.

Intermediate 5-7 Hours

Materials Needed for Boho Chic Mash Bag Crochet Pattern

β€” Main Fabric

  • 01
    300 yards (300 meters) of 3 mm soutache cord, cotton cord, or polyester cord

β€” Tools Required

  • 01
    6.0 mm (Size J/10) crochet hook
  • 02
    4.0 mm (Size G/6) crochet hook for weaving in loose ends
  • 03
    Standard plastic card (approx. 2 2/8 inches or 5.5 cm wide) for loop sizing
  • 04
    Two circular purse handles (approx. 4 1/2 inches or 11 cm in diameter)
  • 05
    Four metal purse feet/legs (optional)
  • 06
    Lighter for sealing cord ends
  • 07
    Sharp scissors
  • 08
    Four stitch markers
  • 09
    Small Phillips screwdriver if installing metal purse feet

Progress Tracker

0% Complete

β€” 1. The Bottom :

Row 1 :

CH 9. Starting in the second chain from your hook, work 8 SC. CH 1 and turn your work. (8)

Row 2-26 :

Work 8 SC across. CH 1 and turn. (8)

Row 27 :

Work 8 SC across. Do not cut your working cord. (8)

Trim :

Work 2 SC in the last loop, then crochet 24 SC evenly along the side edge (1 SC per row). Work 3 SC in the corner space, 6 SC along the opposite side of the starting chain, 3 SC in the next corner space, 24 SC evenly along the second side edge, and finish with 1 SC in the final corner. Fasten off and secure the ends. Place 4 stitch markers in the middle stitch of each corner. (72)

β€” 2. The Wall-Side :

Row 1 :

Insert your hook into the back loop and back bump (jumper) only at any marked corner. Pull up a loop and CH 1. Work 1 SC in the same stitch. Continuing to work only in the back loops and back bumps around: 26 SC, 3 SC in the next stitch, 8 SC, 3 SC in the next stitch, 26 SC, 3 SC in the next stitch, 8 SC, 2 SC in the last stitch. Join with a SlSt. (80)

Row 2 :

Insert your hook under the last loop of the previous row, pull up a loop, and CH 1. Holding your plastic card in front of your work, yarn over the card and work 80 LS around. Slide the completed loops off the right side of the card as it fills up. Join the row with a SlSt. (80)

Row 3 :

CH 5. Gather the first 5 LS and turn them 90 degrees counterclockwise. Work 5 SC through this first group of loops. Gather the next 5 LS and turn them over. Insert hook through the 1st loop of this group and pull up a loop, then insert hook through the 2nd loop and pull up a loop (3 loops on hook). Work these loops together. Next, work 5 SC through this second group of 5 LS. Repeat this sequence around to create 16 mesh arcs. Join with a SlSt. (16 arcs)

Row 4 :

Work 5 LS over the plastic card, skip 1 stitch of the previous row, work 5 LS, skip 1 stitch. Repeat this pattern around. Join with a SlSt. Place a stitch marker in the very first LS of this row. (80)

Row 5 :

CH 5. Skip the marked LS. Work 5 SC through the next 5 LS. For the remaining groups: work 1 SC in the space between the arcs, then 5 SC through the next 5 LS. Repeat around, working the skipped LS at the very end. Join with a SlSt. (16 arcs)

Row 6-17 :

Repeat the sequence of Row 4 and Row 5 six more times. Fasten off, pull the cord through the loop, tighten, and secure the ends on the inside of the bag. (16 arcs)

β€” 3. Handles (Make 2) :

Row 1 :

Insert your hook through the center of the circular handle, yarn over, twist clockwise, and CH 1. Work 10 SC around the handle. Cut the cord, leaving a tail of approximately 27-28 inches (70 cm), and pull the end through the loop. (10)

Assembly Instructions

  • Steam the finished rectangular bottom base through a damp cloth on a medium setting to flatten and shape it before starting the walls.
  • If using optional metal purse feet, install them by counting 2 stitches and 2 rows inward from each of the four corners, securing them firmly with a screwdriver.
  • After completing the bag body, steam the entire textured piece once more to relax the loop stitches and set the beautiful mesh pattern.
  • Align the first circular handle with the center of the bag's top front edge, matching it to the middle of the arcs.
  • Use the long yarn tail of the handle to join it to the bag by working 9 slip stitches through the loops of the bag and the handle together.
  • Repeat the alignment and slip stitch joining process for the second handle on the opposite side of the bag, then secure and melt all remaining cord ends.

Important Notes

  • πŸ’‘Always use a damp cloth when steaming your bag to protect the synthetic or cotton cord fibers from direct heat damage.
  • πŸ’‘When working the loop stitches, slide the accumulated loops off the right side of the card only when you run out of physical space.
  • πŸ’‘Make sure to melt the cut ends of your cord immediately with a lighter to prevent the inner core from fraying during assembly.
  • πŸ’‘Keep your stitch markers in place at the corners of the base to ensure your wall alignment remains perfectly symmetrical.

I cannot wait to see your gorgeous new bag come to life! This project is such an absolute joy to make, and that final reveal after steaming those beautiful loops is pure creative satisfaction. Wear it out with your favorite summer dress, show it off at the local market, or gift it to someone truly special who appreciates handmade style. You have got this, and I am cheering you on every single stitch of the way! Happy crafting, my wonderful friends! 🧢✨

You ask,

we answer.

FAQs

Can I use regular worsted weight acrylic yarn for this bag?

I do not recommend it. This bag relies on the stiff structure of 3 mm soutache, cotton, or polyester cord to hold its shape and keep the loops defined. Soft yarn will sag.

What can I use if I do not have a plastic card of the exact size?

Any standard store loyalty card, old credit card, or even a sturdy piece of cardboard cut to 5.5 cm wide will work perfectly to keep your loop stitches uniform.

Do I really need to steam the bag after finishing the loop rows?

Yes, steaming is crucial! It relaxes the cord fibers, helps the loops lay flat, and opens up the beautiful macrame-like mesh texture of the bag.

How do I make sure the handles are centered correctly?

Lay your bag flat and count your 16 mesh arcs. Mark the central arcs on both sides with stitch markers, then align your 9 joining slip stitches directly over those marked sections.