๐Ÿงถ Beautiful โœจ Detailed ๐Ÿ’ Adorable

Bobble Sheep Amigurumi Pattern

Bobble Sheep Amigurumi Pattern
4.7โ˜… Rating
8-10 Hours Time Needed
3.1K Made This
โœ‚๏ธ

Intermediate Level

Ideal for those with basic knitting experience, featuring slightly more advanced stitches and techniques to expand your skills.

โฑ๏ธ

All-Day Adventure

Requires 8-10 hours, ideal for a full day of immersive knitting.

๐Ÿงธ

Cute Companion

An adorable friend to cherish, handcrafted with love to bring comfort and joy for years to come.

About This Bobble Sheep Amigurumi Pattern

Bobble Sheep Amigurumi Pattern crochet pattern - detailed view of completed project

The sheep is worked in rounds with a mix of regular single crochet and bobble stitches throughout the body and head. Special techniques include shaping the hooves, embroidering facial features, and carefully assembling all pieces for a professional finish.

Why You'll Love This Bobble Sheep Amigurumi Pattern

I absolutely love how the bobble stitches create such amazing texture on this little sheep - it's like creating your own fluffy cloud friend! The pattern might look intimidating with all those bobbles, but once you get into the rhythm, it's actually quite meditative and satisfying to watch the fleece take shape. I especially enjoy the challenge of working with the bobble stitch technique, as it adds so much character and dimension to the finished piece. The combination of white and gray yarn creates such a classic sheep look, and the embroidered details on the face give each sheep its own unique personality. This is one of those patterns where the finished result looks incredibly impressive, and people are always amazed when you tell them you made it yourself!

Bobble Sheep Amigurumi Pattern step 1 - construction progress Bobble Sheep Amigurumi Pattern step 2 - assembly progress Bobble Sheep Amigurumi Pattern step 3 - details and accessories Bobble Sheep Amigurumi Pattern step 4 - final assembly and finishing

Switch Things Up

I love how versatile this bobble sheep pattern can be with just a few creative modifications! Instead of the classic white and gray color scheme, why not experiment with natural sheep colors like brown, black, or even mix colors to create a spotted or multi-toned fleece? You could make an entire flock of sheep in different colors for a truly unique collection.

For a fun twist, try adding a little bell around the sheep's neck using embroidery floss or thin ribbon, or create a small flower crown for the head to give your sheep a whimsical garden party look. I've even seen makers add tiny felt patches to create a patchwork sheep effect that's absolutely adorable.

If you want to challenge yourself further, consider making the sheep in different sizes by using various yarn weights - imagine a mama sheep with baby lambs in graduated sizes! You could also experiment with the bobble placement, creating patterns like stripes or spirals across the fleece for a more stylized artistic look.

Another idea I absolutely love is turning this sheep into a functional item - add a music box mechanism inside to create a musical plushie, or make a larger version to use as a decorative pillow. Some crafters have even created sheep mobiles for nurseries by making several smaller versions and hanging them together.

Don't be afraid to personalize the facial features either - try different eye placements for various expressions, add rosy cheeks with pink embroidery, or even create sleepy eyes for a bedtime buddy version. The possibilities are truly endless with this charming pattern!

Common Mistakes & How to Fix Them

โœ— Forgetting to push bobbles to the front of your work as you crochet each round, resulting in an uneven texture throughout the fleece โœ— Not stuffing the body and head firmly enough before shaping, which can cause the bobble texture to look flat and lose definition โœ— Placing safety eyes incorrectly or too close together, affecting the sheep's expression and overall appearance of the face โœ— Skipping the vertical stitch detail on the hooves, which creates the authentic split-hoof look that gives character to the legs

Bobble Sheep Amigurumi Pattern

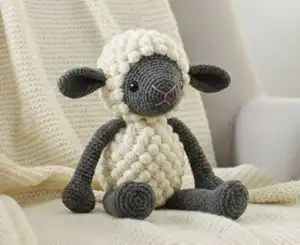
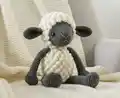
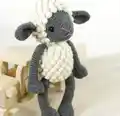
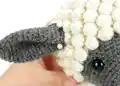
Create your own adorable bobble sheep with this charming amigurumi pattern featuring a textured fleece made with bobble stitches. This cuddly companion stands 30cm tall and combines soft white fleece with contrasting gray details for the perfect farmyard friend. The pattern includes detailed instructions for creating distinctive bobble texture throughout the body and head, making this sheep truly special and huggable.

Intermediate 8-10 Hours

Materials Needed for Bobble Sheep Amigurumi Pattern

โ€” Main Fabric

  • 01
    DK weight alpaca wool yarn, approximately 90g of white color for the fleece body and head
  • 02
    DK weight alpaca wool yarn, approximately 40g of gray color for the face, ears, arms, and legs
  • 03
    100m=50g (109yd=50g) / 8 ply / 11 wpi weight yarn recommended for accurate sizing

โ€” Tools Required

  • 01
    2.50mm to 3.00mm crochet hook (US size 1/B to 3/D) or hook size according to yarn weight
  • 02
    12mm (1/2 inch) safety eyes or alternative buttons, beads, or felt for eyes
  • 03
    Cotton embroidery floss in black color for nose details
  • 04
    Cotton embroidery floss in pink color for mouth details
  • 05
    Polyester fiberfill, wool, or wadding for stuffing the sheep firmly
  • 06
    Yarn needle for sewing pieces together and embroidering facial features
  • 07
    Sharp scissors for cutting yarn
  • 08
    Stitch marker or piece of contrasting yarn to mark rounds
  • 09
    Sewing pins for positioning pieces before final assembly

Progress Tracker

0% Complete

โ€” HEAD :

Info :

The fleece is crocheted in rounds, starting each round with a ch and joining each round with a sl st through the first stitch. Do not count them as stitches. Start each round in the first stitch, the same one you slip stitched into earlier. Use white yarn.

Round 1 :

mr, sc 10, sl st in 1st sc (10)

Round 2 :

ch, (sc, bo+sc) x 5, sl st in 1st sc (15)

Round 3 :

ch, (sc 2, inc) x 5, sl st in 1st sc (20)

Round 4 :

ch, (sc, bo+sc) x 10, sl st in 1st sc (30)

Round 5 :

ch, sc in each stitch, sl st in 1st sc (30)

Round 6 :

ch, (bo+sc, sc) x 15, sl st in 1st bo (45)

Round 7 :

ch, (sc 4, inc) x 9, sl st in 1st sc (54)

Round 8 :

ch, (sc 2, bo) x 18, sl st in 1st sc (54)

Round 9 :

ch, sc in each stitch, sl st in 1st sc (54)

Round 10 :

ch, sc, bo, (sc 2, bo) x 17, sc, sl st in 1st sc (54)

Round 11 :

ch, sc in each stitch, sl st in 1st sc (54)

Round 12 :

ch, (bo, sc 2) x 18, sl st in 1st bo (54)

Round 13 :

ch, sc in each stitch, sl st in 1st sc (54)

Round 14 :

ch, (sc 2, bo) x 18, sl st in 1st sc (54)

Round 15 :

ch, sc in each stitch, sl st in 1st sc (54)

Round 16 :

ch, sc, bo, (sc 2, bo) x 17, sc, sl st in 1st sc (54)

Round 17 :

ch, sc in each stitch, sl st in 1st sc (54)

Round 18 :

ch, (bo, sc 2) x 18, sl st in 1st bo (54)

Round 19 :

ch, (sc 4, sc2tog) x 9, sl st in 1st sc (45)

Round 20 :

ch, (sc 2, bo) x 15, sl st in 1st sc (45)

Info :

Fasten off white yarn. Attach gray yarn with slip stitch in first stitch and continue crocheting in spiral.

Round 21 :

sl st (counts as first stitch), sc 13, sc2tog, (sc 2, sc2tog) x 4, sc 13 (40)

Round 22 :

sc in each stitch (40)

Round 23 :

(sc 6, dec) x 5 (35)

Round 24-25 :

sc in each stitch (35)

Info :

Attach safety eyes between rounds 24 and 25, leaving 14 stitches (count 13 holes) between them

Round 26 :

sc 2, dec, (sc 5, dec) x 4, sc 3 (30)

Round 27 :

sc in each stitch (30)

Info :

Start stuffing the head. Keep adding a bit of fiberfill after every few rounds, stuffing the head firmly.

Round 28 :

(sc 4, dec) x 5 (25)

Round 29 :

sc in each stitch (25)

Round 30 :

sc, dec, (sc 3, dec) x 4, sc 2 (20)

Round 31 :

(dec, sc 8) x 2 (18)

Round 32 :

(sc, dec) x 6 (12)

Round 33 :

dec x 6 (6)

Info :

Finish stuffing. Cut the yarn, leaving a long yarn tail, fasten off and close the opening.

โ€” EARS (make 2) :

Info :

Use gray yarn

Round 1 :

mr, sc 6 (6)

Round 2 :

(inc, sc) x 3 (9)

Round 3 :

(sc 2, inc) x 3 (12)

Round 4 :

sc, inc, (sc 3, inc) x 2, sc 2 (15)

Round 5 :

(sc 4, inc) x 3 (18)

Round 6 :

sc 2, inc, (sc 5, inc) x 2, sc 3 (21)

Round 7-12 :

sc in each stitch (21)

Round 13 :

dec, sc 9, dec, sc 8 (19)

Round 14 :

sc in each stitch (19)

Round 15 :

sc 14, dec, sc 3 (18)

Round 16 :

dec, sc 6, dec, sc 8 (16)

Info :

Fold the ear in half and crochet over the top with single crochet stitches. Cut the yarn, leaving a long yarn tail for sewing, and fasten off.

โ€” BODY :

Info :

The fleece is crocheted in rounds, starting each round with a ch and joining each round with a sl st through the first stitch. Do not count them as stitches. Start each round in the first stitch, the same one you slip stitched into earlier. Use white yarn.

Round 1 :

mr, sc 10, sl st in 1st sc (10)

Round 2 :

ch, (sc, bo+sc) x 5, sl st in 1st sc (15)

Round 3 :

ch, (sc 2, inc) x 5, sl st in 1st sc (20)

Round 4 :

ch, (sc, bo+sc) x 10, sl st in 1st sc (30)

Round 5 :

ch, sc in each stitch, sl st in 1st sc (30)

Round 6 :

ch, (bo+sc, sc) x 15, sl st in 1st bo (45)

Round 7 :

ch, sc in each stitch, sl st in 1st sc (45)

Round 8 :

ch, (sc 2, bo) x 15, sl st in 1st sc (45)

Round 9 :

ch, sc in each stitch, sl st in 1st sc (45)

Round 10 :

ch, sc, bo, (sc 2, bo) x 14, sc, sl st in 1st sc (45)

Round 11 :

ch, sc in each stitch, sl st in 1st sc (45)

Round 12 :

ch, (bo, sc 2) x 15, sl st in 1st bo (45)

Round 13 :

ch, sc in each stitch, sl st in 1st sc (45)

Round 14 :

ch, (sc 2, bo) x 15, sl st in 1st sc (45)

Round 15 :

ch, sc in each stitch, sl st in 1st sc (45)

Round 16 :

ch, sc, bo, (sc 2, bo) x 14, sc, sl st in 1st sc (45)

Round 17 :

ch, sc in each stitch, sl st in 1st sc (45)

Round 18 :

ch, (bo, sc 2) x 15, sl st in 1st bo (45)

Round 19 :

ch, (sc 13, sc2tog) x 3, sl st in 1st sc (42)

Round 20 :

ch, (sc 2, bo) x 14, sl st in 1st sc (42)

Round 21 :

ch, sc 4, sc2tog, (sc 2, sc2tog) x 8, sc 4, sl st in 1st sc (33)

Round 22 :

ch, sc, bo, (sc 2, bo) x 10, sc, sl st in 1st sc (33)

Round 23 :

ch, (sc 3, sc2tog) x 6, sc 3, sl st in 1st sc (27)

Round 24 :

ch, (bo, sc 2) x 9, sl st in 1st bo (27)

Round 25 :

ch, sc in each stitch, sl st in 1st sc (27)

Info :

Cut the yarn, leaving a long yarn tail for sewing, and fasten off. Stuff the body firmly.

โ€” ARMS (make 2) :

Info :

Use gray yarn

Round 1 :

mr, sc 6 (6)

Round 2 :

inc x 6 (12)

Round 3 :

(sc, inc) x 6 (18)

Round 4 :

(inc, sc 2) x 6 (24)

Round 5 :

sc 8, dec, (sc, dec) x 2, sc 8 (21)

Round 6 :

sc in each stitch (21)

Round 7 :

sc 10, dec, sc 9 (20)

Round 8 :

sc 7, dec, sc 3, dec, sc 6 (18)

Round 9 :

(dec, sc 7) x 2 (16)

Round 10 :

sc 7, dec, sc 7 (15)

Info :

Stuff the hands firmly. Make a long vertical stitch along the front of the hoof, draw it very tight and knot the yarn ends together. Keep adding a bit of fiberfill after every few rounds, stuffing the arms lightly about 2/3 way up.

Round 11 :

sc 4, dec, sc 3, dec, sc 4 (13)

Round 12-14 :

sc in each stitch (13)

Round 15 :

sc 6, dec, sc 5 (12)

Round 16-18 :

sc in each stitch (12)

Round 19 :

sc 6, dec, sc 4 (11)

Round 20-28 :

sc in each stitch (11)

Round 29 :

sc 9, dec (10)

Info :

Sl st in next stitch. Cut the yarn, leaving a long yarn tail for sewing, and fasten off.

โ€” LEGS (make 2) :

Info :

Use gray yarn

Round 1 :

mr, sc 6 (6)

Round 2 :

inc x 6 (12)

Round 3 :

(sc, inc) x 6 (18)

Round 4 :

(inc, sc 2) x 6 (24)

Round 5 :

(sc 3, inc) x 6 (30)

Round 6 :

sc 10, dec, (sc 2, dec) x 2, sc 10 (27)

Round 7 :

sc 11, dec, sc, dec, sc 11 (25)

Round 8 :

(sc 7, dec) x 2, sc 7 (23)

Round 9 :

dec, sc 9, dec, sc 10 (21)

Round 10 :

sc 9, dec, sc 10 (20)

Round 11 :

(sc 5, dec) x 2, sc 6 (18)

Round 12 :

sc 8, dec, sc 8 (17)

Info :

Stuff the feet firmly. Make a long vertical stitch along the front of the hoof, draw it very tight and knot the yarn ends together. Keep adding a bit of fiberfill after every few rows, stuffing the legs lightly.

Round 13 :

sc 7, dec, sc 8 (16)

Round 14-15 :

sc in each stitch (16)

Round 16 :

sc 7, dec, sc 7 (15)

Round 17-19 :

sc in each stitch (15)

Round 20 :

sc 7, dec, sc 6 (14)

Round 21-31 :

sc in each stitch (14)

Round 32 :

(sc, dec) x 4, sc 2 (10)

Info :

Sl st in next stitch. Cut the yarn, leaving a long yarn tail for sewing, and fasten off. Finish stuffing.

Assembly Instructions

  • Sew the head to the body with whip stitch, placing it so the front edge of the body is just behind the last row of bobbles, adding more stuffing before closing the seam
  • Position the arms to the sides of the body just below the last round of bobbles, push the top of the arms flat and sew through both layers to secure
  • Place the legs over the third round of bobbles leaving 4-5 bobbles between them, then sew the legs to the body with the opening positioned over a bobble
  • Use sewing pins to attach the ears to the sides of the head just behind the second to last round of bobbles before sewing permanently
  • Embroider the nose by making a vertical stitch just above the last round and creating a Y-shape for the mouth using black embroidery floss
  • Use gray yarn to shape around each eye by threading through from the bottom of the head, going halfway around each eye and pulling tight to create definition
  • Weave in all remaining yarn tails securely by threading through the stuffing in different directions or knotting around stitch loops before hiding inside

Important Notes

  • ๐Ÿ’กWork in a continuous spiral without joining rounds or turning your work unless specifically instructed otherwise in the pattern
  • ๐Ÿ’กUse a stitch marker or piece of contrasting yarn to mark the beginning or end of each round throughout the pattern
  • ๐Ÿ’กPush each bobble stitch to the front of your work immediately after completing it to ensure consistent texture throughout the fleece
  • ๐Ÿ’กStuff the head and body firmly to maintain the bobble texture definition and prevent the fleece from looking flat
  • ๐Ÿ’กWhen working the head fleece in joined rounds, remember not to count the starting chain and slip stitch as actual stitches
  • ๐Ÿ’กPin all body parts in place before final sewing to ensure symmetrical placement and the best finished appearance
  • ๐Ÿ’กMake the vertical hoof stitches on arms and legs very tight to create the distinctive split-hoof appearance characteristic of sheep

This charming Bobble Sheep pattern was designed by Kristi Tullus to bring the texture and softness of real fleece to your amigurumi collection. The distinctive bobble stitch technique creates a wonderfully dimensional and fluffy appearance that makes this sheep truly special. With careful attention to details like the embroidered face and shaped hooves, you'll create a farmyard friend that's perfect for display or cuddling. The combination of white fleece and gray details gives this sheep an authentic look that will delight makers and recipients alike. ๐Ÿงถ Happy crocheting! ๐Ÿ‘โœจ

You ask,

we answer.

FAQs

What is a bobble stitch and how do I make it?

A bobble stitch is created by crocheting 5 double crochet stitches together in the same stitch. Yarn over, insert hook, pull up a loop, yarn over and draw through first two loops, then repeat this 4 more times in the same stitch until you have 6 loops on your hook. Yarn over and draw through all loops, then push the bobble to the front of your work with your finger.

Can I use a different yarn weight for this pattern?

Yes, you can use different yarn weights, but your finished sheep will be a different size. The pattern specifies DK weight yarn with a 2.50-3.00mm hook for a 30cm tall sheep. If you use thicker yarn with a larger hook, your sheep will be bigger; thinner yarn will make a smaller sheep. Always adjust your hook size to match your yarn weight.

Why do some rounds use joined rounds while others use spiral?

The white fleece sections (head and body) are worked in joined rounds with chain and slip stitch to create even bobble placement, while the gray sections (face, limbs, ears) are worked in continuous spiral for smoother shaping. This combination creates the best texture and appearance for each part of the sheep.

How do I keep track of my place when working the bobble pattern?

Use a stitch marker to mark the beginning of each round. The pattern alternates between bobble rounds and plain single crochet rounds, so keeping notes of which round you've completed helps. The joined rounds for the fleece also have natural markers since you slip stitch at the end of each round.

What's the best way to stuff the sheep to maintain the bobble texture?

Stuff the head and body very firmly to keep the bobbles prominent and prevent them from looking flat. Add small amounts of fiberfill gradually as you work rather than trying to stuff everything at the end. The arms and legs should be stuffed lightly in the upper portions and firmly in the hooves for realistic structure.

Can I use safety eyes alternatives for this pattern?

Yes, you can use buttons, beads, felt pieces, or embroider the eyes with yarn instead of safety eyes. If making this for young children, embroidered eyes are the safest option. Just make sure to place them between rounds 24 and 25 with 14 stitches (13 holes) between them for the correct expression.