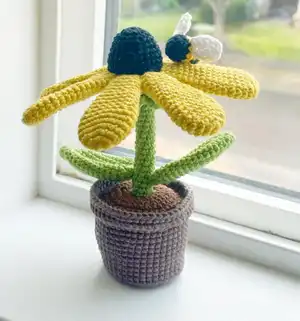
Create your own cheerful Black Eyed Susan flower complete with an adorable bumblebee companion! This delightful crochet pattern brings the beauty of summer blooms indoors with a vibrant yellow flower, realistic brown center, and a charming striped bee. Perfect for plant lovers who want a forever bloom that never needs watering, this project sits beautifully in its own crocheted pot with dirt detail. The finished piece measures approximately 12.5cm tall and makes a wonderful gift or home decoration that brightens any space year-round.
Progress Tracker
0% Complete
— Stem (Make 1) :
Round 2-30 :
8 Sc (8) (29 rounds)
Info :
Add stuffing to the stem for added support starting after round 10. Continue to add stuffing as you go.
Round 31 :
BLO (1 Sc, 1 INC) x 4 (12)
Round 33 :
(3 Sc, 1 INC) x 6 (30)
Info :
Cut yarn and fasten off invisibly.
Info :
Add the sepal to the stem. Holding the stem with the bottom facing up, insert the hook into last stitch of the remaining loops of round 31 and attach the yarn.
Sepal Instructions :
Ch 9, starting in the 2nd chain from the hook Sc 8. Slst into the next loop in the row. Repeat in the remaining 11 loops of round 31. Cut yarn and fasten off invisibly.
— Flower Center (Make 1) :
Round 4 :
(1 Sc, 1 INC) x 6 (18)
Round 6 :
(1 Sc, 1 INC, 1 Sc) x 6 (24)
Round 8 :
(3 Sc, 1 INC) x 6 (30)
Info :
Cut yarn and fasten off invisibly.
— Petal (Make 7) :
Round 3 :
(1 Sc, 1 INC) x 6 (18)
Round 4-7 :
18 Sc (18) (4 rounds)
Round 8 :
(2 Sc, 1 DEC, 2 Sc) x 3 (15)
Round 9-12 :
15 Sc (15) (4 rounds)
Round 13 :
(3 Sc, 1 DEC) x 3 (12)
Round 14-17 :
12 Sc (12) (4 rounds)
Round 18 :
(1 Sc, 1 DEC, 1 Sc) x 3 (9)
Info :
Cut yarn and fasten off. Leave a long tail for sewing.
— Leaf (Make 2) :
Round 3 :
(1 Sc, 1 INC, 1 Sc) x 2, 1 Sc (9)
Round 4 :
(1 Sc, 1 INC, 1 Sc) x 3 (12)
Round 5 :
(3 Sc, 1 INC) x 3 (15)
Round 6 :
(2 Sc, 1 INC, 2 Sc) x 3 (18)
Round 7-16 :
18 Sc (18) (10 rounds)
Round 17 :
(1 Sc, 1 DEC) x 6 (12)
Info :
Cut yarn and fasten off. Leave a long tail for sewing.
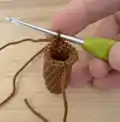
— Pot (Make 1) :
Round 3 :
(1 Sc, 1 INC) x 6 (18)
Round 4 :
(1 Sc, 1 INC, 1 Sc) x 6 (24)
Round 5 :
(3 Sc, 1 INC) x 6 (30)
Round 6 :
(2 Sc, 1 INC, 2 Sc) x 6 (36)
Round 7 :
(5 Sc, 1 INC) x 6 (42)
Round 9-11 :
42 Sc (42) (3 rounds)
Round 12 :
(13 Sc, 1 INC) x 3 (45)
Round 13-15 :
45 Sc (45) (3 rounds)
Round 16 :
(7 Sc, 1 INC, 7 Sc) x 3 (48)
Round 17-19 :
48 Sc (48) (3 rounds)
Round 20 :
FLO (7 Dc, 1 DcINC) x 6 (54)
Info :
Cut yarn and fasten off invisibly.
— Dirt (Make 1) :
Info :
The dirt for the pot is created in two parts: the hole in which the flower will be inserted and the top of the dirt. Begin with the dirt hole.
Round 3-14 :
12 Sc (12) (12 rounds)
Info :
Cut yarn and fasten off invisibly. Begin to crochet the dirt top by holding the hole with the opening facing up. Reattach the yarn and continue crocheting the dirt top. The wrong side of the stitches should be on the bottom of the dirt when finished.
Round 15 :
(1 Sc, 1 INC) x 6 (18)
Round 16 :
(1 Sc, 1 INC, 1 Sc) x 6 (24)
Round 17 :
(3 Sc, 1 INC) x 6 (30)
Round 18 :
(2 Sc, 1 INC, 2 Sc) x 6 (36)
Round 19 :
(5 Sc, 1 INC) x 6 (42)
Round 20 :
(3 Sc, 1 INC, 3 Sc) x 6 (48)
Info :
Cut yarn and fasten off. Leave a long tail for sewing.
— Bumblebee Body (Make 1) :
Info :
Switch to yellow yarn.
Round 4-5 :
12 Sc (12) (2 rounds)
Info :
Switch to black yarn.
Round 6-7 :
12 Sc (12) (2 rounds)
Info :
Switch to yellow yarn.
Info :
Cut yarn and use the yarn end to close the remaining stitches.
— Bumblebee Wing (Make 2) :
Instructions :
Ch 4, starting in the 2nd chain from the hook: 1 Sc, 1 HDc, 5 Dc in the same stitch, 1 HDc, 1 Sc (9)
Info :
Cut yarn and fasten off. Leave a long tail for sewing.
This cheerful Black Eyed Susan pattern brings the joy of summer wildflowers into your home all year long! The design combines beautiful realistic details with beginner-friendly techniques, creating a stunning display piece complete with its own adorable bumblebee friend. Whether you're making it for yourself or as a thoughtful gift, this pattern offers a rewarding project that results in a forever bloom requiring zero maintenance. The modular construction means you can work on different pieces at your own pace and enjoy watching your flower garden come to life stitch by stitch. 🌻🐝