🧶 Beautiful ✨ Detailed 💝 Adorable

Big Turtle Mama Amigurumi Pattern

Big Turtle Mama Amigurumi Pattern
4.9★ Rating
12-15 Hours Time Needed
2.1K Made This
✂️

Advanced Level

Designed for experienced knitters, these patterns involve intricate designs and complex techniques to challenge and inspire.

⏱️

Slow & Steady

A 10-12 hour project—great for savoring the process over several sessions.

🧸

Cute Companion

An adorable friend to cherish, handcrafted with love to bring comfort and joy for years to come.

About This Big Turtle Mama Amigurumi Pattern

Big Turtle Mama Amigurumi Pattern crochet pattern - detailed view of completed project

The construction requires careful assembly of multiple shell pieces, precise shaping for the head with facial features, and detailed finishing work including embroidered mouth details and strategic stuffing to maintain proper shape while keeping the interior hollow enough for the egg insert.

Why You'll Love This Big Turtle Mama Amigurumi Pattern

I absolutely adore this pattern because it's unlike any amigurumi I've ever created! The engineering behind the hollow shell that actually holds a secret baby turtle egg is pure genius and brings such joy when you reveal the surprise to someone. I love how the multiple carapace pieces come together like a puzzle, creating that beautiful textured shell effect that looks incredibly professional. The attention to detail with the movable eyelids and the contrasting colors makes this turtle come alive with personality. Every stitch feels purposeful, and watching this mama turtle take shape piece by piece is incredibly rewarding—it's the kind of project that showcases your skills and becomes a cherished heirloom.

Big Turtle Mama Amigurumi Pattern step 1 - construction progress Big Turtle Mama Amigurumi Pattern step 2 - assembly progress Big Turtle Mama Amigurumi Pattern step 3 - details and accessories Big Turtle Mama Amigurumi Pattern step 4 - final assembly and finishing

Switch Things Up

I love experimenting with color variations for this mama turtle pattern! Instead of the traditional green, try working her shell in ocean blues and teals with cream accents for a sea turtle look, or use warm browns and oranges for a tortoise vibe. You could make the baby turtle in a completely different color scheme to create a fun contrast when revealed.

For a more whimsical approach, consider using variegated yarn for the shell pieces to create a rainbow effect, or add small embroidered flowers to the brown shell segments for a garden turtle aesthetic. I've even seen crafters add small beads or sequins to the shell for extra sparkle that catches the light beautifully.

If you want to personalize it further, try embroidering a name on the underside of the shell or adding a small crocheted accessory like a tiny bow or flower crown. You could also modify the interior to hold other small treasures beyond just the baby turtle—think tiny crocheted eggs, a small ring box, or even a secret message scroll.

For gifting purposes, I sometimes create themed versions by changing the eye color and adding specific details. A holiday version with red and green colors or a birthday version with festive colored spots on the shell makes it extra special. The possibilities are truly endless with this versatile pattern base!

Common Mistakes & How to Fix Them

✗ Sewing carapace pieces in wrong order or misaligning them—always use temporary stitching first and markers to ensure proper placement before permanent attachment ✗ Overstuffing the body which prevents the egg from fitting inside—test fit the egg regularly and maintain light, even stuffing throughout construction ✗ Missing the BLO and FLO instructions for shell texture—carefully track which loops to work into as this creates the dimensional shell pattern ✗ Rushing the eye constriction steps which creates uneven or poorly shaped facial features—take time with threading and pulling evenly for symmetrical results

Big Turtle Mama Amigurumi Pattern

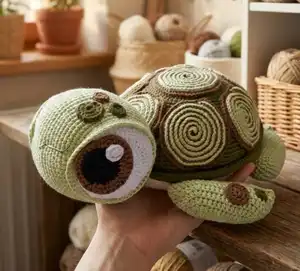
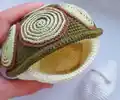
Create an enchanting mama turtle with her adorable baby tucked safely inside! This charming design features a detailed multi-layered shell with intricate carapace construction, sweet light green body parts, and expressive eyes complete with movable eyelids. The pattern includes a removable egg that opens to reveal a tiny turtle baby, making this a truly magical project. Perfect for advanced crocheters who love detailed amigurumi with surprising interactive elements that delight both makers and gift recipients.

Advanced 12-15 Hours

Materials Needed for Big Turtle Mama Amigurumi Pattern

— Main Fabric

  • 01
    YarnArt Jeans yarn (50g/150m, 55% cotton/45% polyacrylic) in dark green (color 82)
  • 02
    YarnArt Jeans yarn in light yellow (color 67)
  • 03
    YarnArt Jeans yarn in brown (color 40)
  • 04
    YarnArt Jeans yarn in light green (color 11)
  • 05
    YarnArt Jeans yarn in white (color 01)
  • 06
    YarnArt Jeans yarn in black (color 53)

— Tools Required

  • 01
    Crochet hook size 2.25mm (Crochet Soft Touch or equivalent)
  • 02
    Crochet hook size 1.5mm (Gamma or equivalent)
  • 03
    Scissors
  • 04
    Stitch markers
  • 05
    Beads for eyes
  • 06
    Polyester fiberfill stuffing (Syntepuh)
  • 07
    Tapestry needle for sewing
  • 08
    Black embroidery thread for mouth details
  • 09
    Pins for assembly

Progress Tracker

0% Complete

— Carapace (1) (Dark Green) :

Round 1 :

8 sc in mr (8)

Round 2 :

8 inc (16)

Round 3 :

(1 sc, inc)*8 (24)

Round 4 :

1 sc, inc, (2 sc, inc)*7, 1 sc (32)

Round 5 :

(3 sc, inc)*8 (40)

Round 6 :

2 sc, inc, (4 sc, inc)*7, 2 sc (48)

Round 7 :

(5 sc, inc)*8 (56)

Round 8-9 :

56 sc (56)

Round 10 :

3 sc, inc, (6 sc, inc)*7, 3 sc (64)

Round 11 :

(7 sc, inc)*8 (72)

Round 12 :

4 sc, inc, (8 sc, inc)*7, 4 sc (80)

Round 13-14 :

80 sc (80)

Round 15 :

(9 sc, inc)*8 (88)

Round 16 :

5 sc, inc, (10 sc, inc)*7, 5 sc (96)

Round 17 :

(11 sc, inc)*8 (104)

Round 18-19 :

104 sc (104)

Round 20 :

6 sc, inc, (12 sc, inc)*7, 6 sc (112)

Round 21 :

(13 sc, inc)*8 (120)

Round 22 :

7 sc, inc, (14 sc, inc)*7, 7 sc (128)

Round 23-27 :

128 sc (128)

Round 28 :

BLO: 128 sc (128)

Round 29 :

FLO: 128 sc (128)

Round 30 :

(15 sc, inc)*8 (136)

Round 31 :

136 sc (136)

Round 32 :

(15 sc, dec)*8 (128)

Round 33 :

128 sc (128)

Info :

Fasten off and cut the thread, leave a yarn tail

— Carapace (2) (Light Yellow) :

Round 1 :

8 sc in mr (8)

Round 2 :

BLO: 8 inc (16)

Round 3 :

BLO: (1 sc, inc)*8 (24)

Round 4 :

BLO: 1 sc, inc, (2 sc, inc)*7, 1 sc (32)

Round 5 :

BLO: (3 sc, inc)*8 (40)

Round 6 :

BLO: 2 sc, inc, (4 sc, inc)*7, 2 sc (48)

Round 7 :

BLO: (5 sc, inc)*8 (56)

Round 8 :

BLO: 56 sc (56)

Round 9 :

BLO: 3 sc, inc, (6 sc, inc)*7, 3 sc (64)

Round 10 :

BLO: (7 sc, inc)*8 (72)

Round 11 :

BLO: 4 sc, inc, (8 sc, inc)*7, 4 sc (80)

Round 12 :

BLO: 80 sc (80)

Round 13 :

BLO: (9 sc, inc)*8 (88)

Round 14 :

BLO: 5 sc, inc, (10 sc, inc)*7, 5 sc (96)

Round 15 :

BLO: (11 sc, inc)*8 (104)

Round 16 :

BLO: 104 sc (104)

Round 17 :

BLO: 6 sc, inc, (12 sc, inc)*7, 6 sc (112)

Round 18 :

BLO: (13 sc, inc)*8 (120)

Round 19 :

BLO: 7 sc, inc, (14 sc, inc)*7, 7 sc (128)

Round 20 :

BLO: 128 sc (128)

— Carapace (3) (Light Yellow) :

Round 1 :

8 sc in mr (8)

Round 2 :

8 hdc inc (16)

Round 3 :

(1 hdc, hdc inc)*8 (24)

Round 4 :

1 hdc, hdc inc, (2 hdc, hdc inc)*7, 1 hdc (32)

Round 5 :

(3 hdc, hdc inc)*8 (40)

Round 6 :

2 hdc, hdc inc, (4 hdc, hdc inc)*7, 2 hdc (48)

Round 7 :

48 hdc (48)

Round 8 :

(5 hdc, hdc inc)*8 (56)

Round 9-21 :

56 hdc (56)

Round 22 :

56 sc (56)

— Carapace (4) (Brown - Make 7 pieces) :

Round 1 :

8 sc in mr (8)

Round 2 :

BLO: 8 inc (16)

Round 3 :

BLO: (1 sc, inc)*8 (24)

Round 4 :

BLO: (2 sc, inc)*8 (32)

Round 5 :

BLO: (3 sc, inc)*8 (40)

Round 6 :

BLO: (4 sc, inc)*8 (48)

Round 7 :

BLO: (5 sc, inc)*8 (56)

Info :

Change color to light green and work slip stitch FLO from rows 6-1

— Tail (Light Green) :

Round 1 :

6 sc in mr (6)

Round 2 :

6 inc (12)

Round 3-6 :

12 sc (12)

Info :

Fold the piece in halves and work sc. Sew the tail to the carapace

— Head (Light Green) :

Round 1 :

8 sc in mr (8)

Round 2 :

8 inc (16)

Round 3 :

(1 sc, inc)*8 (24)

Round 4 :

1 sc, inc, (2 sc, inc)*7, 1 sc (32)

Round 5 :

(3 sc, inc)*8 (40)

Round 6 :

40 sc (40)

Round 7 :

2 sc, inc, (4 sc, inc)*7, 2 sc (48)

Round 8 :

48 sc (48)

Round 9 :

BLO: 48 sc (48)

Round 10-11 :

48 sc (48)

Round 12 :

(5 sc, inc)*8 (56)

Round 13-14 :

56 sc (56)

Round 15 :

3 sc, inc, (6 sc, inc)*7, 3 sc (64)

Round 16-19 :

64 sc (64)

Round 20 :

(6 sc, dec)*8 (56)

Round 21-22 :

56 sc (56)

Round 23 :

(5 sc, dec)*8 (48)

Round 24 :

BLO: 48 sc (48)

Round 25-26 :

48 sc (48)

Round 27 :

(4 sc, dec)*8 (40)

Round 28 :

40 sc (40)

Round 29 :

(3 sc, dec)*8 (32)

Round 30 :

(2 sc, dec)*8 (24)

Round 31 :

(1 sc, dec)*8 (16)

Round 32 :

8 dec (8)

Info :

Fasten off leaving a tail about 15 cm long. Using tapestry needle, weave the yarn tail through the front loop of each stitch and pull tight to close

— Eyes (Detail 1) (White - Make 2 pieces) :

Round 1 :

8 sc in mr (8)

Round 2 :

8 inc (16)

Round 3 :

(1 sc, inc)*8 (24)

Round 4 :

1 sc, inc, (2 sc, inc)*7, 1 sc (32)

Round 5 :

(3 sc, inc)*8 (40)

Round 6 :

40 sc (40)

Round 7 :

2 sc, inc, (4 sc, inc)*7, 2 sc (48)

Round 8 :

48 sc (48)

Info :

Fasten off, weave in ends

— Eyes (Detail 2) (Black & Brown - Make 2 pieces) :

Round 1 :

Black: 8 sc in mr (8)

Round 2 :

8 inc (16)

Round 3 :

(1 sc, inc)*8 (24)

Info :

Fasten off black, join brown

Round 3 :

BLO: 12 sc, (1 hdc, hdc inc)*6 (30)

Round 4 :

12 sc, 18 hdc (30)

Info :

Fasten off. Sew detail 2 to detail 1

— Eyelids :

Info :

Return to the 9th row and work FLO with light green thread. Work 3 rows of 48 sc. Work the 2nd eyelid in the same way, beginning from the 46th row

— Head Assembly :

Infos :

Sew eyes to head. Make contraction by inserting thread in point A and pulling through point C. Leave long tail at point A. Skip 1 sc, insert needle in point B and pull through eyelid at point D. Insert needle in point E and pull out point F. Insert needle through the opposite eyelid and pull thread out point G. Tighten thread and make strong knot for constriction. Hide tail threads. Embroider mouth with thin black thread. Sew small piece of eyelid to head. Sew the head to the carapace in upper and lower parts

— Feet (Make 2 pieces - Light Green) :

Round 1 :

14 ch (14)

Round 2 :

Hdc in the second ch from hook, 11 hdc, 3 hdc in next st, 12 hdc on the other side of the chain, 3 hdc in next st (30)

Round 3 :

12 hdc, 3 hdc inc, 12 hdc on the other side, 3 hdc inc (36)

Round 4 :

12 hdc, (1 hdc, hdc inc)*3, 12 hdc on the other side, (1 hdc, hdc inc)*3 (42)

Round 5 :

12 hdc, (2 hdc, hdc inc)*3, 12 hdc on the other side, (2 hdc, hdc inc)*3 (48)

Round 6-8 :

48 hdc (48)

Info :

Fold the piece in halves and work sc. Fill this part with fiber. Sew feet to carapace

— Eye Spots & Details (Multiple Pieces) :

Brown Large :

8 sc in mr, inc round to 16 sc. Fasten off

Dark Green Big :

8 sc in mr, inc round to 16 sc. Fasten off

Dark Green Small (Make 2) :

8 sc in mr. Fasten off

Brown Small :

8 sc in mr. Fasten off

White Glare (Make 2) :

8 sc in mr. Fasten off

Info :

Sew flecks to the head and paw. Sew glare of the eye to the eyes

Assembly Instructions

  • Sew the 33rd row of carapace piece 1 to the 28th row to create the shell base structure
  • Attach all seven brown carapace pieces (4) to the main carapace piece (1), beginning from the top and using temporary seams first to ensure proper spacing
  • Fold carapace piece 3 in half, place marker at folded edge, then attach line AB of piece 3 to piece 2 with careful stitching
  • Sew carapace piece 1 to piece 2, leaving a small opening for stuffing—fill lightly to allow space for the egg insert with baby turtle
  • Attach the tail to the back of the carapace shell at the appropriate position shown in photos
  • Sew completed head to the carapace shell at both upper and lower attachment points for secure positioning
  • Attach both feet to the sides of the carapace, ensuring they are symmetrically placed and firmly sewn

Important Notes

  • 💡This pattern requires advanced crochet skills and is not suitable for beginners due to complex shell construction
  • 💡Pay careful attention to BLO and FLO instructions throughout as they create essential texture and structure
  • 💡Use temporary seams when attaching the seven brown shell pieces to ensure proper spacing before permanent attachment
  • 💡Do not overstuff the carapace body—it must remain somewhat hollow to accommodate the egg with baby turtle inside
  • 💡Test fit the egg regularly during assembly to ensure proper sizing and adjust stuffing density accordingly
  • 💡The eye constriction technique requires patience and precision—take your time threading to achieve symmetrical facial features
  • 💡Keep all yarn tails long during assembly for easier sewing and weaving in ends after completion

This magnificent Big Turtle Mama pattern is truly a labor of love that creates an heirloom-quality interactive toy! The multi-layered shell construction showcases advanced amigurumi techniques, while the hidden egg compartment adds magical surprise and delight. With detailed facial features including movable eyelids, decorative shell segments, and that precious baby turtle tucked safely inside, this pattern offers both an impressive challenge for experienced crocheters and a stunning finished piece that will be treasured for generations. The engineering behind the hollow construction is brilliant, making this more than just a stuffed animal—it's a functional keepsake box with personality! 🐢💚🥚

You ask,

we answer.

FAQs

How do I ensure the egg with baby turtle fits properly inside the mama turtle?

Test fit the egg regularly during construction and keep the stuffing light and even throughout the carapace body. The pattern specifically instructs to leave the interior somewhat hollow, so resist the urge to overstuff. It's better to place the egg inside piece 3 before final assembly to determine the correct fiber density.

What's the best way to attach all seven brown carapace pieces without misalignment?

Always use temporary stitching first with contrasting thread or pins. Begin from the top piece and work your way around, spacing evenly. The pattern notes that if you can't fit all seven pieces with proper spacing, it's better to sew one less piece than to force them and create puckering.

How do I create the movable eyelids that are mentioned in the pattern?

The eyelids are created by returning to row 9 of the head and working in the front loops only with light green yarn for 3 rows. The second eyelid starts from row 46. The constriction technique with threading through specific points creates the dimensional eye socket that allows the lids to have realistic movement.

Can I make this pattern without the hollow interior feature?

Yes, you can fully stuff the mama turtle for a traditional amigurumi if you prefer, but you'll lose the interactive element of the hidden baby turtle egg. Simply stuff normally during assembly and skip the egg insert component. The mama turtle will still be beautiful with her detailed shell and expressive face.

What yarn weight works best for this pattern?

The pattern specifically calls for YarnArt Jeans, which is a fine weight 2 yarn (sport weight). Using this exact weight is important for achieving the correct sizing and ensuring the egg compartment functions properly. Substituting with different weight yarn will significantly change the final dimensions.