๐Ÿงถ Beautiful โœจ Detailed ๐Ÿ’ Adorable

Baby Rabbit Amigurumi Pattern

Baby Rabbit Amigurumi Pattern
4.6โ˜… Rating
4-5 Hours Time Needed
2.7K Made This
โœ‚๏ธ

Intermediate Level

Ideal for those with basic knitting experience, featuring slightly more advanced stitches and techniques to expand your skills.

โฑ๏ธ

Weekend Treat

Takes 5-7 hours, making it an enjoyable project to finish over a couple of days.

๐Ÿฐ

Whimsical Buddy

Playful characters full of personality, designed to spark imagination and become cherished playtime favorites.

About This Baby Rabbit Amigurumi Pattern

This sweet bunny pattern brings together classic amigurumi techniques with charming details that make it truly special. The pattern works from the head down through the body in one continuous piece, which creates a seamless finish and reduces assembly work. With floppy two-toned ears, delicate embroidered features, and a pompom tail, this rabbit has personality and warmth that shines through every stitch.

Baby Rabbit Amigurumi Pattern crochet pattern - detailed view of completed project

The dual-color design adds visual interest while keeping the construction straightforward. Each component is carefully designed to create balanced proportions and a stable sitting position.

Why You'll Love This Baby Rabbit Amigurumi Pattern

I absolutely love this pattern because it combines simplicity with adorable results. The way the head and body work as one piece means less sewing at the end, which I always appreciate. The two-color ears give such a professional touch, and watching that little bunny personality emerge as you add the embroidered nose and attach those floppy ears is genuinely magical. It's one of those projects where you can see it coming to life with each round, and the finished bunny has such a sweet, huggable quality that makes all the effort worthwhile.

Baby Rabbit Amigurumi Pattern step 1 - construction progress Baby Rabbit Amigurumi Pattern step 2 - assembly progress Baby Rabbit Amigurumi Pattern step 3 - details and accessories Baby Rabbit Amigurumi Pattern step 4 - final assembly and finishing

Switch Things Up

I love experimenting with this bunny pattern because it's so versatile! Sometimes I make the entire rabbit in one solid color for a minimalist look, or I'll use variegated yarn to create a magical ombre effect from head to toe. I've even tried making seasonal versions - a white winter bunny with a blue scarf, or a pastel Easter version with tiny embroidered flowers on the ears.

One of my favorite modifications is adjusting the ear size by adding or removing rounds to create different bunny personalities. Longer ears make it look more like a lop-eared bunny, while shorter ears give it a baby cottontail vibe. I've also experimented with different eye placements - positioning them slightly lower and farther apart creates an innocent baby look, while higher placement makes the bunny appear more alert and mature.

For special gifts, I sometimes add tiny accessories like a ribbon bow around the neck, a crocheted flower crown, or even a miniature carrot made from orange and green yarn. The possibilities are truly endless, and each variation gives the bunny its own unique character and charm!

Common Mistakes & How to Fix Them

โœ— Not maintaining tight tension throughout can cause stuffing to show through gaps between stitches especially around the head area โœ— Placing safety eyes incorrectly or too far apart can drastically change the bunny's expression and overall appearance โœ— Overstuffing the neck area between head and body creates an awkward bulge instead of smooth transition โœ— Forgetting to leave the top portions of arms and legs unstuffed makes sewing them flat impossible โœ— Not properly closing the final hole at the bottom can leave visible stuffing and create unstable sitting position

Baby Rabbit Amigurumi Pattern

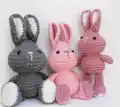
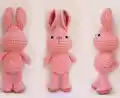
Create your own adorable handmade bunny with this delightful crochet pattern! This charming rabbit stands approximately 24cm tall and features sweet details like floppy ears, a fluffy tail, and an embroidered nose. Perfect for gifting or adding to your amigurumi collection, this pattern guides you through creating a cuddly companion that's sure to bring smiles. Using simple stitches worked in continuous rounds, you'll craft each piece separately before assembling your precious bunny friend.

Intermediate 4-5 Hours

Materials Needed for Baby Rabbit Amigurumi Pattern

โ€” Main Fabric

  • 01
    Bonbon classic 100% Acrylic yarn (100g, 200m) in Light Pink color (Renk no: 98221)
  • 02
    Bonbon classic 100% Acrylic yarn (100g, 200m) in Dark Pink color (Renk no: 98224)

โ€” Tools Required

  • 01
    3.0mm crochet hook
  • 02
    2 black 8mm safety eyes
  • 03
    Soft stuffing (poly fill or cotton wool)
  • 04
    Purple embroidery thread
  • 05
    Yarn needle
  • 06
    Scissors
  • 07
    Stitch marker

Progress Tracker

0% Complete

โ€” Head and Body :

Info :

Start from the top of the head and finish at the bottom of the body using light pink yarn

R1 :

magic circle with 6st (6)

R2 :

2sc in each st (12st)

R3 :

1sc then 2sc in next st rep 6 times (18st)

R4-5-6 :

1sc in each st for 3 rows (18st)

R7 :

1sc in next 2st then 2sc in next st rep 6 times (24st)

R8 :

1sc in next 3st then 2sc in next st rep 6 times (30st)

R9 :

1sc in next 4st then 2sc in next st rep 6 times (36st)

R10 :

1sc in next 5st then 2sc in next st rep 6 times (42st)

R11-12 :

1sc in each st for 2 rows (42st)

Info :

Attach safety toy eyes round 8 leaving 8 stitches (count 7 holes) between them

R13 :

1sc in next 5st then sc2tog rep 6 times (36st)

R14 :

1sc in next 4st then sc2tog rep 6 times (30st)

R15 :

1sc in next 3st then sc2tog rep 6 times (24st)

R16 :

1sc in next 2st then sc2tog rep 6 times (18st)

R17 :

1sc in each st for 1 row (18st)

R18 :

1sc in next 4st then sc2tog rep 3 times (15st)

R19 :

1sc in next 2st then 2sc in next st rep 5 times (20st)

R20 :

1sc in next 4st then 2sc in next st rep 4 times (24st)

Info :

Stuff firmly and shape the head

R21 :

1sc in next 3st then 2sc in next st rep 6 times (30st)

R22-28 :

1sc in each st for 7 rows (30st)

R29 :

1sc in next 3st then sc2tog rep 6 times (24st)

R30 :

1sc in next 2st then sc2tog rep 6 times (18st)

Info :

Stuff firmly and shape the body, add more fiberfill into the neck area if needed

R31 :

1sc in next st then sc2tog rep 6 times (12st)

R32 :

1sc in next st then sc2tog rep 4 times (8st)

Info :

Before closing the hole, add more fiberfill if needed and make sure the bottom is flat so bunny can sit

R33 :

sc2tog one time fasten off and use yarn tail to weave in and out of remaining stitches, pull tight until hole is closed

โ€” Legs (Make 2) :

Info :

Start with dark pink yarn, foot is an oval shape starting with a chain

R1 :

Ch 6 then 2sc into second chain from hook, 1sc next 3st then 4sc in last chain, turn and work on other side, 1sc in next 3st then 2sc into last chain (14st)

R2 :

1sc in next st then 2sc next st rep 7 times (21st)

R3 :

1sc in each BL (Back loop only) st for 1 row (21st)

Info :

Switch color with light pink yarn

R4 :

1sc in each st for 1 row (21st)

R5 :

1sc in next 7st then sc2tog 4 times 1sc in next 6st (17st)

R6 :

1sc in next 6st then sc2tog 3 times 1sc in next 5st (14st)

R7 :

sc2tog then 1sc in next 10st then sc2tog (12st)

Info :

Stuff and shape the foot, leave the top of the leg free of stuffing

R8 :

sc2tog then 1sc in next 8st then sc2tog (10st)

R9-10-11 :

1sc in each st for 3 rows (10st)

R12 :

sc2tog then 1sc in next 6st then sc2tog (8st)

R13 :

1sc in each st for 1 row (8st)

R14 :

Press the top of the leg together and 1sc through both sides of the leg across the top for one row, fasten off leaving long tail for sewing

โ€” Arms (Make 2) :

Info :

Use light pink yarn

R1 :

magic circle with 6st (6)

R2 :

2sc in each st (12st)

R3 :

1sc in each st (12st)

R4 :

1sc then sc2tog rep 4 times (8st)

R5-6-7-8 :

1sc in each st for 4 rows (8st)

Info :

Stuff lightly the hand and leave the top of the arm free of stuffing, sl st in next st fasten off leaving long tail for sewing

โ€” Ears (Make 2 dark pink and 2 light pink) :

R1 :

magic circle with 6st (6)

R2 :

2sc in each st (12)

R3 :

1sc then 2sc in next st rep 6 times (18st)

R4 :

1sc in next 2st then 2sc in next st rep 6 times (24st)

R5 :

1sc in next 3st then 2sc in next st rep 6 times (30st)

Info :

Fasten off and weave in the ends on wrong side. Face 2 pieces to one another with wrong side. SC together one stitch of both pieces at a time all the way around. sl st in next st fasten off leaving long tail for sewing

Finishing :

Fold ear in half, sew 4 stitches together, then sew back to bottom edge

โ€” Tail :

Info :

Use light pink yarn

R1 :

magic circle with 6st (6)

R2 :

2sc in each st (12st)

R3 :

1sc in next st then sc2tog rep 4 times (8st)

Info :

Stuff lightly the tail, sl st in next st fasten off leaving long tail for sewing

Assembly Instructions

  • Embroider the nose using purple embroidery thread in the center of row 8, creating vertical stitches along 3 stitches and filling horizontally
  • Sew the legs above row 31, positioning them slightly toward the front of the body so the bunny can sit properly
  • Attach the arms just beneath row 19 on either side of the body using the flat piece to closed piece technique
  • Position the ears just beneath row 5 on top of the head, pin in place before sewing to ensure even placement
  • Attach the tail at the bottom center back of the body using the open piece to closed piece sewing method
  • Ensure all yarn tails are knotted securely and hidden inside the body or head after assembly
  • Check that the bunny sits flat and balanced before finalizing all attachments

Important Notes

  • ๐Ÿ’กWork in continuous spiral without joining rounds unless specifically instructed to close with slip stitch
  • ๐Ÿ’กCrochet tightly to prevent gaps between stitches that would allow stuffing to show through the fabric
  • ๐Ÿ’กUse a stitch marker or piece of yarn to mark the beginning or end of rounds, moving it after each round
  • ๐Ÿ’กFor children under age 3, use embroidered eyes instead of safety eyes and avoid buttons or small parts
  • ๐Ÿ’กThe pattern can be adjusted to different sizes by using bulkier or finer yarn with appropriate hook size adjustments
  • ๐Ÿ’กLeave the top portions of arms and legs unstuffed to allow them to be pressed flat for easier sewing
  • ๐Ÿ’กMake sure the bottom of the body is flat when closing so the bunny can sit upright without tipping

This precious Baby Rabbit pattern combines classic amigurumi construction with thoughtful details that create an irresistibly cuddly companion. The one-piece head and body design streamlines your crafting while the two-toned ears and embroidered features add charming personality. Whether you're making a gift for someone special or adding to your own collection, this sweet bunny brings joy to every stitch. The finished result is a perfectly proportioned, stable-sitting friend that's destined to be treasured for years to come. ๐Ÿฐ๐Ÿ’•

You ask,

we answer.

FAQs

What size will my finished bunny be?

Using 3.0mm hook and the recommended yarn, your bunny will be approximately 24cm (9.4 inches) tall and 9.5cm (3.7 inches) wide. You can adjust the size by using thicker or thinner yarn with an appropriately sized hook.

Can I use different colors for my rabbit?

Absolutely! While the pattern uses light and dark pink, you can choose any color combination you like. Consider natural bunny colors like white, gray, or brown, or get creative with rainbow or pastel shades.

How do I prevent the stuffing from showing through?

The key is to crochet tightly throughout the entire project. Using a hook one size smaller than recommended on your yarn label helps create a tighter fabric. Also ensure your tension remains consistent as you work.

Is this pattern suitable for beginners?

This pattern is best suited for crocheters with some experience. You should be comfortable with magic ring, single crochet, increases, decreases, and working in continuous rounds. The assembly and embroidery require intermediate skills.

How do I attach the two-colored ears properly?

Crochet one piece in each color, place them wrong sides together, then single crochet through both pieces simultaneously around the edge. After joining, fold the ear in half and sew 4 stitches together before attaching to the head.

What's the best way to position the safety eyes?

Place the eyes on round 8 with 8 stitches (7 holes) between them. Pin them in place first to check the expression before securing permanently, as they cannot be repositioned once attached.