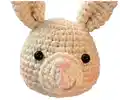
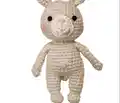
Bring the sweetest little bunny to life with this enchanting autumn-themed amigurumi pattern! Anna Bunny stands at 12cm tall with her adorable long ears, soft cream muzzle, and charming embroidered features. This delightful pattern includes Anna's complete wardrobe featuring two beautiful dresses with intricate collar details, a cozy burgundy raincoat with ear holes in the hood, and lovely finishing touches like embroidered hearts and floral designs. Perfect for bunny lovers and crafters who enjoy creating dressed-up amigurumi with personality and charm.
Progress Tracker
0% Complete
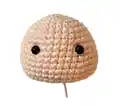
— Head :
Round 1 :
sc 6 into the ring (6)
Round 3 :
(sc 1, inc) x6 (18)
Round 4 :
(sc 2, inc) x6 (24)
Round 5 :
(sc 3, inc) x6 (30)
Round 6-7 :
sc around (30)
Round 8 :
(sc 4, inc) x6 (36)
Round 9-11 :
sc around (36)
Round 12 :
(sc 17, inc) x2 (38)
Round 13-15 :
sc around (38)
Round 16 :
(sc 2, dec) x4, (sc 3, dec) x4, sc 2 (30)
Info :
Insert 5mm safety eyes between rounds 9 and 10, 7 stitches apart. Stuff the head firmly.
Round 17 :
(sc 1, dec) x10 (20)
Info :
Finish stuffing. Fasten off leaving a long tail. With yarn needle, make a whip stitch in front loops of last 10 stitches and tighten to close hole. Weave in end.
— Muzzle :
Round 1 :
sc 6 into the ring (6)
Round 3 :
(sc 1, inc) x6 (18)
Info :
Fasten off leaving tail for sewing. Using color 011 pink, embroider nose between rounds 2 and 3, 2 stitches wide, then a line descending under the starting magic ring. Using color 010 smokey rose, embroider a smiling mouth between rounds 2 and 3. Sew muzzle on head between rounds 9 and 15, centered between eyes. Put blusher on cheeks.
— Ears (make 2) :
Round 1 :
sc 6 into the ring (6)
Round 2 :
(sc 1, inc) x3 (9)
Round 4 :
(sc 2, inc) x3 (12)
Round 5 :
(sc 3, inc) x3 (15)
Round 7 :
(sc 4, inc) x3 (18)
Round 9 :
(sc 5, inc) x3 (21)
Round 11 :
(sc 6, inc) x3 (24)
Round 12-16 :
sc around (24)
Info :
Fasten off leaving tail for sewing. Optional: using color 011 pink, embroider inner ear details. Sew ears on top of head between rounds 2 and 6.
— Body, Legs, and Arms :
Info :
Follow Victor Fox's instructions for legs, body, and arms using color 051 mastic throughout.
— Tail :
Round 1 :
sc 6 into the ring (6)
Info :
Pinch the top of the tail flat without stuffing it and close the opening with 3 sc, inserting the hook in both sides at the same time. Fasten off leaving tail for sewing. Sew tail at back of body between rounds 12 and 13.
— Flared Dress - Main Part :
Row 1 :
sc 24, ch 1, turn (24)
Row 2 :
(sc 2, inc) x8, ch 1, turn (32)
Row 3 :
(sc 3, inc) x8, ch 1, turn (40)
Row 4 :
sc across, ch 1, turn (40)
Row 5 :
sc 6, ch 4, skip 8 stitches (1st armhole), sc 12, ch 4, skip 8 stitches (2nd armhole), sc 6, ch 1, turn (32)
Row 6 :
sc across, close with sl st in 1st stitch (32)
Info :
Continue in spirals.
Round 7 :
BLO (ch 2, hdc 1, ch 2, hdc 2) in 1st stitch, skip 2 stitches, [(hdc 2, ch 2, hdc 2) in next, skip 2 stitches] x10 (11 clusters)
Round 8-10 :
Start with 2 sl st to get to 1st space created by ch 2 of previous round, then (ch 2, hdc 1, ch 2, hdc 2) in this 1st space, (hdc 2, ch 2, hdc 2) in each space created by ch 2 of previous round x10 (11 clusters)
Info :
Fasten off and weave in end.
— Flared Dress - Sleeves (make 2) :
Info :
Hold outfit upright and insert hook in armhole corner at the back.
Round 1 :
sc around: the 4 sl st and the 8 skipped stitches (12)
Round 2-5 :
sc around (12)
Info :
Fasten off and weave in end. Sew snap button at back to close dress.
— Flared Dress - Collar :
Info :
Using color 002 cream, hold outfit upside down and insert hook at back, at end of row 1.
Round 1 :
(sl st 1, ch 2) x24
Info :
Fasten off and weave in end.
— Ribbed Dress - Main Part :
Row 1 :
sc 5, ch 5, skip 6 stitches (1st armhole), sc 6, ch 5, skip 6 stitches (2nd armhole), sc 5, ch 1, turn (26)
Row 2 :
sc 4, inc, sc 5 in ch 5, inc, sc 4, inc, sc 5 in ch 5, inc, sc 4, ch 1, turn (30)
Row 3 :
(sc 14, inc) x2, close with sl st in 1st stitch (32)
Info :
Continue in spirals. Start each round with ch 2 (counts as 1 hdc), and close each round with sl st on top of beginning ch 2.
Round 4 :
BLO (hdc 7, hdc-inc) x4 (36)
Info :
For rounds 5 to 9, crochet in the 3rd loop of the stitches - the one just behind the usual V. This creates the ribbed effect.
Round 5-9 :
hdc around (36)
Info :
Fasten off and weave in end.
— Ribbed Dress - Sleeves (make 2) :
Info :
Hold outfit upright and insert hook in armhole corner at the back.
Round 1 :
sc around: the 5 sl st and the 6 skipped stitches plus 2 corners (13)
Round 2-7 :
sc around (13)
Info :
Fasten off and weave in end.
— Ribbed Dress - Collar :
Info :
Using appropriate collar color, hold outfit upright and insert hook at back, at end of row 1.
Row 1 :
sc across, ch 1, turn (28)
Row 2 :
BLO sc 4, sl st in same stitch, then (hdc 3 in next, sl st in next) x10, sc 4
Info :
Fasten off and weave in end. Sew snap button at back to close dress.
— Raincoat - Front, Back, Sleeves :
Info :
Follow Victor Fox's raincoat instructions using color 030 burgundy for all pieces including assembly and border.
— Raincoat - Hood :
Info :
Using color 030 burgundy, hold coat right side out, leave 3 stitches free on right front and insert hook in next stitch.
Round 1 :
sc 1 in right front/sleeve junction, sc 4 in 1st sleeve, sc 1 in sleeve/back junction, sc 4 in back, sc 1 in back/sleeve junction, sc 3 in 2nd sleeve, sc 1 in sleeve/left front junction, ch 1, turn (14)
Round 2 :
BLO (sc 6, inc) x2, ch 1, turn (16)
Round 3 :
(sc 3, inc) x4, ch 1, turn (20)
Round 4 :
(sc 4, inc) x4, ch 1, turn (24)
Round 5 :
inc, sc 22, inc, ch 1, turn (26)
Round 6 :
inc, sc 24, inc, ch 1, turn (28)
Round 7 :
inc, sc 26, inc, ch 1, turn (30)
Round 8-15 :
sc across, ch 1, turn (30)
Round 16 :
sc 4, ch 4, skip 4 stitches (1st ear hole), sc 14, ch 4, skip 4 stitches (2nd ear hole), sc 4, ch 1, turn (30)
Round 17-18 :
sc across, ch 1, turn (30)
Info :
Fasten off leaving tail for sewing. Fold top of hood in 2 and sew last round edge to edge. Using colors 002 cream, 063 saffron, and 075 reed, embroider flowers on fronts and back of raincoat.
Anna Bunny hops straight into your heart with her sweet expression, long elegant ears, and gorgeous wardrobe options! This intermediate pattern teaches wonderful techniques like cluster stitches and 3rd loop ribbing while creating a truly enchanting character. The thoughtful details like the raincoat with ear holes and the delicate embroidered collars make this pattern extra special. Perfect for bunny enthusiasts and anyone who loves dressed-up amigurumi! 🐰💕 Happy crocheting! 🧶✨