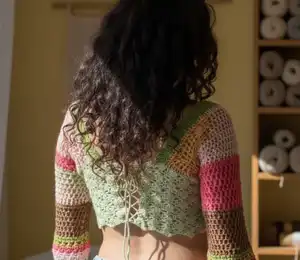
Create your own stunning Andromeda crochet top with this detailed pattern featuring beautiful shell and lace stitches. This versatile design includes customizable sizing options from S to XL, with adjustable features for different cup sizes and body types. Perfect for warm weather wear, this top combines colorful striped sections with delicate open-work sleeves for a stylish, bohemian look. The pattern guides you through creating a wrap-style top with adjustable back straps and shoulder ties for a perfect fit every time.
Progress Tracker
0% Complete
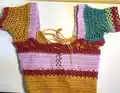
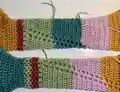
— Front Panel (4mm hook):
Colour 1: Yellow
Size S - Row 1:
ch62, turnover, skip2st, 60 x 1dc
Row 2-7:
ch3, 60 x 1dc (repeat for rows 2, 3, 4, 5, 6, 7), cut and fasten off after row 7
Size M - Row 1:
ch72, turnover, skip2st, 70 x 1dc
Row 2-7:
ch3, 70 x 1dc (repeat for all rows), cut and fasten off after row 7
Size L - Row 1:
ch82, turnover, skip2st, 80 x 1dc
Row 2-7:
ch3, 80 x 1dc (repeat for all rows), cut and fasten off after row 7
Size XL - Row 1:
ch92, turnover, skip2st, 90 x 1dc
Row 2-7:
ch3, 90 x 1dc (repeat for all rows), cut and fasten off after row 7
Colour 2: Dark Pink
Info:
Flip the yellow band before starting these rows so the shirt doesn't taper at the bottom
Size S - Row 1:
ch3, *1 x 1dc, ch3, 1 x 1dc in the same space, skip2st*. 1 x 1dc, turnover
Row 2:
ch3, 1 x 1dc, 20 shells in the 20 ch3 spaces, cut and fasten off
Size M - Row 1:
ch3, *1 x 1dc, ch3, 1 x 1dc in the same space, skip2st*. 1 x 1dc, turnover
Row 2:
ch3, 1 x 1dc, 23 shells in the 23 ch3 spaces, cut and fasten off
Size L - Row 1:
ch3, *1 x 1dc, ch3, 1 x 1dc in the same space, skip2st*. 1 x 1dc, turnover
Row 2:
ch3, 1 x 1dc, 26 shells in the 26 ch3 spaces, cut and fasten off
Size XL - Row 1:
ch3, *1 x 1dc, ch3, 1 x 1dc in the same space, skip2st*. 1 x 1dc, turnover
Row 2:
ch3, 1 x 1dc, 30 shells in the 30 ch3 spaces, cut and fasten off
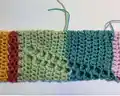
Colour 3: Light Pink
Size S - Row 1:
ch3, *1 x 2dc in each shell space, 1 x 1dc in the space between two shells*
Row 2:
ch3, 28 x 1dc, ch4, skip2st, 1x 1sc, ch4, skip2st, 28 x 1dc
Row 3-7:
ch3, 28 x 1dc, ch4, 1sc into space, ch4, 1sc into space, 28 x 1dc (repeat for rows 3, 4, 5, 6, 7)
Size M - Row 1:
ch3, *1 x 2dc in each shell space, 1 x 1dc in the space between two shells*
Row 2:
ch3, 33 x 1dc, ch4, skip2st, 1x 1sc, ch4, skip2st, 33 x 1dc
Row 3-7:
ch3, 33 x 1dc, ch4, 1sc into space, ch4, 1sc into space, 33 x 1dc (repeat for rows 3, 4, 5, 6, 7)
Size L - Row 1:
ch3, *1 x 2dc in each shell space, 1 x 1dc in the space between two shells*
Row 2:
ch3, 38 x 1dc, ch4, skip2st, 1x 1sc, ch4, skip2st, 38 x 1dc
Row 3-7:
ch3, 38 x 1dc, ch4, 1sc into space, ch4, 1sc into space, 38 x 1dc (repeat for rows 3, 4, 5, 6, 7)
Size XL - Row 1:
ch3, *1 x 2dc in each shell space, 1 x 1dc in the space between two shells*
Row 2:
ch3, 43 x 1dc, ch4, skip2st, 1x 1sc, ch4, skip2st, 43 x 1dc
Row 3-7:
ch3, 43 x 1dc, ch4, 1sc into space, ch4, 1sc into space, 43 x 1dc (repeat for rows 3, 4, 5, 6, 7)
Info:
If you are a larger cup size, do a few extra rows of this color until your bust is covered, all up to personal preference
Colour 2: Dark Pink (Switch to 7mm hook)
Size S - Row 1:
60 x 1dc with a 4mm hook
Row 2:
Switch to 7mm hook ch3, 30 x 1dc (skip every other st)
Row 3:
ch3, *3 x 1dc, skip2st, 1 x 1dc, ch3, 1 x 1dc in the same space, skip2st*
Row 4:
ch3, *8 x 1dc in the shell space, skip1st, 1 x 1dc, skip1st*
Size M - Row 1:
70 x 1dc with a 4mm hook
Row 2:
Switch to 7mm hook ch3, 35 x 1dc (skip every other st)
Row 3:
ch3, *3 x 1dc, skip2st, 1 x 1dc, ch3, 1 x 1dc in the same space, skip2st*
Row 4:
ch3, *8 x 1dc in the shell space, skip1st, 1 x 1dc, skip1st*
Size L - Row 1:
80 x 1dc with a 4mm hook
Row 2:
Switch to 7mm hook ch3, 40 x 1dc (skip every other st)
Row 3:
ch3, *3 x 1dc, skip2st, 1 x 1dc, ch3, 1 x 1dc in the same space, skip2st*
Row 4:
ch3, *8 x 1dc in the shell space, skip1st, 1 x 1dc, skip1st*
Size XL - Row 1:
90 x 1dc with a 4mm hook
Row 2:
Switch to 7mm hook ch3, 45 x 1dc (skip every other st)
Row 3:
ch3, *3 x 1dc, skip2st, 1 x 1dc, ch3, 1 x 1dc in the same space, skip2st*
Row 4:
ch3, *8 x 1dc in the shell space, skip1st, 1 x 1dc, skip1st*
Infos:
In row 1, for the middle of the panel, place 1dc in the ch4 space, 1dc in between, and another 1dc in the second ch4 space. To make this row look more symmetrical I have added 4dc at the end on top of the 3 x 1dc from row 3
— Back Panel (Switch to 4mm hook):
Info:
Where we cut off the dark pink yarn, attach yellow yarn
Size S:
Ch3, 43 x 1dc, turnover, repeat for 12 rows in total. At the end of the twelfth row, ch120-ch150, so it is 70cm long. Repeat for the other side of the front panel
Size M:
Ch3, 43 x 1dc, turnover, repeat for 14 rows in total. At the end of the fourteenth row, ch120-ch150, so it is 70cm long. Repeat for the other side of the front panel
Size L:
Ch3, 43 x 1dc, turnover, repeat for 16 rows in total. At the end of the sixteenth row, ch120-ch150, so it is 70cm long. Repeat for the other side of the front panel
Size XL:
Ch3, 43 x 1dc, turnover, repeat for 18 rows in total. At the end of the eighteenth row, ch120-ch150, so it is 70cm long. Repeat for the other side of the front panel
Info:
If you have made the front panel longer to support a larger cup size, just continue to do 1dc until the end of the side of the front panel, for example 55 x 1dc - however many you need
— Shoulder Straps (4mm hook):
Instructions:
In an appropriate place for the first strap, attach your yarn and place 6 x 1dc, ch2, turnover. Create 28 rows in total of 6 x 1dc, this is the shoulder strap. Sc the shoulder strap to the end of the back panel. Repeat for the second shoulder strap, symmetrically to the first
Info:
If longer or shorter straps are needed, go for it! The next part of the pattern is a guide based on the length of the 28 rows however
— Sleeves:
Colour 4: Turquoise (At the back of the top where the shoulder strap and back panel meet)
Size S - Row 1:
ch3, 78 x 1dc, ss
Row 2:
Switch to 7mm hook, ch3, 38 x 1dc, (skip every other st) ss
Row 4:
ch3, *6 x 1dc, dc2tog*, ss
Row 5:
ch3, *6 x 1dc, dc2tog*, ss
Row 6:
ch3, dc2tog, 24 x 1dc, dc2tog, ss, cut, fasten off. Repeat with the other sleeve. (26st)
Size M - Row 1:
ch3, 85 x 1dc, ss
Row 2:
Switch to 7mm hook, ch3, 42 x 1dc, (skip every other st) ss
Row 4:
ch3, *6 x 1dc, dc2tog*, ss (37st)
Row 5:
ch3, *6 x 1dc, dc2tog*, ss (33st)
Row 6:
ch3, dc2tog, 29 x 1dc, dc2tog, ss, cut, fasten off. Repeat with the other sleeve. (31st)
Size L - Row 1:
ch3, 90 x 1dc, ss
Row 2:
Switch to 7mm hook, ch3, 45 x 1dc, (skip every other st) ss
Row 4:
ch3, *6 x 1dc, dc2tog*, ss (40st)
Row 5:
ch3, *6 x 1dc, dc2tog*, ss (35st)
Row 6:
ch3, dc2tog, 31 x 1dc, dc2tog, ss, cut, fasten off. Repeat with the other sleeve. (33st)
Size XL - Row 1:
ch3, 102 x 1dc, ss
Row 2:
Switch to 7mm hook, ch3, 51 x 1dc, (skip every other st) ss
Row 4:
ch3, *6 x 1dc, dc2tog*, ss (47st)
Row 5:
ch3, *6 x 1dc, dc2tog*, ss (41st)
Row 6:
ch3, dc2tog, 31 x 1dc, dc2tog, ss, cut, fasten off. Repeat with the other sleeve. (39st)
Info:
If you don't have enough stitches at the end of the row for another decrease, e.g 4 x 1dc, don't worry about it and finish with a slip stitch as normal, then do 2 x 1dc and dc2tog in the next row
Colour 5: Sage Green (4mm hook) - Shell Rows
Size S - Row 1:
ch3, *1 x 1dc, ch4, 1dc in the same space, skip 1st* ss
Row 2:
ch3, 13 shells in 13 ch4 spaces, ss, cut, fasten off
Size M - Row 1:
ch3, *1 x 1dc, ch4, 1dc in the same space, skip1st* ss
Row 2:
ch3, 15 shells in 15 ch4 spaces, ss, cut, fasten off
Size L - Row 1:
ch3, *1 x 1dc, ch4, 1dc in the same space, skip 1st* ss
Row 2:
ch3, 17 shells in 17 ch4 spaces, ss, cut, fasten off
Size XL - Row 1:
ch3, *1 x 1dc, ch4, 1dc in the same space, skip 1st* ss
Row 2:
ch3, 20 shells in 20 ch4 spaces, ss, cut, fasten off
Colour 2: Dark Pink
Row 1:
ch3, 13/15/17/20 shells in 13/15/17/20 ch4 spaces, ss
Row 2:
ch3, 13/15/17/20 shells in 13/15/17/20 ch4 spaces, ss, cut, fasten off
Colour 5: Sage Green (7mm hook) - Lace Rows
Size S - Row 1:
ch3, *1 x 2dc in each space*, ss
Row 2:
ch3, 16 x 1dc, ch5, skip1st, sc, ch5, skip1st, 7x 1dc, ss
Row 3-7:
ch3, 16 x 1dc, ch5, 1sc in space below, ch5, sc in space, 7 x 1dc, ss (repeat for rows 3, 4, 5, 6, 7)
Size M - Row 1:
ch3, *1 x 2dc in each space*, ss
Row 2:
ch3, 20 x 1dc, ch5, skip1st, sc, ch5, skip1st, 7x 1dc, ss
Row 3-7:
ch3, 20 x 1dc, ch5, 1sc in space below, ch5, sc in space, 7 x 1dc, ss (repeat for rows 3, 4, 5, 6, 7)
Size L - Row 1:
ch3, *1 x 2dc in each space*, ss
Row 2:
ch3, 24 x 1dc, ch5, skip1st, sc, ch5, skip1st, 7x 1dc, ss
Row 3-7:
ch3, 24 x 1dc, ch5, 1sc in space below, ch5, sc in space, 7 x 1dc, ss (repeat for rows 3, 4, 5, 6, 7)
Size XL - Row 1:
ch3, *1 x 2dc in each space*, ss
Row 2:
ch3, 30 x 1dc, ch5, skip1st, sc, ch5, skip1st, 7x 1dc, ss
Row 3-7:
ch3, 30 x 1dc, ch5, 1sc in space below, ch5, sc in space, 7 x 1dc, ss (repeat for rows 3, 4, 5, 6, 7)
Info:
Alternate with colors, lace rows (in whichever order you'd like) or shell rows until 24 rows on sleeves. For Shell rows with 4mm hook on top of 7mm hook rows, skip 1 stitch between every shell. For Lace rows on top of shell rows, place 2 stitches in every shell for one row before starting the actual lace rows
— Sleeve Increase (7mm hook):
Increase Row:
ch3, *6 x 1dc, 1 x 2dc* ss
Maintenance:
ch3, 1dc in each stitch, ss
Instructions:
Do this for twelve rows in total (alternating between increasing row and maintenance row). For final 5-7 rows, do an increase row with two maintenance rows in between. Shell rows can be used as maintenance rows, not increase rows
— Back Straps (4mm hook):
Instructions:
On the 6th-8th row on the shoulder strap (counting from bottom to top), attach your yarn
Row 1-6:
ch3, 6 x 1dc, turnover (repeat for rows 1, 2, 3, 4, 5, 6)
Row 7:
3 x 1sc, ch51, ss50, 3 x 1sc, fasten off. Repeat on the other shoulder strap
— Alternative Back Panel (4mm hook):
Row 1:
Ch3, 43 x 1dc, turnover (if more or less than 43dc are needed that is fine)
Row 2:
ch3, *3 x 1dc, skip2st, 1 x 1dc, ch3, 1 x 1dc in the same space, skip2st*
Row 3:
ch3, *8 x 1dc in the shell space, skip1st, 1 x 1dc, skip1st*
Instructions:
Repeat rows 2 and 3 until you have 5 to 8 rows in total (this is customizable). At the bottom of the panels, add (tightly) 120ch-150ch, so you can lace up from bottom to top
The Andromeda crochet top pattern is a beautiful celebration of texture, color, and customization! This wrap-style garment combines the stability of solid double crochet bands with the delicate beauty of shell and lace stitches to create a truly unique wearable piece. Whether you're heading to a summer festival or enjoying a warm evening out, this top will turn heads with its bohemian charm and handmade elegance. The detailed sizing guidance ensures that crocheters of all shapes can create a garment that fits beautifully and feels comfortable. Get ready to fall in love with every colorful row! 🧶✨