🧢 Beautiful ✨ Detailed πŸ’ Adorable

Adorable Squid Plush Amigurumi Pattern

Adorable Squid Plush Amigurumi Pattern
4.7β˜… Rating
2-3 Hours Time Needed
2.0K Made This
βœ‚οΈ

Beginner Friendly Level

Perfect for those just starting their sewing journey, with clear instructions and simple techniques

⏱️

Bite-Sized Project

Complete in under 2 hoursβ€”quick, fun, and perfect for a little creative escape.

🧸

Cute Companion

An adorable friend to cherish, handcrafted with love to bring comfort and joy for years to come.

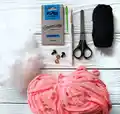
About This Adorable Squid Plush Amigurumi Pattern

Adorable Squid Plush Amigurumi Pattern crochet pattern - detailed view of completed project

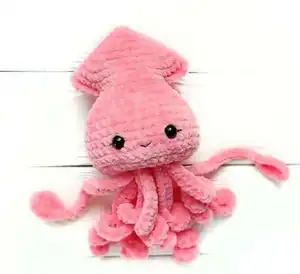
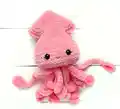
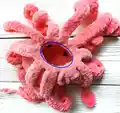
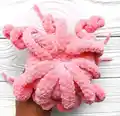
The pattern includes detailed instructions for creating two types of tentacles that give your squid character and dimension. With safety eyes and an embroidered smile, this little ocean buddy comes to life with minimal effort and maximum charm!

Why You'll Love This Adorable Squid Plush Amigurumi Pattern

I absolutely love this squid pattern because it's one of those projects that gives you instant gratification! The super bulky yarn means you can finish it in just a couple of hours, which is perfect when you need a quick gift or just want to see fast results. I also appreciate how forgiving the pattern is for beginners – the simple stitches and clear instructions make it stress-free, yet the finished piece looks impressive with those flowing tentacles. The plush yarn creates such a soft, huggable texture that makes this squid irresistible to squeeze. Plus, there's something so joyful about giving this little ocean friend its personality with those cute eyelashes and smile!

Adorable Squid Plush Amigurumi Pattern step 1 - construction progress Adorable Squid Plush Amigurumi Pattern step 2 - assembly progress Adorable Squid Plush Amigurumi Pattern step 3 - details and accessories Adorable Squid Plush Amigurumi Pattern step 4 - final assembly and finishing

Switch Things Up

I love experimenting with this squid pattern because it's so versatile! Try using different colors to create a whole rainbow family of squids - pastels for a nursery theme, bright neon colors for a fun pop of personality, or even ombre yarn for a magical gradient effect. You could make a giant squid using even bulkier yarn and a larger hook, or go tiny with fingering weight yarn for an adorable keychain version.

For a unique twist, consider adding glitter or sparkle yarn for the tentacles to create a magical underwater effect. I've also experimented with making the tentacles different lengths by varying the chain count, which gives each squid its own personality. Some crafters even add small beads or sequins to the tentacles for extra texture and shimmer.

If you want to get really creative, try embroidering different facial expressions - sleepy eyes, winking, or even adding little rosy cheeks with pink embroidery thread. You could also add a small bow between the eyes or a tiny crocheted hat for seasonal versions. The simple base pattern makes it perfect for customization, so let your imagination run wild with embellishments and color combinations!

Common Mistakes & How to Fix Them

βœ— Skipping the stuff before closing: Always stuff the body firmly before fully closing Round 25 to maintain proper shape and prevent lumpy appearance βœ— Not marking center for eye placement: Failing to mark the center can result in uneven eye placement creating a crooked or asymmetrical face βœ— Pulling tentacles too tight when attaching: This causes puckering on the body and distorts the round shape where tentacles connect to the base βœ— Forgetting to use front loops only on Round 23: Using both loops instead of front loops only will make it impossible to close the bottom hole properly βœ— Overstuffing the head section: Packing too much stuffing into the head stretches the stitches and makes the plush yarn lose its soft texture βœ— Not counting stitches in Round 11: The skip stitches in this round are crucial for eye placement and missing them throws off the entire head shape

Adorable Squid Plush Amigurumi Pattern

Create your own cuddly ocean friend with this delightful squid plush amigurumi pattern! This charming design features a rounded head-body with adorable safety eyes, a sweet embroidered smile, and eight flowing tentacles that give it personality and movement. Perfect for sea lovers and plushie collectors, this squid works up quickly using super bulky plush yarn for an extra soft and huggable finish. Whether you're making it as a gift or adding to your own collection, this squid will bring smiles and ocean vibes to any space!

Beginner Friendly 2-3 Hours

Materials Needed for Adorable Squid Plush Amigurumi Pattern

β€” Main Fabric

  • 01
    Super bulky plush yarn - Himalaya Dolphin Baby 120m/100g (131 yds/100g) in pink color 80346
  • 02
    Black fine yarn for smile embroidery - Yarnart Begonia black color 0999

β€” Tools Required

  • 01
    4.5 mm (H-7 US) crochet hook
  • 02
    2 black safety amigurumi eyes 12 mm (0.5 inch)
  • 03
    Stuffing
  • 04
    Big yarn needle
  • 05
    Small yarn needle
  • 06
    Scissors

Progress Tracker

0% Complete

β€” Head-Body :

Round 1 :

Crochet a MR with 4 Sc (4)

Round 2 :

(Sc 1, Inc) x 2 (6)

Round 3 :

Inc 6 (12)

Round 4 :

(Sc 1, Inc) x 6 (18)

Round 5 :

(Sc 2, Inc) x 6 (24)

Round 6 :

(Sc 7, Inc) x 3 (27)

Round 7 :

(Sc 8, Inc) x 3 (30)

Round 8 :

(Sc 4, Inc) x 6 (36)

Round 9 :

(Sc 11, Inc) x 3 (39)

Round 10 :

(Sc 12, Inc) x 3 (42)

Round 11 :

Sc 5, SKIP Sc 10, Sc 11, SKIP Sc 10, Sc 6 (22)

Round 12 :

Sc 5, Inc 1, Sc 10, Inc 1, Sc 5 (24)

Round 13 :

(Sc 3, Inc) x 6 (30)

Round 14 :

(Sc 4, Inc) x 6 (36)

Round 15 :

(Sc 5, Inc) x 6 (42)

Round 16-21 :

Sc around (42) 6 Rnds

Round 22 :

(Sc 5, Dec) x 6 (36)

Round 23 :

(Sc 2, Dec 8) x 2 (20)

Infos :

Flatten the body, mark the center and insert the eyes between the 19th and 20th rounds with a distance of 6 Stitches (3 St from the center) and secure backings

β€” Tentacles :

Info :

Use FRONT LOOP ONLY of R23. There are 10 pieces: 8 pieces of type A, 2 pieces of type B. Continue to crochet from the body in the following order: Type A x 3, Type B x 1, Type A x 4, Type B x 1, Type A x 1

Tentacle Type A :

Sc, Ch 27. From 3rd chain from hook: (Inc HDC, HDC 3) x 5, HDC 4, Sc 1. Sc 1 to the next stitch of the body to finish tentacle. Sc 1 to the next stitch and continue with Ch 27 and repeat the tentacle Type A

Tentacle Type B :

Sc, Ch 30. From 2nd chain from hook: Sl St 5, on the opposite side Sc 1, HDC 3, Sc 1, in the top Stitch (Sc 1, chain 1, Sc 1), on the opposite side Sc 5, Sl St 24 to the end of the tentacle. Sc 1 to the next stitch of the body to finish tentacle B. Next, Sc 1 to the next stitch and continue crochet tentacle Type A

Info :

After crocheting all the tentacles leave the body for a while and close the holes on the head with the Sc. Fill with stuffing and hide the ends of the threads inside

β€” Finishing the Body :

Info :

We crocheted the tentacles only on the front loops of the R23, and we will close the hole using the back loops of the same R23

Round 24 :

Dec 10 (10)

Info :

Stuff firmly

Round 25 :

Next, we crochet as usual, using both loops. Dec 5, Sl St (5)

Info :

Fasten off and sew the hole closed. Hide the end of the thread inside

β€” Eyelashes and Smile :

Eyelashes :

Take a black cotton thread and tie it in a knot around the eye. Embroider the eyelashes and bring out the threads to the bottom under the tentacles. Tie a knot and hide the ends of the threads inside. With the second eye, repeat the same thing, only keep the thread longer and do not hide the ends

Smile :

With a longer end, embroider a smile in a V-shape, bring it to the other end, tie it again in a knot, hide the ends of the threads inside

Assembly Instructions

  • Insert safety eyes between rounds 19 and 20 with 6 stitches distance (3 stitches from center) before closing the body
  • After completing all tentacles, go back and close the holes on the head using single crochet stitches
  • Fill the body firmly with stuffing before working Round 24, ensuring even distribution throughout
  • Work Round 24 using the back loops only of Round 23 to close the bottom opening
  • After Round 25, fasten off securely and sew the remaining hole closed with yarn needle
  • Tie black thread around each eye in a knot, embroider eyelashes, and bring threads to bottom to hide
  • Use the longer thread end from the second eye to embroider a V-shaped smile across the face

Important Notes

  • πŸ’‘Round 11 requires skipping stitches to create the eye placement openings - count carefully to avoid mistakes
  • πŸ’‘Always use front loops only when attaching tentacles on Round 23, then back loops only for Round 24
  • πŸ’‘The pattern alternates between Type A and Type B tentacles in a specific order - follow the sequence carefully
  • πŸ’‘Super bulky plush yarn can be difficult to see individual stitches, so use stitch markers generously
  • πŸ’‘Stuff the body firmly but not overly tight to maintain the soft plush texture of the yarn
  • πŸ’‘Keep the black thread long when doing the second eye so you can use it for the smile embroidery
  • πŸ’‘The tentacles are worked directly from the body, not separately attached, which creates a seamless look

This adorable squid plush pattern is perfect for ocean lovers and anyone who enjoys quick, satisfying crochet projects! The super soft plush yarn creates an irresistibly cuddly texture, while the flowing tentacles give your squid personality and charm. With simple techniques and clear instructions, even beginners can create this sweet sea creature in just a few hours. The combination of safety eyes and embroidered details brings your squid to life with minimal effort. 🧢 Dive into this fun project and enjoy creating your own ocean companion! πŸ™βœ¨

You ask,

we answer.

FAQs

Can I use regular yarn instead of super bulky plush yarn?

Yes, you can use any weight yarn, but you'll need to adjust your hook size accordingly and the finished size will be different. The plush yarn creates the signature soft, cuddly texture, so regular yarn will have a firmer feel.

What does 'SKIP Sc 10' mean in Round 11?

This means you skip over 10 stitches without working into them. These skipped stitches create openings where you'll place the safety eyes. Make sure to count carefully as this affects the entire face structure.

Why are there two different types of tentacles?

Type A and Type B tentacles create variety and make the squid look more natural and dimensional. Type B tentacles have a slightly different shape with a pointed tip, adding visual interest to your finished piece.

How do I work the tentacles using front loops only?

After completing Round 23, you'll see two loops at the top of each stitch. Insert your hook only under the loop closest to you (front loop) when starting each tentacle. This leaves the back loops available for closing the bottom later.

Can I make the tentacles longer or shorter?

Absolutely! For Type A tentacles, adjust the starting chain (currently 27 chains). For Type B, adjust the 30 chains. Just remember to adjust the subsequent instructions proportionally to maintain the wavy shape.

When should I add the stuffing?

Add stuffing after completing all tentacles and closing the head holes, but before working Round 24. The pattern specifically notes to 'stuff firmly' at this point to ensure proper shape before final closing.