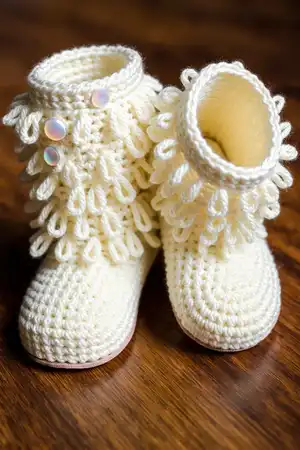
Create the softest, most adorable baby boots with this charming Furrylicious pattern. Designed for babies aged 0-6 and 6-12 months, these boots feature a unique loop stitch texture that creates a fluffy, fur-like appearance perfect for keeping tiny toes warm and cozy. With a clever button closure on the side and a sturdy crocheted sole, these boots combine practicality with irresistible cuteness. The pattern includes detailed instructions for both size ranges, making it easy to craft the perfect fit for your little one or as a thoughtful handmade gift.
Progress Tracker
0% Complete
— 0-6 Months (3.75 inches)
— Sole (Make 2) :
Round 1 :
With color A ch 13, 2 hdc in 3rd ch from hook, 9 hdc, 4 hdc in last ch, Now working down the other side of beginning chain work 9 hdc, 2 hdc in last ch that already has 2 hdc in it. Join with sl st to top of first stitch. 26 total stitches in round.
Round 2 :
Ch 1, 2 sc in each of the first two stitches, 4 sc, 5 hdc, 2 hdc in each of the next 4 stitches, 5 hdc, 4 sc, 2 sc in each of the next two stitches. Join with sl st. 34 total stitches in round.
Round 3 :
Ch 1, 2 sc, 2 sc in next stitch, 9 sc, 3 hdc, 2 hdc in next two stitches, 2 hdc, 2 hdc in each of the next two stitches, 3 hdc, 9 sc, 2 sc in next stitch. Join with sl st and bind off! 40 total stitches in round.
Round 4 :
With color B and wrong side of sole facing you, attach yarn at center back of heel. Sl st all the way around sole. Join with sl st. 40 total stitches in round.
— Upper Shoe :
Round 5 :
Ch 1, sc in all slip stitches. Insert hook only through slip stitch on top and not through sc below. Join with sl st. 40 total stitches in round.
Round 6 :
Ch 1, sc all the way around. Join with sl st. 40 total stitches in round.
Round 7 :
Ch 1 sc all the way around. Join with sl st. 40 total stitches in round.
Round 8 :
Ch 1, sc2tog, 14 sc, [sc2tog, 2 sc] two times. sc2tog, 14 sc. Join with sl st. 36 total stitches in round.
Round 9 :
Ch1, 12 sc, sc2tog, 1 sc, sc2tog, 2 sc, sc2tog, 1 sc, sc2tog, 12 sc. Join with sl st. 32 total stitches in round.
Round 10 :
Ch 1, 6 Lp st, 4 sc, sc2tog, 1 sc, sc2tog, 2 sc, sc2tog, 1 sc, sc2tog, 4 sc, 6 lp st. Join with sl st. 28 total stitches in round. Bind off!
— First Boot Upper Leg :
Row 11 :
Count 9 sc over from center back of heel. Mark this stitch! Now Attach yarn in the next stitch so that you will be working towards toe of boot. Starting in same stitch you attached to and with hook inserted from the inside of boot to the outside [sc2tog] 5 times. 5 total stitches in row. Turn!
Round 12 :
Now you will be working back over the five stitches just made. Ch 1, 1 sc in same st (mark that stitch), sc2tog, 2 sc, Now for the next stitch you will have to take a little jump down to the rest of the boot. Starting in the stitch you marked, 18 sc, You should have to take a little jump up now. Starting in marked stitch place 5 more sc across front of boot. Turn
Round 13 :
Ch 1, 1 lp st in same as chain 1, lp st all the way around. (The loop stitch should be on the outside of the shoe.) 22 total stitches in round. Turn.
Row 14 :
Ch 1, 11 sc, 2 sc in next stitch, sc to the end. 23 stitches total in row. Turn.
Row 15 :
Ch1 , lp st all the way around until last two stitches. 2 sc. 23 total stitches in row. Turn.
Row 16 :
Ch 1, 11 sc, 2 sc in next stitch, sc to the end. 24 total stitches in row. Turn.
Row 17 :
Ch 1, lp st all the way around until the last two, 2 sc. 24 Total stitches in row. Turn
Row 18 :
Ch 1, sc all the way around. 24 total stitches in row. Turn.
Row 19 :
Ch 1, lp st all the way around until last two, 2 sc. 24 total stitches in row. Turn.
Row 20 :
Ch 1, sc all the way around. 24 total stitches in row. Turn.
Row 21 :
Ch 1, lp st all the way around until last two stitches, 2 sc. 24 total stitches in row. Turn.
Row 22 :
Ch 2, 2 dc, [1 fp dc, 1 bp dc] repeat until end of row. Do not turn.
— Button Hole Area on Side :
Row 1 :
Now going down side of shoe. Start in side of last dc, ch 1, 12 sc down side of shoe. Turn.
Row 2 :
Ch 1, (Going back up side) 1 sc, ch 2, skip 2 stitches, 2 sc, ch 2, skip 2 stitches, 2 sc, ch 2, skip 2 stitches, 1 sc. Turn to go back down.
Row 3 :
Ch 1, 12 sc. Bind off.
— Second Boot Upper Leg :
Info :
Do rounds 1-10 same as first boot.
Row 11 :
Count 9 sc over from center back of sole. Mark this stitch. Now attach yarn in the next stitch closer to toe of boot. Starting with the stitch you attached to and hook inserted from the outside of the boot [sc2tog] 5 times. Mark the next stitch. 5 total stitches in row. Turn.
Round 12 :
Now you will be working back over the five stitches just made. Ch 1, 1 sc in same st, sc2tog, 2 sc, 1 more sc in marked stitch. Turn! Ch 1, starting in same stitch, 5 sc across front of boot. Take a little jump down again and put 1 sc in marked stitch, 16 more sc around boot. Turn again!
Round 13 :
Ch 1, 1 lp st in same as chain 1, lp st all the way around. (The loop stitch should be on the outside of the shoe.) 22 stitches total in row. Turn.
Row 14 :
Ch 1, 12 sc, 2 sc in next stitch, sc to the end. 23 stitches total in row. Turn.
Row 15 :
Ch 1, 2 sc. lp st the rest of the way around. 23 total stitches in row. Turn.
Row 16 :
Ch 1, 12 sc, 2 sc in next stitch, sc to the end. 24 total stitches in row. Turn.
Row 17 :
Ch 1, 2 sc, lp st the rest of the way around. 24 Total stitches in row. Turn
Row 18 :
Ch 1, sc all the way around. 24 total stitches in row. Turn.
Row 19 :
Ch 1, 2 sc, lp st the rest of the way around. 24 total stitches in row. Turn.
Row 20 :
Ch 1, sc all the way around. 24 total stitches in row. Turn.
Row 21 :
Ch 1, 2 sc, lp st the rest of the way around. 24 total stitches in row. Turn.
Row 22 :
Ch 2, [1 fp dc, 1 bp dc] repeat until last two, 2 dc. Bind off.
— Button Hole Area on Side :
Info :
Reattach yarn at beginning of Rnd 22 at top of first dc to start button hole area.
Row 1 :
Going down side of shoe. Starting in side of first dc ch 1, 12 sc down side of shoe. Turn
Row 2 :
Ch 1, Going back up side 1 sc, ch 2, skip 2, 2 sc, ch 2, skip 2, 2 sc, ch 2, skip 2, 1 sc. Turn to go back down.
Row 3 :
Ch 1, 12 sc. Bind off.
— 6-12 Months (4.5 inches)
— Sole (Make 2) :
Round 1 :
With color A ch 16, 2 hdc in 3rd ch from hook, 12 hdc, 4 hdc in last ch, 12 hdc down the other side of beginning ch, 2 hdc in last ch that already has 2 hdc in it. Join with sl st to top of first stitch. 32 total stitches in round.
Round 2 :
Ch 1 , 2 sc in each of the first two stitches, 5 sc, 7 hdc, 2 hdc in each of the next 4 stitches, 7 hdc, 5 sc, 2 sc in each of the last two stitches. Join with sl st. 40 total stitches in round.
Round 3 :
Ch 2, 2 hdc, 2 hdc in next stitch, 15 hdc, 2 hdc in each of the next two stitches, 2 hdc, 2 hdc in each of the next two stitches, 15 hdc, 2 hdc in next stitch. Join with sl st and Bind Off! 46 total stitches in round.
Round 4 :
With color B and wrong side of sole facing you, attach yarn at center back of heel. sl st all the way around sole. Join with sl st. 46 total stitches in round.
— Upper Shoe :
Round 5 :
Ch 1, sc in all slip stitches. Insert hook only through slip stitch on top not through sc below. Join with sl st. 46 total stitches in round.
Round 6 :
Ch 1, sc all the way around. Join with sl st. 46 total stitches in round.
Round 7 :
Ch 1 sc all the way around. Join with sl st. 46 total stitches in round.
Round 8 :
Ch 1 sc all the way around. Join with sl st. 46 total stitches in round.
Round 9 :
Ch 1, sc2tog, 17 sc, [sc2tog, 2 sc] two times. sc2tog, 17 sc. Join with sl st. 42 total stitches in round.
Round 10 :
Ch1, 15 sc, sc2tog, 1 sc, sc2tog, 2 sc, sc2tog, 1 sc, sc2tog, 15 sc. Join with sl st. 38 total stitches in round.
Round 11 :
Ch 1, 8 Lp st, 5 sc, sc2tog, 1 sc, sc2tog, 2 sc, sc2tog, 1 sc, sc2tog, 5 sc, 8 lp st. Join with sl st. 34 total stitches in round. Bind off!
— First Boot Upper Leg :
Row 12 :
Count 12 sc over from center back of heel. Mark this stitch! Now Attach yarn in the next stitch closer to toe of boot. Starting in same stitch you attached to and with hook inserted from inside of boot to the outside, sc2tog, [hdc2tog] 3 times, sc2tog. 5 total stitches in row. Turn!
Round 13 :
Now you will be working back over the five stitches just made. Ch 1, 1 sc in same st (Mark stitch just made), hdc2tog, 1 hdc, 1 sc, Now for the next stitch you will have to take a little jump down to the rest of the boot. Starting in marked stitch, 24 sc, You should have to take a little jump up now. Starting in marked chain stitch place 5 more sc across front of boot. Turn
Row 14 :
Ch 1, 1 lp st in same as chain 1, lp st all the way around. (The loop stitch should be on the outside of the shoe.) 28 total stitches in row. Turn.
Row 15 :
Ch 1, 1 sc in same stitch and all the way around. 28 total stitches in row. Turn
Row 16 :
Ch 1, lp st all the way around until last two. 1 sc in each of the last 2 stitches. 28 total stitches in row. Turn
Row 17 :
Ch 1, 13 sc, 2 sc in next stitch, sc to the end. 29 stitches total in row. Turn.
Row 18 :
Ch1 , lp st all the way around until last two stitches. 2 sc. 29 stitches in row. Turn.
Row 19 :
Ch 1, 14 sc, 2 sc in next stitch, sc to the end. 30 total stitches in row. Turn.
Row 20 :
Ch 1, lp st all the way around until the last two, 2 sc. 30 Total stitches in row. Turn
Row 21 :
Ch 1, sc all the way around. 30 total stitches in row. Turn.
Row 22 :
Ch 1, lp st all the way around until last two, 2 sc. 30 total stitches in row. Turn.
Row 23 :
Ch 1, sc all the way around. 30 total stitches in row. Turn.
Row 24 :
Ch 1, lp st all the way around until last two stitches, 2 sc. 30 stitches in row. Turn
Row 25 :
Ch 2, 2 dc, [1 fp dc, 1 bp dc] repeat until end or row. Do not turn.
— Button Hole Area on Side :
Row 1 :
Worked down side of shoe. Starting in side of last dc ch 1, 14 sc worked down side of boot. Turn.
Row 2 :
Ch 1, (Going back up side) 1 sc, ch 2, skip 2 stitches, 3 sc, ch 2, skip 2 stitches, 3 sc, ch 2, skip 2 stitches, 1 sc. Turn to go back up.
Row 3 :
Ch 1, 14 sc. Bind off.
— Second Boot Upper Leg :
Info :
Do rounds 1-11 same as first boot
Row 12 :
Count 12 sc over from center back of sole. Mark this stitch! Now attach yarn in the next stitch closer to toe of boot. Starting with the stitch you attached to and hook inserting from outside of boot, sc2tog, [hdc2tog] 3 times, sc2tog, mark next stitch. 5 total stitches in row. Turn.
Round 13 :
Now you will be working back over the five stitches just made. Ch 1, 1 sc in same st, hdc2tog, 1 hdc, 1 sc, 1 more sc in marked stitch. Turn! Ch 1, starting in same stitch 5 sc worked across front of boot, take a little jump down again and put 1 sc in marked stitch, 22 more sc around boot. Turn again.
Row 14 :
Ch 1, 1 lp st in same as chain 1, lp st all the way around. (The loop stitch should be on the outside of the shoe.) 28 stitches total in row. Turn.
Row 15 :
Ch 1, 1 sc in same stitch and all the way around. 28 total stitches in row. Turn.
Row 16 :
Ch 1, 2 sc. lp st the rest of the way around. 28 total stitches in row. Turn.
Row 17 :
Ch 1, 14 sc, 2 sc in next stitch, sc to the end. 29 stitches total in row. Turn.
Row 18 :
Ch 1, 2 sc. lp st the rest of the way around. 29 total stitches in row. Turn.
Row 19 :
Ch 1, 15 sc, 2 sc in next stitch, sc to the end. 30 total stitches in row. Turn.
Row 20 :
Ch 1, 2 sc, lp st the rest of the way around. 30 Total stitches in row. Turn
Row 21 :
Ch 1, sc all the way around. 30 total stitches in row. Turn.
Row 22 :
Ch 1, 2 sc, lp st the rest of the way around. 30 total stitches in row. Turn.
Row 23 :
Ch 1, sc all the way around. 30 total stitches in row. Turn.
Row 24 :
Ch 1, 2 sc, lp st the rest of the way around. 30 total stitches in row. Turn.
Row 25 :
Ch 2, [1 fp dc, 1 bp dc] repeat until last two, 2 dc. Bind off.
— Button Hole Area on Side :
Info :
Reattach yarn at beginning of Rnd 25. Attach at top, to start button hole area.
Row 1 :
Going down side of shoe. Starting in side of first dc ch 1, 14 sc down side of shoe. Turn
Row 2 :
Ch 1, Now going back up side ,1 sc, ch 2, skip 2, 3 sc, ch 2, skip 2, 3 sc, ch 2, skip 2, 1 sc. Turn to go back down.
Row 3 :
Ch 1, 14 sc. Bind off.
— Finishing :
Info :
Sew on Buttons, Weave in ends and you're done!
These Furrylicious Baby Boots are the perfect blend of function and adorable style, guaranteed to keep tiny toes warm while making everyone who sees them smile. The unique loop stitch texture creates a luxurious, fur-like finish that elevates these boots from simple baby booties to heirloom-quality keepsakes. With two size options and detailed instructions complete with helpful photos, you'll be able to create perfectly fitting boots for any baby in your life. The button closure adds a practical touch while ensuring the boots stay securely on wiggly little feet. Happy crocheting, and enjoy watching these precious boots come to life stitch by stitch!