🧶 Beautiful ✨ Detailed 💝 Adorable

Adorable Sloth Stacking Toy Amigurumi Pattern

Adorable Sloth Stacking Toy Amigurumi Pattern
4.1★ Rating
12-15 Hours Time Needed
1.6K Made This
✂️

Intermediate Level

Ideal for those with basic knitting experience, featuring slightly more advanced stitches and techniques to expand your skills.

⏱️

Slow & Steady

A 10-12 hour project—great for savoring the process over several sessions.

🧸

Cute Companion

An adorable friend to cherish, handcrafted with love to bring comfort and joy for years to come.

About This Adorable Sloth Stacking Toy Amigurumi Pattern

This delightful sloth stacking toy pattern combines the beloved amigurumi style with educational play value. The design features a sturdy base topped with a sweet sloth character that welcomes three graduating rings, creating an interactive toy perfect for toddlers and young children. Each component is carefully crafted with detailed instructions for the sloth's distinctive features including three-clawed hands and feet, charming brown eye patches, and a rounded belly base that provides stability during playtime.

Adorable Sloth Stacking Toy Amigurumi Pattern crochet pattern - detailed view of completed project

The stacking rings progress from large to small, offering endless entertainment while helping develop hand-eye coordination and spatial awareness. This pattern beautifully merges the art of amigurumi with practical toy-making, resulting in a treasured keepsake that grows with your little one.

Why You'll Love This Adorable Sloth Stacking Toy Amigurumi Pattern

I absolutely love this pattern because it's not just adorable—it's genuinely functional! Creating a toy that children can actually play with and learn from adds so much meaning to every stitch. The sloth's personality shines through those sweet eye patches and long claws, making it impossible not to smile while working on it. I appreciate how the pattern challenges your skills with color changes and shaping while remaining totally achievable. Plus, watching little ones figure out the stacking rings you've created with your own hands is incredibly rewarding. This project proves that crochet can be both beautiful and purposeful, and that's what makes it so special to me.

Adorable Sloth Stacking Toy Amigurumi Pattern step 1 - construction progress Adorable Sloth Stacking Toy Amigurumi Pattern step 2 - assembly progress Adorable Sloth Stacking Toy Amigurumi Pattern step 3 - details and accessories Adorable Sloth Stacking Toy Amigurumi Pattern step 4 - final assembly and finishing

Switch Things Up

I absolutely love personalizing this sloth stacking toy to make each one truly unique and special! One of my favorite modifications is changing up the color palette entirely—imagine a pastel sloth with soft pink, lavender, and mint rings, or go bold with bright rainbow-colored stacking rings that really pop against a neutral sloth base.

You could also experiment with the facial features by embroidering different expressions, adding felt eyelashes for a feminine touch, or even creating sleepy closed eyes for a bedtime version. I've tried adding a little bow or flower crown to the head for baby girl gifts, which adds such a sweet touch.

Another fun variation is to add textural elements to the rings—try working some rounds in a different stitch pattern like puff stitches or popcorn stitches to create interesting bumps and ridges that are great for sensory exploration. You could also add small crinkle material inside one of the rings for extra sensory stimulation.

For a seasonal twist, consider making holiday-themed versions with red and green for Christmas, pastels for Easter, or orange and brown for autumn. Adding small accessories like a tiny scarf or hat to the sloth character makes it even more adorable and gift-worthy. The possibilities are truly endless with this versatile pattern!

Common Mistakes & How to Fix Them

✗ Not stuffing the base firmly enough which can cause the stacking toy to tip over during play—add extra fiberfill for stability ✗ Forgetting to stuff the claws with tweezers before closing them off, resulting in flat undefined fingers that lack character and detail ✗ Missing the color changes in the head section especially around rounds 19-21 which creates the distinctive facial markings of the sloth ✗ Rushing through the ring assembly and not aligning rounds properly when sewing closed, creating lumpy or uneven stacking rings that won't balance

Adorable Sloth Stacking Toy Amigurumi Pattern

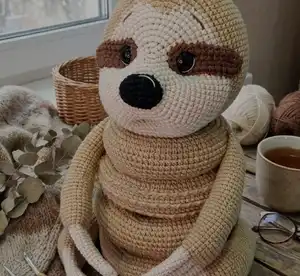
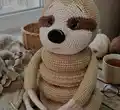
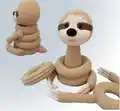
Create an enchanting sloth stacking toy that combines playfulness with developmental benefits! This charming amigurumi features a cozy base with a sweet sloth character plus three perfectly sized rings that little ones can stack and explore. With detailed claws, an adorable face complete with brown eye patches, and a cute little tail, this project brings together function and cuteness. Perfect for gifting or adding handmade charm to any nursery, this pattern guides you through creating an interactive toy that encourages fine motor skills while providing endless cuddles and imaginative play.

Intermediate 12-15 Hours

Materials Needed for Adorable Sloth Stacking Toy Amigurumi Pattern

— Main Fabric

  • 01
    Alize Cotton Gold in Beige (color 262) - 2 balls, approximately 660m (722 yards)
  • 02
    Alize Cotton Gold in Ivory (color 67)
  • 03
    Alize Cotton Gold in Brown (color 493)
  • 04
    Black yarn for crocheting eyes (if not using safety eyes)

— Tools Required

  • 01
    Crochet hook 1.5mm
  • 02
    Crochet hook 3mm
  • 03
    Safety eyes 12mm diameter (or black yarn for crocheted eyes)
  • 04
    Fiberfill for stuffing
  • 05
    Tapestry needle for sewing
  • 06
    Scissors
  • 07
    Tweezers (for stuffing small claws)

Progress Tracker

0% Complete

— BASE :

Round 1 :

6 sc in MR (6)

Round 2 :

6 inc (12)

Round 3 :

12 sc (12)

Round 4 :

(1 sc; inc)*6 (18)

Round 5-6 :

18 sc (18)

Round 7 :

(2 sc; inc)*6 (24)

Round 8-10 :

24 sc (24)

Round 11 :

(3 sc; inc)*6 (30)

Round 12-15 :

30 sc (30)

Round 16 :

(4 sc; inc)*6 (36)

Round 17-21 :

36 sc (36)

Round 22 :

(5 sc; inc)*6 (42)

Round 23-28 :

42 sc (42)

Round 29 :

(6 sc; inc)*6 (48)

Round 30-36 :

48 sc (48)

Round 37 :

(7 sc; inc)*6 (54)

Round 38-45 :

54 sc (54)

Round 46 :

(8 sc; inc)*6 (60)

Round 47 :

FLO (9 sc; inc)*6 (66)

Round 48 :

5 sc; inc; (10 sc; inc)*5; 5 sc (72)

Round 49 :

(11 sc; inc)*6 (78)

Round 50 :

6 sc; inc; (12 sc; inc)*5; 6 sc (84)

Round 51 :

(13 sc; inc)*6 (90)

Round 52 :

7 sc; inc; (14 sc; inc)*5; 7 sc (96)

Round 53 :

(15 sc; inc)*6 (102)

Round 54 :

8 sc; inc; (16 sc; inc)*5; 8 sc (108)

Round 55 :

(17 sc; inc)*6 (114)

Round 56-62 :

114 sc (114)

Round 63 :

(17 sc; dec)*6 (108)

Round 64 :

8 sc; dec; (16 sc; dec)*5; 8 sc (102)

Round 65 :

(15 sc; dec)*6 (96)

Round 66 :

7 sc; dec; (14 sc; dec)*5; 7 sc (90)

Round 67 :

(13 sc; dec)*6 (84)

Round 68 :

6 sc; dec; (12 sc; dec)*5; 6 sc (78)

Round 69 :

(11 sc; dec)*6 (72)

Round 70 :

5 sc; dec; (10 sc; dec)*5; 5 sc (66)

Round 71 :

(9 sc; dec)*6 (60)

Round 72 :

Connect round 71 with round 47 (BLO) with 60 sc (60), fill with stuffing as you go, then continue to work in rounds

Round 73 :

(8 sc; dec)*6 (54)

Round 74 :

(7 sc; dec)*6 (48)

Round 75 :

(6 sc; dec)*6 (42)

Round 76 :

(5 sc; dec)*6 (36)

Round 77 :

(4 sc; dec)*6 (30)

Round 78 :

(3 sc; dec)*6 (24)

Round 79 :

(2 sc; dec)*6 (18)

Round 80 :

(1 sc; dec)*6 (12)

Round 81 :

6 dec (6), cut the yarn, pull off hole, hide the tail

— LEGS (make 2) :

Info :

With ivory yarn and 1.5mm hook make 3 claws, middle claw will be a bit longer than the other two, stuff claws using tweezers

Long claw (make 1) :

Round 1 :

6 sc in MR (6)

Round 2-6 :

6 sc (6)

Round 7 :

inc; 5 sc (7)

Round 8-12 :

7 sc (7)

Round 13 :

1 sc; inc; 5 sc (8)

Round 14-17 :

8 sc (8)

Round 18 :

2 sc; inc; 5 sc (9)

Round 19-22 :

9 sc (9), fasten off

Short claws (make 2) :

Round 1 :

6 sc in MR (6)

Round 2-5 :

6 sc (6)

Round 6 :

inc; 5 sc (7)

Round 7-10 :

7 sc (7)

Round 11 :

1 sc; inc; 5 sc (8)

Round 12-15 :

8 sc (8)

Round 16 :

2 sc; inc; 5 sc (9)

Round 17-20 :

9 sc (9), fasten off one claw and in second short claw change yarn to beige and from now on use 3mm hook

Info :

Connect short, long and short claw

Round 1 :

9 sc in a short claw; 5 sc in a long claw; 9 sc in a second short claw; 4 sc in a long claw (27)

Round 2 :

9 sc; inc; 3 sc; inc; 10 sc; inc; 2 sc (30)

Round 3-7 :

30 sc (30)

Round 8 :

9 sc; dec; (3 sc; dec)*2; 4 sc; inc; (1 sc; inc)*2 (30)

Round 9-13 :

23 sc; BLO 7 sl st (30)

Round 14 :

30 sc (30)

Round 15 :

(3 sc; dec)*6 (24)

Round 16-30 :

24 sc (24)

Round 31 :

(2 sc; dec)*6 (18)

Round 32 :

5 sc, turn fold in half and crochet 9 sc closing the hole (fill with stuffing, not too tight - 3/4 of the leg)

Info :

Sew legs to the base as you can see in the photos, connect as much as you like

— TAIL :

Round 1 :

6 sc in MR (6)

Round 2 :

6 inc (12)

Round 3 :

12 sc (12)

Round 4 :

(1 sc; inc)*6 (18)

Round 5 :

18 sc (18)

Round 6 :

(2 sc; inc)*6 (24)

Round 7 :

24 sc (24)

Round 8 :

(3 sc; inc)*6 (30)

Round 9-13 :

30 sc (30)

Round 14 :

BLO (3 sc; dec)*6 (24)

Round 15 :

(2 sc; dec)*6 (18), fill with stuffing

Round 16 :

(1 sc; dec)*6 (12)

Row 17 :

6 dec (6), fasten off, leave a tail for sewing

Info :

Sew the tail to the base as you can see in the photos
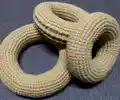
— LARGE RING :

Round 1 :

60 ch; sl st in 1st ch (60)

Round 2 :

(9 sc; inc)*6 (66)

Round 3 :

5 sc; inc; (10 sc; inc)*5; 5 sc (72)

Round 4 :

(11 sc; inc)*6 (78)

Round 5 :

6 sc; inc; (12 sc; inc)*5; 6 sc (84)

Round 6 :

(13 sc; inc)*6 (90)

Round 7 :

7 sc; inc; (14 sc; inc)*5; 7 sc (96)

Round 8 :

(15 sc; inc)*6 (102)

Round 9-11 :

102 sc (102)

Round 12 :

BLO 102 sc (102)

Round 13-15 :

102 sc (102)

Round 16 :

(15 sc; dec)*6 (96)

Round 17 :

7 sc; dec; (14 sc; dec)*5; 7 sc (90)

Round 18 :

(13 sc; dec)*6 (84)

Round 19 :

6 sc; dec; (12 sc; dec)*5; 6 sc (78)

Round 20 :

(11 sc; dec)*6 (72)

Round 21 :

5 sc; dec; (10 sc; dec)*5; 5 sc (66)

Round 22 :

(9 sc; dec)*6 (60), sew round 22 with round 1, fill with stuffing as you go

— MIDDLE RING :

Info :

With gray yarn (Note: pattern says gray but materials list shows beige, use beige or preferred color)

Round 1 :

48 ch; sl st in 1st ch (48)

Round 2 :

(7 sc; inc)*6 (54)

Round 3 :

4 sc; inc; (8 sc; inc)*5; 4 sc (60)

Round 4 :

(9 sc; inc)*6 (66)

Round 5 :

5 sc; inc; (10 sc; inc)*5; 5 sc (72)

Round 6 :

(11 sc; inc)*6 (78)

Round 7 :

6 sc; inc; (12 sc; inc)*5; 6 sc (84)

Round 8 :

(13 sc; inc)*6 (90)

Round 9 :

90 sc (90)

Round 10 :

BLO 90 sc (90)

Round 11 :

90 sc (90)

Round 12 :

BLO 90 sc (90)

Round 13 :

90 sc (90)

Round 14 :

BLO 90 sc (90)

Round 15 :

90 sc (90)

Round 16 :

(13 sc; dec)*6 (84)

Round 17 :

6 sc; dec; (12 sc; dec)*5; 6 sc (78)

Round 18 :

(11 sc; dec)*6 (72)

Round 19 :

5 sc; dec; (10 sc; dec)*5; 5 sc (66)

Round 20 :

(9 sc; dec)*6 (60)

Round 21 :

4 sc; dec; (8 sc; dec)*5; 4 sc (54)

Round 22 :

(7 sc; dec)*6 (48), sew round 22 with round 1, fill with stuffing as you go

Info :

There are two ways to make pretty edges on the rings - in rounds 10, 12, 14 in the front loops make slip stitch round or reverse crochet (crab stitch) round. Optional: R 10, 12, 14 (1 rev; skip 1 sc)*45 (45)

— ARMS (make 2) :

Info :

With ivory yarn and 1.5mm hook make 3 claws, middle claw will be a bit longer than the other two, stuff claws using tweezers

Long claw (make 1) :

Round 1 :

6 sc in MR (6)

Round 2-7 :

6 sc (6)

Round 8 :

inc; 5 sc (7)

Round 9-15 :

7 sc (7)

Round 16 :

1 sc; inc; 5 sc (8)

Round 17-18 :

8 sc (8), fasten off

Short claws (make 2) :

Round 1 :

6 sc in MR (6)

Round 2-6 :

6 sc (6)

Round 7 :

inc; 5 sc (7)

Round 8-13 :

7 sc (7)

Round 14 :

1 sc; inc; 5 sc (8)

Round 15-16 :

8 sc (8), fasten off one claw and in second short claw change yarn to beige and from now on use 3mm hook

Info :

Connect short, long and another short claw

Round 1 :

8 sc in a short claw; 4 sc in a long claw; 8 sc in a second short claw; 4 sc in a long claw (24)

Round 2-7 :

24 sc (24)

Round 8 :

5 sc; dec; (3 sc; dec)*2; 4 sc; 3 inc (24)

Round 9-13 :

18 sc; BLO 6 sl st (24)

Round 14 :

24 sc (24)

Round 15 :

(2 sc; dec)*6 (18)

Round 16-34 :

18 sc (18)

Round 35 :

6 sc, turn fold in half and crochet 9 sc closing the hole (fill with stuffing, not too tight - 3/4 of the arm)

— SMALL RING :

Round 1 :

36 ch; sl st in 1st ch (36)

Round 2 :

(5 sc; inc)*6 (42)

Round 3 :

3 sc; inc; (6 sc; inc)*5; 3 sc (48)

Round 4 :

(7 sc; inc)*6 (54)

Round 5 :

4 sc; inc; (8 sc; inc)*5; 4 sc (60)

Round 6 :

(9 sc; inc)*6 (66)

Round 7 :

5 sc; inc; (10 sc; inc)*5; 5 sc (72)

Round 8 :

(11 sc; inc)*6 (78)

Round 9-15 :

78 sc (78)

Round 16 :

(11 sc; dec)*6 (72)

Round 17 :

5 sc; dec; (10 sc; dec)*5; 5 sc (66)

Round 18 :

(9 sc; dec)*6 (60)

Round 19 :

4 sc; dec; (8 sc; dec)*5; 4 sc (54)

Round 20 :

(7 sc; dec)*6 (48)

Round 21 :

3 sc; dec; (6 sc; dec)*5; 3 sc (42)

Round 22 :

(5 sc; dec)*6 (36), sew round 22 with round 1, fill with stuffing as you go

Info :

Sew arms to the small ring as you can see in the photos

— HEAD :

Info :

Start with black yarn for nose (hook 1.5mm)

Row 1 :

5 ch; turn and continue to work in rounds

Round 2 :

inc; 2 sc; 2 inc in first ch; 2 sc; inc in fourth ch (12)

Round 3 :

(1 sc; inc)*6 (18)

Round 4 :

(2 sc; inc)*6 (24)

Round 5-6 :

24 sc (24)

Round 7a :

BLO (2 sc; dec)*6 (18), fill with stuffing

Round 8a :

(1 sc; dec)*6 (12), fasten off, close the hole

Info :

Start to crochet in front loops of round 6 with ivory yarn and 3mm hook

Round 7 :

(3 sc; inc)*6 (30)

Round 8 :

30 sc (30)

Round 9 :

(4 sc; inc)*6 (36)

Round 10 :

(5 sc; inc)*6 (42)

Round 11 :

(6 sc; inc)*6 (48)

Round 12 :

(7 sc; inc)*6 (54)

Round 13 :

(8 sc; inc)*6 (60)

Round 14 :

6 sc; 6 inc; 48 sc (66)

Round 15-16 :

66 sc (66)

Round 17 :

6 sc; (1 sc; inc)*6; 48 sc (72)

Round 18 :

72 sc (72)

Round 19 :

14 sc; change to beige - 3 sc; change to ivory - 55 sc (72)

Round 20 :

6 sc; (2 sc; inc)*2; change to beige - 1 sc; inc; 2 sc; inc; change to ivory - (2 sc; inc)*2; 48 sc (78)

Round 21 :

13 sc; change to beige - 11 sc; change to ivory - 54 sc (78), change to beige color

Round 22 :

(12 sc; inc)*6 (84)

Round 23 :

(13 sc; inc)*6 (90)

Round 24 :

(14 sc; inc)*6 (96)

Round 25 :

62 sc; 18 ch (skip 18 sc); 16 sc (96)

Round 26-34 :

96 sc (96)

Round 35 :

(14 sc; dec)*6 (90)

Round 36 :

(13 sc; dec)*6 (84)

Round 37 :

(12 sc; dec)*6 (78)

Round 38 :

(11 sc; dec)*6 (72)

Round 39 :

(10 sc; dec)*6 (66)

Round 40 :

(9 sc; dec)*6 (60)

Round 41 :

(8 sc; dec)*6 (54)

Round 42 :

(7 sc; dec)*6 (48)

Round 43 :

(6 sc; dec)*6 (42)

Round 44 :

(5 sc; dec)*6 (36)

Round 45 :

(4 sc; dec)*6 (30)

Round 46 :

(3 sc; dec)*6 (24)

Round 47 :

(2 sc; dec)*6 (18)

Round 48 :

(1 sc; dec)*6 (12)

Round 49 :

6 dec (6), fasten off

— Eye patches (make 2) :

Info :

With brown yarn

Row 1 :

11 ch; turn and continue to work in rounds

Round 2 :

9 sc; 3 sc in 1st ch; 8 sc; inc (22)

Round 3 :

inc; 8 sc; 3 inc; 8 sc; 2 inc (28), leave a tail for sewing

Infos :

Sew eye patches and insert safety eyes as shown in the photos. After attaching (or sewing eyes) fill the head with stuffing and continue to crochet, starting in the spot between rounds 26-27

— Neck :

Round 1 :

BLO 36 sc (36)

Round 2-4 :

36 sc (36)

Round 5 :

(4 sc; dec)*6 (30)

Round 6-7 :

30 sc (30)

Round 8 :

(3 sc; dec)*6 (24)

Round 9-10 :

24 sc (24)

Round 11 :

(2 sc; dec)*6 (18)

Round 12 :

18 sc (18)

Round 13 :

(1 sc; dec)*6 (12)

Round 14 :

6 dec (6), fasten off

Assembly Instructions

  • Sew the completed legs to the base using the beige tail left from each leg, positioning them as shown in the pattern photos and connecting them as closely or spaced as you prefer.
  • Attach the tail to the back center of the base using the remaining yarn tail, making sure it sits firmly and points upward or to the side.
  • Stack the large ring onto the base first, ensuring it sits securely and evenly around the sloth's body.
  • Place the middle ring on top of the large ring, checking that it centers properly and stacks smoothly without wobbling.
  • Position the small ring with attached arms on top of the middle ring to complete the stacking tower.
  • Carefully attach the completed head to the small ring, sewing it securely so the sloth face is centered and visible when viewing from the front.
  • Ensure all pieces are sewn tightly and test the stability of the entire stacking toy before gifting or allowing children to play with it.

Important Notes

  • 💡Use tweezers to stuff the small claws properly as they are difficult to fill evenly with fingers alone
  • 💡Keep stitch markers handy especially during color changes in the head section between rounds 19-21 to maintain accurate placement
  • 💡Stuff the base firmly to provide adequate weight and stability for the stacking rings to balance properly during play
  • 💡The pattern mentions gray yarn for the middle ring but materials list only shows beige colors, use beige or your preferred color choice
  • 💡When working BLO (back loop only) sections, make sure you are consistently working in the correct loops to create the textured ridges
  • 💡The decorative edges on the rings using reverse crochet or slip stitches are optional but add a beautiful finished detail
  • 💡Pin all pieces in their intended positions before final sewing to ensure proper alignment and visual balance of the completed toy

This adorable sloth stacking toy pattern combines the sweetness of amigurumi with the developmental benefits of a classic children's toy! Featuring three graduating rings topped with the cutest sloth character complete with long claws and charming brown eye patches, this project creates an heirloom-quality toy that encourages learning through play. The detailed instructions guide you through each component from the sturdy base to the expressive head, resulting in a creation that's both functional and utterly huggable. Perfect for baby showers, nursery decor, or as a thoughtful handmade gift that will be treasured for years. 🦥🧶✨

You ask,

we answer.

FAQs

Can I use different yarn weights for this pattern?

Yes, but you'll need to adjust your hook size accordingly and be aware that using different yarn weights will significantly change the final size of your stacking toy. The pattern uses Alize Cotton Gold with 1.5mm and 3mm hooks for specific sections.

How do I make the rings stack properly without wobbling?

The key is stuffing the base very firmly to provide adequate weight and stability. Also make sure each ring is stuffed evenly and that you sew the starting and ending rounds together tightly without leaving gaps.

What if I can't find 12mm safety eyes?

You can use slightly smaller or larger safety eyes (10mm or 14mm work well), or you can crochet eyes using black yarn as suggested in the materials list. The eye patches will cover most of the eye area anyway.

Is this toy safe for babies and toddlers?

If you use safety eyes that are properly secured and ensure all pieces are sewn very tightly with no loose parts, it can be appropriate for supervised play with older babies and toddlers. For younger babies, consider embroidering the eyes instead of using safety eyes.

Do I have to make the decorative edges on the middle ring?

No, the decorative edges created by working slip stitches or reverse crochet in the front loops are optional. The ring will function perfectly well without them, but they do add a lovely textured detail to the finished piece.

How long are the finished dimensions of the stacking toy?

The final size depends on your tension and yarn choice, but with the recommended Alize Cotton Gold yarn and hooks, the completed stacking toy will be approximately 25-30cm tall when all rings are stacked, making it a perfect size for little hands.