🧢 Beautiful ✨ Detailed πŸ’ Adorable

Adorable Puppy Baby Booties Crochet Pattern

Adorable Puppy Baby Booties Crochet Pattern
4.8β˜… Rating
4-6 Hours Time Needed
4.0K Made This
βœ‚οΈ

Intermediate Level

Ideal for those with basic knitting experience, featuring slightly more advanced stitches and techniques to expand your skills.

⏱️

Weekend Treat

Takes 5-7 hours, making it an enjoyable project to finish over a couple of days.

🐾

Pocket Pal

A mini friend to carry anywhere, providing comfort and companionship in a perfectly portable size.

About This Adorable Puppy Baby Booties Crochet Pattern

Adorable Puppy Baby Booties Crochet Pattern crochet pattern - detailed view of completed project

The base bootie pattern includes multiple size options from 0-3 months up to 18-24 months, ensuring you can create the perfect fit for any baby. Each size has been carefully calculated with specific gauge requirements to achieve accurate measurements.

Why You'll Love This Adorable Puppy Baby Booties Crochet Pattern

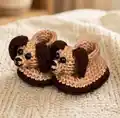
I absolutely love how these booties combine practicality with pure cuteness! The way those floppy puppy ears frame the little face just makes my heart melt every single time. What I really appreciate is how the pattern gives you complete control over customization - you can adjust the sizing, choose your favorite warm brown tones, and even add your own creative touches. The embroidered nose and mouth give each puppy so much personality, and watching them come to life as you assemble each piece is incredibly satisfying. These booties work up relatively quickly compared to other baby projects, yet they look impressively detailed and handcrafted. I love that they make such meaningful gifts that parents actually use and treasure, not just something that sits on a shelf.

Adorable Puppy Baby Booties Crochet Pattern step 1 - construction progress Adorable Puppy Baby Booties Crochet Pattern step 2 - assembly progress Adorable Puppy Baby Booties Crochet Pattern step 3 - details and accessories Adorable Puppy Baby Booties Crochet Pattern step 4 - final assembly and finishing

Switch Things Up

I love experimenting with different color combinations to create unique puppy personalities! Instead of the classic brown tones, I've made these in spotted patterns using white as the base with black or brown patches to create dalmatian or spotted puppy looks. You could even try gray and white for a husky vibe, or golden yellow for a golden retriever aesthetic.

For the ears, I sometimes make them in contrasting colors - one ear in one color and the other ear in a different shade to give that playful mixed-breed puppy charm. You can also adjust the ear length by adding or removing rows to create perky pointed ears instead of floppy ones, perfect for German Shepherd or Corgi-inspired booties.

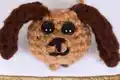
I've experimented with adding small embroidered details like eyebrows above the safety eyes using just a few stitches of contrasting yarn, which adds so much expression and character. A tiny tongue hanging out made from pink or red yarn is another adorable addition that takes just minutes but makes people smile.

The snout can be customized too - stuff it more firmly for a pronounced nose or keep it flatter for a different breed appearance. I've even tried embroidering little spots or freckles on the snout area with French knots for extra cuteness.

For special occasions, I like adding tiny accessories - a miniature crochet collar around the ankle cuff in a contrasting color with a tiny button or bead as a tag makes them extra special. You could even make a matching bone-shaped appliquΓ© to attach to the side of the bootie!

Common Mistakes & How to Fix Them

βœ— Skipping gauge check can result in booties that are too small or too large for the intended baby size βœ— Not using stitch markers when shaping the toe area leads to confusion about where rounds begin and end βœ— Stuffing the head too firmly before attaching safety eyes makes it difficult to secure the backs properly inside βœ— Forgetting to leave long tails for sewing results in having to weave in new yarn mid-assembly which creates bulk βœ— Attaching ears without pinning first can result in uneven placement that affects the overall puppy expression βœ— Not removing stuffing before securing safety eye backs makes it nearly impossible to attach them securely

Adorable Puppy Baby Booties Crochet Pattern

Create the sweetest puppy-themed baby booties that will melt hearts! This charming pattern combines functional footwear with adorable animal character details. Perfect for baby showers, new parents, or anyone who loves crafting precious handmade gifts. Each bootie features a detailed puppy head with floppy ears, embroidered features, and safety eyes that bring these little companions to life. These cozy booties will keep tiny toes warm while adding an extra dose of cuteness to any baby outfit.

Intermediate 4-6 Hours

Materials Needed for Adorable Puppy Baby Booties Crochet Pattern

β€” Main Fabric

  • 01
    Red Heart Super Saver yarn in Warm Brown (main bootie color)
  • 02
    Red Heart Super Saver yarn in Coffee Brown (for ears)
  • 03
    Red Heart Super Saver yarn in Black (for embroidery details)
  • 04
    Worsted weight 4-ply yarn can be substituted but check gauge carefully

β€” Tools Required

  • 01
    Crochet hook size F (3.75mm)
  • 02
    Crochet hook size G (4mm)
  • 03
    Crochet hook size H (5mm)
  • 04
    9mm animal safety eyes (4 eyes total for one pair)
  • 05
    Yarn needle for sewing and embroidery
  • 06
    Fiber fill stuffing
  • 07
    Stitch markers
  • 08
    Scissors
  • 09
    Pins for assembly placement
  • 10
    Tissue paper or extra fiberfill for stuffing bootie toe during assembly (optional)

Progress Tracker

0% Complete

β€” HEAD (Make 2 - All Sizes) :

Info :

This piece is made in continuous rounds. Use a stitch marker if needed. Uses F hook.

Rnd 1 :

Using color of choice and F hook, CH 2, 6 SC in 2nd CH from hook. Do not join. (6 SC)

Rnd 2 :

2 SC in each SC around. (12 SC)

Rnd 3 :

*SC in next SC, 2 SC in next SC*, repeat from * to * around. (18 SC)

Rnd 4-7 :

SC in each SC around. (18 SC)

Rnd 8 :

*SC DEC in next 2 SC, SC in next SC*, repeat from * to * around. (12 SC)

Rnd 9 :

*SC DEC next 2 SC*, repeat from * to * around, fasten off leaving approximately a 12" tail to sew. (6 SC)

Info :

Do not stuff yet.

β€” SNOUT (Make 2 - All Sizes) :

Rnd 1 :

With Warm Brown and F hook, CH 2, 6 SC in 2nd CH from hook, do not join. (6 SC)

Rnd 2 :

Working in back loops only, HDC in each SC around, SC in next stitch, SL ST to join, fasten off leaving a tail for sewing. (6 stitches)

β€” EARS (Make 4 - All Sizes) :

Row 1 :

With Coffee Brown and F hook, CH 3, SC in 2nd CH from hook, SC in last CH, CH 1, turn. (2 SC)

Row 2-6 :

SC in each SC across, CH 1, turn. (2 SC)

Info :

At end of row 6, do not turn, SC up the side of the ear for 6 SC, 2 SC across the bottom, 6 SC up the other side of the ear, SL ST to join, fasten off leaving a tail for sewing.

β€” ASSEMBLY INSTRUCTIONS :

Step 1 :

Stuff the head with fiberfill until it is round and to your desired firmness.

Step 2 :

Insert 9mm eyes between Rnd 4 and 5 with a 1-2 stitch gap between the eyes. Do not attach the backs yet.

Step 3 :

Pick up a snout. With black yarn, embroider a nose and mouth in an "I" shape. Use a double line for the nose and a single line for the mouth lines.

Step 4 :

Stuff the snout and sew to the head at Rnd 6 & 7 centered below the eyes. Once sewn down, check the eye placement and adjust as needed.

Step 5 :

Pull out the last round of the head. You only need to pull out 6 stitches (the 6 SC DEC stitches). Pull up an extra-long loop so you don't accidentally pull out any more stitches.

Step 6 :

Remove the stuffing from the head. Be careful not to let the eyes fall out.

Step 7 :

Attach the safety backs to the inside of the head. Go two clicks. If you attach them too tight, the head will bunch up.

Step 8 :

Re-perform the 6 SC DEC stitches (or however many stitches you removed).

Step 9 :

Re-stuff the head to the desired firmness.

Step 10 :

Sew the ears to the head in desired position.

Step 11 :

Once you are happy with the head, sew the head to the top of the foot. The back of the head will rest against the ankle cuff. Secure the head to the ankle with 3-4 stitches.

Info :

You can stuff the toe of the bootie with tissue paper or fiberfill to give it a harder surface for sewing the head, then remove the stuffing from the bootie. The smaller sizes don't need this, but the 5.5" bootie tends to move around when sewing so stuffing the toe helps keep things still.

Assembly Instructions

  • Stuff the puppy head firmly but not too tightly until it achieves a round shape with your desired firmness level.
  • Position safety eyes between rounds 4 and 5 with a 1-2 stitch gap between them, but don't secure the backs until after embroidering the snout.
  • Embroider the nose and mouth on the snout using black yarn in an 'I' shape with a double line for the nose.
  • Lightly stuff the snout and sew it to the head at rounds 6-7, centered below the eyes, checking eye placement before securing.
  • Carefully remove 6 stitches from the last round of the head, take out stuffing, attach safety eye backs with two clicks, then re-work those stitches and re-stuff.
  • Sew the floppy coffee brown ears to the head in your desired position, ensuring they frame the face nicely.
  • Attach the completed puppy head to the top of the bootie foot with the back of the head resting against the ankle cuff, securing with 3-4 stitches.

Important Notes

  • πŸ’‘Always check gauge before starting to ensure the bootie will be the correct size for the baby's foot measurement.
  • πŸ’‘Use stitch markers consistently when working in continuous rounds to track where each round begins and ends.
  • πŸ’‘Leave long tails (at least 12 inches) when fastening off pieces to make assembly easier and avoid adding bulk.
  • πŸ’‘Stuff the head before placing eyes to get proper positioning, but remove stuffing before securing the safety backs.
  • πŸ’‘Pin all pieces in place before sewing to ensure symmetrical placement and proper positioning on both booties.
  • πŸ’‘The smaller bootie sizes (0-3 and 3-6 months) are easier to assemble than larger sizes which may need toe stuffing for stability.
  • πŸ’‘Each bootie should have ears positioned to create a left and right foot appearance for the complete puppy look.

These precious puppy booties bring warmth, comfort, and adorable character to any baby's wardrobe! The combination of functional footwear with charming three-dimensional puppy faces creates a project that's both practical and absolutely heartwarming. Whether you're making them as a thoughtful baby shower gift or creating a special handmade treasure for your own little one, these booties are sure to become a cherished keepsake. The floppy ears and sweet embroidered expression give each puppy its own unique personality. 🐢🧢 Happy crocheting! βœ¨πŸ‘Ά

You ask,

we answer.

FAQs

What sizes are included in this puppy bootie pattern?

The pattern includes four size options: 0-3 months (3.5" with G hook), 3-6 months (4" with H hook), 6-12 months (4.5" with G hook), 12-18 months (5" with H hook), and 18-24 months (5.5" with H hook). Always measure the baby's foot from heel to longest toe for the best fit, as sizes can vary significantly from baby to baby.

Can I use different yarn brands besides Red Heart Super Saver?

Yes, you can use any worsted weight 4-ply yarn, but it's crucial to check your gauge carefully as different yarn manufacturers have varying thicknesses. The gauge and hook size recommendations in the pattern are specifically for Red Heart Super Saver, so you may need to adjust your hook size to achieve the correct measurements with a different brand.

How do I securely attach the safety eyes without the head bunching up?

The key is to position the eyes first while the head is stuffed, then carefully pull out the last 6 stitches of round 9, remove all stuffing, and attach the safety backs with just two clicks - not too tight. After securing the backs, re-work those 6 stitches and re-stuff the head. This technique prevents bunching and ensures the eyes are securely fastened.

What's the best way to embroider the puppy nose and mouth?

Use black yarn to create an 'I' shape - embroider a double line for the nose portion at the top, then single lines extending down for the mouth. Embroider directly onto the snout piece before stuffing and attaching it to the head. This gives you better control and a cleaner finished look than trying to embroider after assembly.

Do I need to make the booties in specific colors?

Not at all! While the pattern suggests Warm Brown for the main color and Coffee Brown for the ears to create a classic puppy look, you can customize the colors to create different puppy breeds or even fantasy-colored pups. Just ensure you have good contrast between the snout color and the embroidery thread for the facial features to show clearly.

How do I ensure the puppy heads are positioned correctly on each bootie?

The back of the puppy head should rest against the ankle cuff of the bootie. Before sewing permanently, you can stuff the toe of the bootie with tissue paper or extra fiberfill to create a firm surface that won't shift while you're sewing. Pin the head in place first, check from all angles, then secure with 3-4 stitches through both the head and bootie.