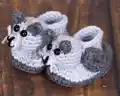
Get ready to fall head over heels for this sweet little kitty baby bootie pattern — it's one of those projects that looks incredibly impressive but is way more approachable than you'd think. From the pointy little ears to the curled tail wrapping up the side of the bootie, every detail has been thought through to give your finished pair that perfect handmade charm. This pattern includes step-by-step instructions for the base bootie, the kitty head, ears, snout, tail, and even whiskers, so there's nothing left to guess. Whether you're whipping these up as a gift for a newborn or just enjoying a fun weekend crochet project, these kitty booties are going to be an absolute hit.
Progress Tracker
0% Complete
— Kitty Snout (Make 2) :
Round 1 :
With Lt. Grey and F hook, CH 2, 6 SC in 2nd CH from hook, do not join. (6 SC)
Round 2 :
SC in each SC around, SL ST to join, fasten off leaving a tail for sewing. (6 stitches)
— Kitty Ears (Make 4) :
Row 1 :
With Heather Grey and F hook, CH 2, SC in 2nd CH from hook, CH 1, turn. (1 SC)
Row 2 :
2 SC in next SC, working around the piece, SC in row, (SC, CH 1, SC) in top, SC in row going down next side, SL ST to join, fasten off leaving a tail for sewing.
— Kitty Tail (Make 2) :
Info :
It is recommended to sew the head on first, then come back to make the tails so you know how long to make them based on your bootie size.
Round 1 :
With Heather Grey and F hook, CH 2, 4 SC in 2nd CH from hook, do not join. (4 SC)
Round 2 :
SC in each SC around. (4 SC)
Round 3 :
HDC in each stitch around.
Info :
Repeat Round 3 until desired length is reached. The tail will go from the back of the bootie, up the side, and curl up a bit or into your desired tail shape. When the length is reached, SL ST to join, fasten off leaving a long tail for sewing. (4 stitches)
— Head (Make 2 – All Sizes) :
Info :
This head works for all bootie sizes and uses an F hook. This piece is made in continuous rounds. Use a stitch marker if needed.
Round 1 :
Using Heather Grey and F hook, CH 2, 6 SC in 2nd CH from hook. Do not join. Use stitch marker if needed. (6 SC)
Round 2 :
2 SC in each SC around. (12 SC)
Round 3 :
*SC in next SC, 2 SC in next SC*, repeat from * to * around. (18 SC)
Round 4-7 :
SC in each SC around. (18 SC)
Round 8 :
*SC DEC in next 2 SC, SC in next SC*, repeat from * to * around. (12 SC)
Round 9 :
*SC DEC next 2 SC*, repeat from * to * around, fasten off leaving approximately a 12" tail to sew. (6 SC)
Info :
Do not stuff yet. Continue to kitty assembly.
— Base Bootie Sole – 0-3 Month / 3-6 Month (Make 2) :
Info :
0-3 Month: 3.5" use G hook. 3-6 Month: 4" use H hook. Remember to measure baby's foot to ensure the correct size is being made.
Round 1 :
Using Sole Color, CH 10, SC in 2nd CH from hook, SC in next 5 CH, HDC in next CH, 2 HDC in next CH, 5 HDC in next CH, working down opposite side of starting CH, 2 HDC in next CH, HDC in next CH, SC in next 5 CH, 2 SC in next CH. (24 Stitches)
Info :
This piece is worked in continuous rounds so do not SL ST to join. Just continue on to next round. Use a stitch marker to mark the beginning stitch.
Round 2 :
2 SC in first SC, SC in next 8 stitches, *2 SC in next stitch, SC in next stitch*, repeat from * to * 2 more times, SC in next 8 stitches, 2 SC in next stitch. (29 SC)
Round 3 :
2 SC in next stitch, SC in next 9 stitches, 2 SC in next stitch, *SC in next stitch, 2 SC in next stitch*, repeat from * to * 2 more times, SC in next 9 stitches, 2 SC in next stitch, SC in next stitch, SL ST in next stitch. (35 SC)
Info :
Check gauge here. Sole should measure 3.5" with G hook or 4" with H hook. If gauge is off, adjust as needed.
— Base Bootie Main – 0-3 Month / 3-6 Month :
Row 1 :
CH 1, working in back loops only, SC in same stitch as joining and in each SC around, SL ST in first SC to join. (35 SC)
Info :
At this point you can change colors if desired to have the sole one color and the bootie a contrasting color. If the decision is to change colors, fasten off, and attach new color in same stitch.
Row 2 :
CH 1, working in both loops, SC in each SC around, SL ST in first SC to join. (35 SC)
Row 3 :
CH 1, SC in same stitch as joining and in each SC around, SL ST in first SC to join. (35 SC)
Info :
We will now begin shaping the toe.
Row 4 :
CH 1, SC in same stitch as joining and in next 11 stitches, skip next stitch, HDC in next stitch, skip next stitch, DC in next stitch, DC DEC next 2 stitches together, DC in next stitch, skip next stitch, HDC in next stitch, skip next stitch, SC in next 13 stitches, SL ST in first SC to join. (30 stitches)
Info :
Use a stitch marker to mark the first stitch so there is no confusion what stitch to join at the end of the row.
Row 5 :
CH 1, skip joining stitch, SC in next 10 stitches, skip next stitch, SC in next stitch, skip next stitch, SC in next 2 stitches, skip next stitch, SC in next stitch, skip next stitch, SC in next 10 stitches, skip last stitch, SL ST in first SC to join. (24 SC)
Row 6 :
CH 1, SC in same stitch as joining and in next 7 SC, *skip next SC, SC in next SC*, repeat from * to * 2 more times, skip next SC, SC in next 8 SC, skip last SC, SL ST in first SC to join. (19 SC)
Row 7 :
CH 1, using front loops only, SC in same stitch as joining and in next 7 SC, skip next SC, SC in each of the next 2 SC, skip next SC, SC in next 7 SC, SL ST in first SC to join. (17 SC)
Info :
The last 3 rows form the ankle cuff.
Row 8-10 :
CH 1, using front loops only, SC in same stitch as joining and in each SC around, SL ST in first SC to join. At end of row 10, fasten off and weave in ends. (17 SC)
— Base Bootie Sole – 6-12 Month / 12-18 Month (Make 2) :
Info :
6-12 Month: 4.5" use G hook. 12-18 Month: 5" use H hook.
Round 1 :
Using Sole Color, CH 14, SC in 2nd CH from hook, SC in next 9 CH, HDC in next CH, 2 HDC in next CH, 5 HDC in next CH, working down opposite side of starting CH, 2 HDC in next CH, HDC in next CH, SC in next 9 CH, 2 SC in next CH. (32 Stitches)
Info :
This piece is worked in continuous rounds so do not SL ST to join. Just continue on to next round. Use a stitch marker to mark the beginning stitch.
Round 2 :
2 SC in first SC, SC in next 12 stitches, *2 SC in next stitch, SC in next stitch*, repeat from * to * 2 more times, SC in next 12 stitches, 2 SC in next stitch. (37 SC)
Round 3 :
2 SC in next stitch, SC in next 13 stitches, 2 SC in next stitch, *SC in next stitch, 2 SC in next stitch*, repeat from * to * 2 more times, SC in next 13 stitches, 2 SC in next stitch, SC in next stitch, SL ST in next stitch. (43 SC)
Info :
Check gauge here. Sole should measure 4.5" with G hook or 5" with H hook. If gauge is off, adjust as needed.
— Base Bootie Main – 6-12 Month / 12-18 Month :
Row 1 :
CH 1, working in back loops only, SC in same stitch as joining and in each SC around, SL ST in first SC to join. (43 SC)
Info :
At this point you can change colors if desired. If the decision is to change colors, fasten off, and attach new color in same stitch.
Row 2 :
CH 1, working in both loops, SC in each SC around, SL ST in first SC to join. (43 SC)
Row 3 :
CH 1, SC in same stitch as joining and in each SC around, SL ST in first SC to join. (43 SC)
Info :
We will now begin shaping the toe.
Row 4 :
CH 1, SC in same stitch as joining and in next 15 stitches, skip next stitch, HDC in next stitch, skip next stitch, DC in next stitch, DC DEC next 2 stitches together, DC in next stitch, skip next stitch, HDC in next stitch, skip next stitch, SC in next 17 stitches, SL ST in first SC to join. (38 stitches)
Info :
Use a stitch marker to mark the first stitch so there is no confusion what stitch to join at the end of the row.
Row 5 :
CH 1, skip joining stitch, SC in next 14 stitches, skip next stitch, SC in next stitch, skip next stitch, SC in next 2 stitches, skip next stitch, SC in next stitch, skip next stitch, SC in next 14 stitches, skip last stitch, SL ST in first SC to join. (32 SC)
Row 6 :
CH 1, SC in same stitch as joining and in next 11 SC, *skip next SC, SC in next SC*, repeat from * to * 2 more times, skip next SC, SC in next 12 SC, skip last SC, SL ST in first SC to join. (27 SC)
Row 7 :
CH 1, using front loops only, SC in same stitch as joining and in next 11 SC, skip next SC, SC in each of the next 2 SC, skip next SC, SC in next 11 SC, SL ST in first SC to join. (25 SC)
Info :
The last 4 rows form the ankle cuff.
Row 8-11 :
CH 1, using front loops only, SC in same stitch as joining and in each SC around, SL ST in first SC to join. At end of row 11, fasten off and weave in ends. (25 SC)
— Base Bootie Sole – 18-24 Month (Make 2) :
Info :
18-24 Month: 5.5" use H hook.
Round 1 :
Using Sole Color, CH 15, SC in 2nd CH from hook, SC in next 10 CH, HDC in next CH, 2 HDC in next CH, 5 HDC in next CH, working down opposite side of starting CH, 2 HDC in next CH, HDC in next CH, SC in next 10 CH, 2 SC in next CH. (34 Stitches)
Info :
This piece is worked in continuous rounds so do not SL ST to join. Just continue on to next round. Use a stitch marker to mark the beginning stitch.
Round 2 :
2 SC in first SC, SC in next 13 stitches, *2 SC in next stitch, SC in next stitch*, repeat from * to * 2 more times, SC in next 13 stitches, 2 SC in next stitch. (39 SC)
Round 3 :
2 SC in next stitch, SC in next 14 stitches, 2 SC in next stitch, *SC in next stitch, 2 SC in next stitch*, repeat from * to * 2 more times, SC in next 14 stitches, 2 SC in next stitch, SC in next stitch, 2 SC in next stitch. (46 SC)
Round 4 :
1 SC in next stitch, 2 SC in next stitch, 1 SC in next 42 stitches, 2 SC in next stitch, SL ST in last stitch. (48 SC)
Info :
Check gauge here. Sole should measure 5.5" with H hook. If gauge is off, adjust as needed.
— Base Bootie Main – 18-24 Month :
Row 1 :
CH 1, working in back loops only, SC in same stitch as joining and in each SC around, SL ST in first SC to join. (48 SC)
Info :
At this point you can change colors if desired. If the decision is to change colors, fasten off, and attach new color in same stitch.
Row 2 :
CH 1, working in both loops, SC in each SC around, SL ST in first SC to join. (48 SC)
Row 3 :
CH 1, SC in same stitch as joining and in each SC around, SL ST in first SC to join. (48 SC)
Info :
We will now begin shaping the toe.
Row 4 :
CH 1, SC in same stitch as joining and in next 18 stitches, skip next stitch, HDC in next stitch, skip next stitch, DC in next stitch, DC DEC next 2 stitches together, DC in next stitch, skip next stitch, HDC in next stitch, skip next stitch, SC in next 19 stitches, SL ST in first SC to join. (43 stitches)
Row 5 :
CH 1, skip joining stitch, SC in next 17 stitches, skip next stitch, SC in next stitch, skip next stitch, SC in next 2 stitches, skip next stitch, SC in next stitch, skip next stitch, SC in next 17 stitches, SL ST in first SC to join. (38 SC)
Row 6 :
CH 1, SC DEC next 2 SC, SC in next 12 SC, SC DEC next 2 SC, *skip next SC, SC in next SC*, repeat from * to * 2 more times, skip next SC, SC DEC next 2 SC, SC in next 11 SC, SC DEC last 2 SC, SL ST in first SC to join. (30 SC)
Row 7 :
CH 1, SC DEC next 2 SC, SC in next 11 SC, skip next SC, SC in each of the next 2 SC, skip next SC, SC in next 11 SC, SC DEC last 2 SC, SL ST in first SC to join. (26 SC)
Row 8 :
CH 1, SC in same stitch as joining and in next 10 SC, skip next SC, SC in next 3 SC, skip next SC, SC in next 10 SC, SL ST in first SC to join. (24 SC)
Info :
The last 4 rows form the ankle cuff.
Row 9-12 :
CH 1, using front loops only, SC in same stitch as joining and in each SC around, SL ST in first SC to join. At end of row 12, fasten off and weave in ends. (24 SC)
There's something genuinely magical about watching a skein of grey yarn slowly turn into a tiny little kitty face with pointy ears, a sweet embroidered nose, and a curling tail that wraps right up the side of the bootie. This pattern is one of those projects that feels like pure joy from start to finish — every single stitch brings the little kitty to life a bit more. Whether you're gifting these to a new parent or tucking them away as a keepsake, they're the kind of handmade treasure that people actually hold onto forever. 🐱🧶 Happy crocheting, and enjoy every single moment of making these! ✨