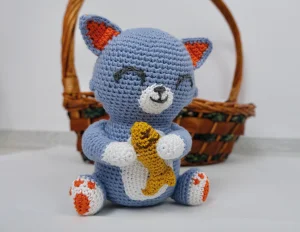
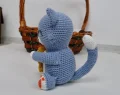
Get ready to create the most charming little feline friend you've ever seen! This sweet blue kitty, complete with its very own mustard-yellow fish, is a joy to crochet from start to finish. I've designed this project to be full of personality, featuring unique details like textured paw pads and a perfectly plump belly that makes it extra huggable. You'll love watching the character come to life as you assemble the pieces and add those final expressive facial stitches.
Progress Tracker
0% Complete
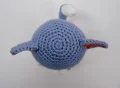
— 1. Head and Torso :
Round 1 :
Using blue yarn, create a magic ring and work 8 sc into it. Do not join rounds; work in a continuous spiral. (8)
Round 2 :
Work 1 inc into every st around. (16)
Round 3 :
[1 sc, 1 inc] repeat 8 times. (24)
Round 4 :
[2 sc, 1 inc] repeat 8 times. (32)
Round 5 :
[3 sc, 1 inc] repeat 8 times. (40)
Round 6 :
[4 sc, 1 inc] repeat 8 times. (48)
Round 7 :
[5 sc, 1 inc] repeat 8 times. (56)
Round 8-16 :
Work 1 sc into every st for these 9 rounds. (56)
Round 17 :
14 sc, sc3tog, 22 sc, sc3tog, 14 sc. (52)
Info :
Note: The stitch count in the source for Round 17 is listed as 50, but the math for the decreases results in 52. Proceed with 52.
Round 18 :
14 sc, sc3tog, 22 sc, sc3tog, 14 sc. (48)
Round 19 :
13 sc, sc3tog, 18 sc, sc3tog, 13 sc. (44)
Round 20 :
13 sc, sc3tog, 18 sc, sc3tog, 13 sc. (40)
Round 21 :
Work 1 sc into every st around. (40)
Round 22 :
[6 sc, 1 dec] repeat 5 times. (35)
Round 23 :
[5 sc, 1 dec] repeat 5 times. (30) Begin stuffing the head firmly.
Round 24 :
Work 1 sc into every st around. (30)
Round 25 :
Work 1 sc into every st around. (30)
Round 26 :
Work 1 sc into every st around. (30)
Round 27 :
[3 sc, 1 inc] repeat 8 times. (38)
Round 28 :
[4 sc, 1 inc] repeat 8 times. (46)
Round 29-35 :
Work 1 sc into every st for these 7 rounds. (46)
Round 36 :
[11 sc, 2 inc, 11 sc] repeat 2 times. (50)
Round 37-43 :
Work 1 sc into every st for these 7 rounds. (50)
Round 44 :
12 sc, 1 inc, 2 sc, 1 inc, 24 sc, 1 inc, 2 sc, 1 inc, 12 sc. (54)
Round 45 :
13 sc, 1 inc, 3 sc, 1 inc, 24 sc, 1 inc, 3 sc, 1 inc, 13 sc. (58)
Round 46 :
Work 1 sc into every st around. (58)
Round 47 :
[6 sc, 1 dec] repeat 7 times, then 2 sc. (51)
Round 48 :
[5 sc, 1 dec] repeat 7 times, then 2 sc. (44)
Round 49 :
[6 sc, 1 dec] repeat 5 times, then 4 sc. (39)
Round 50 :
[5 sc, 1 dec] repeat 5 times, then 4 sc. (34)
Round 51 :
[3 sc, 1 dec] repeat 6 times, then 4 sc. (28)
Round 52 :
[2 sc, 1 dec] repeat 7 times. (21)
Round 53 :
[2 sc, 1 dec] repeat 5 times, then 1 sc. (16)
Info :
Fill the body completely with stuffing. Fasten off and weave in the end to close the remaining gap.
— 2. Arms (Make 2) :
Round 1 :
Using white yarn, make a magic ring and work 6 sc into it. (6)
Round 2 :
Work 1 inc into every st around. (12)
Round 3 :
Work 1 sc into every st around. (12)
Round 4-10 :
Work 1 sc into every st for these 7 rounds. (12)
Round 11 :
Switch to blue yarn. [1 inc, 5 sc] repeat 2 times. (14)
Round 12-14 :
Work 1 sc into every st for these 3 rounds. (14)
Round 15 :
[1 inc, 6 sc] repeat 2 times. (16)
Round 16-19 :
Work 1 sc into every st for these 4 rounds. (16)
Info :
Stuff the arm lightly. Flatten the top edge and sc through both layers (8 sc) to close. Fasten off, leaving a long tail for assembly.
— 3. Tail :
Round 1 :
Using white yarn, make a magic ring and work 6 sc into it. (6)
Round 2 :
[1 sc, 1 inc] repeat 3 times. (9)
Round 3 :
Work 1 sc into every st around. (9)
Round 4 :
[2 sc, 1 inc] repeat 3 times. (12)
Round 5-7 :
Work 1 sc into every st for these 3 rounds. (12)
Round 8 :
[5 sc, 1 inc] repeat 2 times. (14)
Round 9-12 :
Work 1 sc into every st for these 4 rounds. (14)
Round 13 :
Switch to blue yarn. [6 sc, 1 inc] repeat 2 times. (16)
Round 14-20 :
Work 1 sc into every st for these 7 rounds. (16)
Round 21 :
[6 sc, 1 dec] repeat 2 times. (14)
Round 22-24 :
Work 1 sc into every st for these 3 rounds. (14)
Round 25-45 :
Work 1 sc into every st for these 21 rounds. (14)
Info :
Stuff the tail gradually as you work. Flatten the top and sc through both layers (7 sc) to close. Fasten off with a long tail.
— 4. Belly :
Row 1 :
Using white yarn, ch 7. Starting in the 2nd ch from hook, work 5 sc, then 3 sc into the last ch. Turn to work along the other side of the chain: 4 sc, 1 inc. (14)
Row 2 :
1 inc, 4 sc, 3 inc, 4 sc, 2 inc. (20)
Row 3 :
1 sc, 1 inc, 4 sc, [1 sc, 1 inc] repeat 3 times, 4 sc, [1 sc, 1 inc] repeat 2 times. (26)
Row 4 :
2 sc, 1 inc, 4 sc, [2 sc, 1 inc] repeat 3 times, 4 sc, [2 sc, 1 inc] repeat 2 times. (32)
Row 5 :
3 sc, 1 inc, 4 sc, [3 sc, 1 inc] repeat 3 times, 4 sc, [3 sc, 1 inc] repeat 2 times. (38)
Row 6 :
4 sc, 1 inc, 4 sc, [4 sc, 1 inc] repeat 3 times, 4 sc, [4 sc, 1 inc] repeat 2 times. (44)
Info :
Fasten off, leaving a long tail to sew the belly patch onto the torso.
— 5. Ears (Make 2) :
Info :
You will make two inner pieces in orange and two outer pieces in blue, then join them together.
Round 1 :
Ch 2, work 2 sc in the 2nd ch from hook. (2)
Round 2 :
Ch 1, turn. 2 inc. (4)
Round 3 :
Ch 1, turn. 4 sc. (4)
Round 4 :
Ch 1, turn. 1 inc, 2 sc, 1 inc. (6)
Round 5 :
Ch 1, turn. 6 sc. (6)
Round 6 :
Ch 1, turn. 1 inc, 4 sc, 1 inc. (8)
Round 7 :
Ch 1, turn. 8 sc. (8)
Info :
Place one orange piece and one blue piece together. Using blue yarn, sc around the edges to join them, forming a triangle. Leave a tail for sewing.
— 6. Legs (Make 2) :
Round 1 :
Using white yarn, ch 5. In 2nd ch from hook, work 2 sc. Sc in next 2 ch, then 3 sc in the last ch. Work along the other side: 2 sc, 1 inc. (12)
Round 2 :
Switch to blue yarn. 2 inc, 4 sc, 2 inc, 4 sc. (16)
Round 3 :
Work 1 sc into every st around. (16)
Round 4 :
6 sc, [switch to orange, 1 inc, 1 sc, switch to blue, 1 sc] repeat 3 times. (19)
Round 5 :
Work 1 sc into every st around. (19)
Round 6 :
Switch back to main blue yarn and work 1 sc into every st around. (19)
Round 7 :
7 sc, [1 dec] repeat 3 times, 6 sc. (16)
Round 8 :
Work 1 sc into every st around. (16)
Round 9 :
Work 1 sc into every st around. (16)
Round 10 :
7 sc, [1 dec] repeat 2 times, 5 sc. (14)
Round 11-14 :
Work 1 sc into every st for these 4 rounds. (14)
Info :
Stuff the leg. Flatten the top and sc through both layers (7 sc) to close. Leave a tail for sewing.
— 7. The Fish :
Round 1 :
Using mustard yellow yarn, make a magic ring and work 6 sc into it. (6)
Round 2 :
[1 sc, 1 inc] repeat 3 times. (9)
Round 3 :
Work 1 sc into every st around. (9)
Round 4 :
[2 sc, 1 inc] repeat 3 times. (12)
Round 5 :
Work 1 sc into every st around. (12)
Round 6-8 :
Work 1 sc into every st for these 3 rounds. (12)
Round 9 :
[2 sc, 1 dec] repeat 3 times. (9)
Round 10 :
[1 sc, 1 dec] repeat 3 times. (6)
Round 11 :
Work 2 inc, then 4 sc. (8)
Round 12 :
Work 1 sc into every st around. (8)
Round 13 :
Flatten the end. To make the tail fins: [ch 1, 3 sc in next st, sl st] repeat twice across the flattened edge. Fasten off.
— 8. Muzzle :
Round 1 :
Using white yarn, make a magic ring and work 8 sc into it. (8)
Round 2 :
Work 1 inc into every st around. (16)
Round 3 :
[3 sc, 1 inc] repeat 4 times. (20)
Info :
Fasten off, leaving a tail for sewing onto the face.
I hope you enjoyed making this little cat as much as I did! There's something so special about finishing an amigurumi project and seeing that cute little face staring back at you. Whether you keep him for yourself or give him away as a thoughtful gift, he’s sure to be a hit. Don't forget to share your finished photos with the community—I love seeing the different yarn choices and personalities you all bring to these patterns. Happy crafting, and may your hook always find the right stitch! 🧶 ✨