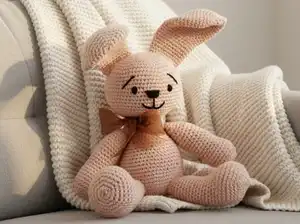
Create your own charming bunny companion with this delightful amigurumi pattern. Perfect for beginners and experienced crocheters alike, this sweet bunny measures 20cm sitting and features cute floppy ears, a fluffy tail, and an adorable embroidered face. Craft a timeless keepsake that will bring joy for years to come.
Progress Tracker
0% Complete
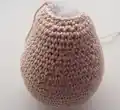
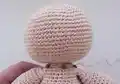
— Head (make 1) :
Rnd. 1 :
6sc in 2nd ch from hook; 6sts
Rnd. 2 :
inc 6 times; 12sts
Rnd. 3 :
(1sc, inc) 6 times; 18sts
Rnd. 4 :
(2sc, inc) 6 times; 24sts
Rnd. 5 :
(3sc, inc) 6 times; 30sts
Rnd. 6 :
(4sc, inc) 6 times; 36sts
Rnd. 7 :
(5sc, inc) 6 times; 42sts
Rnd. 8 :
(6sc, inc) 6 times; 48sts
Rnd. 9 :
(7sc, inc) 6 times; 54sts
Rnd. 10 :
(8sc, inc) 6 times; 60sts
Rnd. 11 :
(9sc, inc) 6 times; 66sts
Rnd. 12-20 :
sc around; 66sts
Rnd. 21 :
(sc2tog, 9sc) 6 times; 60sts
Rnd. 22 :
(sc2tog, 8sc) 6 times; 54sts
Rnd. 23 :
(sc2tog, 7sc) 6 times; 48sts
Rnd. 24 :
(sc2tog, 6sc) 6 times; 42sts
Rnd. 25 :
(sc2tog, 5sc) 6 times; 36sts
Rnd. 26 :
(sc2tog, 4sc) 6 times; 30sts
Rnd. 27 :
(sc2tog, 3sc) 6 times; 24sts
Rnd. 28 :
(sc2tog, 2sc) 6 times; 18sts
Info :
Finish. Stuff the head
— Body (make 1) :
Rnd. 1 :
6sc in 2nd ch from hook; 6sts
Rnd. 2 :
inc 6 times; 12sts
Rnd. 3 :
(1sc, inc) 6 times; 18sts
Rnd. 4 :
(2sc, inc) 6 times; 24sts
Rnd. 5 :
(3sc, inc) 6 times; 30sts
Rnd. 6 :
(4sc, inc) 6 times; 36sts
Rnd. 7 :
(5sc, inc) 6 times; 42sts
Rnd. 8 :
(6sc, inc) 6 times; 48sts
Rnd. 9 :
(7sc, inc) 6 times; 54sts
Rnd. 10-17 :
sc around; 54sts
Rnd. 18 :
(sc2tog, 7sc) 6 times; 48sts
Rnd. 19 :
sc around; 48sts
Rnd. 20 :
(sc2tog, 6sc) 6 times; 42sts
Rnd. 21 :
sc around; 42sts
Rnd. 22 :
(sc2tog, 5sc) 6 times; 36sts
Rnd. 23 :
sc around; 36sts
Rnd. 24 :
(sc2tog, 4sc) 6 times; 30sts
Rnd. 25-27 :
sc around; 30sts
Rnd. 28 :
(sc2tog, 3sc) 6 times; 24sts
Rnd. 29 :
(sc2tog, 2sc) 6 times; 18sts
Info :
Finish and leave long end to sew head to the body. Stuff the body
— Arms (make 2) :
Rnd. 1 :
6sc in 2nd ch from hook; 6sts
Rnd. 2 :
inc 6 times; 12sts
Rnd. 3 :
(1sc, inc) 6 times; 18sts
Rnd. 4 :
(2sc, inc) 6 times; 24sts
Rnd. 5-9 :
sc around; 24sts
Rnd. 10 :
(sc2tog, 4sc) 4 times; 20sts
Rnd. 11-20 :
sc around; 20sts
Rnd. 21 :
(sc2tog, 3sc) 4 times; 16sts
Info :
Start to stuff the arm lightly and keep adding stuffing after every few rounds
Rnd. 22 :
sc around; 16sts
Rnd. 23 :
(sc2tog, 6sc) 2 times; 14sts
Rnd. 24 :
(sc2tog, 5sc) 2 times; 12sts
Rnd. 25 :
(sc2tog, 2sc) 3 times; 9sts
Info :
Finish, leave long end to sew arms to the body
— Legs (make 2) :
Rnd. 1 :
6sc in 2nd ch from hook; 6sts
Rnd. 2 :
inc 6 times; 12sts
Rnd. 3 :
(1sc, inc) 6 times; 18sts
Rnd. 4 :
(2sc, inc) 6 times; 24sts
Rnd. 5 :
(3sc, inc) 6 times; 30sts
Rnd. 6 :
(4sc, inc) 6 times; 36sts
Rnd. 7-10 :
sc around; 36sts
Rnd. 11 :
sc2tog 10 times, 16sc; 26sts
Rnd. 12-13 :
sc around; 26sts
Rnd. 14 :
2sc, sc2tog 3 times, 18sc; 23sts
Rnd. 15 :
sc around; 23sts
Rnd. 16 :
1sc, sc2tog 3 times, 16sc; 20sts
Info :
Start to stuff the leg lightly and keep adding stuffing after every few rounds
Rnd. 17-20 :
sc around; 20sts
Rnd. 21 :
(sc2tog, 8sc) 2 times; 18sts
Rnd. 22-23 :
sc around; 18sts
Rnd. 24 :
(sc2tog, 4sc) 3 times; 15sts
Rnd. 25 :
sc around; 15sts
Info :
Finish and leave long end to sew legs to the body
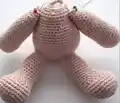
— Ears (make 2) :
Rnd. 1 :
6sc in 2nd ch from hook; 6sts
Rnd. 2 :
inc 6 times; 12sts
Rnd. 3 :
(1sc, inc) 6 times; 18sts
Rnd. 4 :
(2sc, inc) 6 times; 24sts
Rnd. 5 :
(3sc, inc) 6 times; 30sts
Rnd. 6 :
(4sc, inc) 6 times; 36sts
Rnd. 7-11 :
sc around; 36sts
Rnd. 12 :
(sc2tog, 4sc) 6 times; 30sts
Rnd. 13-15 :
sc around; 30sts
Rnd. 16 :
(sc2tog, 3sc) 6 times; 24sts
Rnd. 17-22 :
sc around; 24sts
Rnd. 23 :
(sc2tog, 4sc) 4 times; 20sts
Rnd. 24-27 :
sc around; 20sts
Info :
Finish and leave long end to sew ear onto the head. Do not stuff
— Tail (make 1) :
Rnd. 1 :
6sc in 2nd ch from hook; 6sts
Rnd. 2 :
inc 6 times; 12sts
Rnd. 3 :
(1sc, inc) 6 times; 18sts
Rnd. 4-6 :
sc around; 18sts
Rnd. 7 :
(sc2tog, 1sc) 6 times; 12sts
Info :
Finish and leave long end to sew tail to the body. Stuff the tail
This adorable bunny amigurumi pattern brings a timeless handmade companion to life. With its sweet embroidered face, floppy ears, and cuddly body, this pattern combines beginner-friendly techniques with charming results. The continuous rounds create smooth, professional-looking pieces that assemble into a keepsake treasure. Whether you're creating a gift for someone special or adding to your own collection, this bunny is sure to bring smiles and warm hearts. 🧶 Happy crocheting! 🐰✨