🧢 Beautiful ✨ Detailed πŸ’ Adorable

Yumi Baby Panda Amigurumi Pattern

Yumi Baby Panda Amigurumi Pattern
4.3β˜… Rating
8-10 Hours Time Needed
3.4K Made This
βœ‚οΈ

Intermediate Level

Ideal for those with basic knitting experience, featuring slightly more advanced stitches and techniques to expand your skills.

⏱️

All-Day Adventure

Requires 8-10 hours, ideal for a full day of immersive knitting.

🧸

Cute Companion

An adorable friend to cherish, handcrafted with love to bring comfort and joy for years to come.

About This Yumi Baby Panda Amigurumi Pattern

Yumi Baby Panda Amigurumi Pattern crochet pattern - detailed view of completed project

The pattern includes detailed instructions for creating posable limbs that can be positioned for sitting or standing displays. Special tightening techniques create the characteristic panda muzzle shape, while the optional decorative bow adds an extra touch of sweetness to your finished creation.

Why You'll Love This Yumi Baby Panda Amigurumi Pattern

I absolutely love this pattern because it transforms simple plush yarn into a character bursting with personality and charm! The way the muzzle takes shape through strategic increases and decreases creates such an authentic panda expression that makes me smile every time. I appreciate how the pattern thoughtfully guides you through attaching limbs during construction, making assembly so much easier than traditional methods. The combination of textures between the soft plush body and detailed cotton features creates a professional-looking finish that I'm always proud to display or gift. Plus, there's something incredibly satisfying about watching those sweet eyes and blushes come together to create Yumi's irresistible face!

Yumi Baby Panda Amigurumi Pattern step 1 - construction progress Yumi Baby Panda Amigurumi Pattern step 2 - assembly progress Yumi Baby Panda Amigurumi Pattern step 3 - details and accessories Yumi Baby Panda Amigurumi Pattern step 4 - final assembly and finishing

Switch Things Up

I love experimenting with color variations to make each Yumi panda uniquely special and personalized for different recipients or preferences! Instead of the classic black and white combination, you could create a red panda version using rust orange, cream, and dark brown yarns for an entirely different woodland creature vibe. For a magical twist, try pastel rainbow colors with a white base - imagine a pink, lavender, or mint green panda with matching blushes and bow that looks straight out of a kawaii dream.

The bow presents endless customization opportunities that I absolutely adore exploring! You could make it larger or smaller, add embroidered details, switch to a necktie or scarf instead, or even create seasonal accessories like a tiny Santa hat for Christmas or bunny ears for Easter. I've also experimented with adding small crocheted accessories like a miniature backpack, honey pot, or bamboo stalk that can be attached to the paws.

For a more realistic approach, I sometimes skip the pink blushes and bow to create a natural-looking panda, or add texture by using a loop stitch or different yarn type for certain areas to create a fuzzy effect. You could even safety-pin different outfits onto your panda - tiny sweaters, dresses, or costumes that can be changed out. The eye color is another fun element to personalize; while the pattern uses blue or green, you could create brown, amber, or even heterochromatic eyes for extra character. The beauty of this pattern is how the basic structure provides the perfect canvas for your creative vision to shine through!

Common Mistakes & How to Fix Them

βœ— Not maintaining proper yarn tension when working with plush yarn can create uneven stitches and gaps that show stuffing through the fabric βœ— Forgetting to shift stitch markers to correct positions before working increases or decreases can throw off the entire symmetry of facial features βœ— Overstuffing the head prevents achieving the characteristic flat panda face shape while understuffing makes it look deflated and shapeless βœ— Attaching limbs without checking their positioning with pins first often results in asymmetrical or awkwardly angled arms and legs that look unnatural

Yumi Baby Panda Amigurumi Pattern

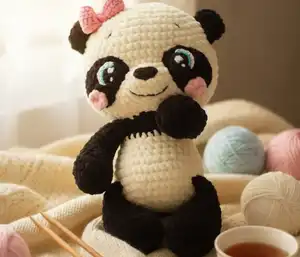
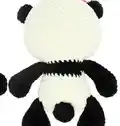
Create your own adorable Yumi the Baby Panda with this delightful amigurumi pattern! Standing at approximately 25-28 cm tall, this cuddly companion features charming black and white plush yarn construction with sweet pink blushes and a decorative bow. Perfect for panda lovers and amigurumi enthusiasts, this pattern guides you through creating a huggable friend with detailed eyes, embroidered features, and posable limbs. The finished panda sits beautifully and makes a wonderful gift or nursery decoration that will bring joy for years to come.

Intermediate 8-10 Hours

Materials Needed for Yumi Baby Panda Amigurumi Pattern

β€” Main Fabric

  • 01
    Plush yarn (120 m/100 gr) in white/ivory for main body color
  • 02
    Plush yarn (120 m/100 gr) in black for paws, ears, tail, and eye patches
  • 03
    Plush yarn (120 m/100 gr) in pink for blushes
  • 04
    Cotton or semi-cotton yarn (~330 m/100 g) in black for eyes, smile, and eyebrows
  • 05
    Cotton or semi-cotton yarn (~330 m/100 g) in white for eye details
  • 06
    Cotton or semi-cotton yarn (~330 m/100 g) in blue or green for iris
  • 07
    Cotton or semi-cotton yarn (~330 m/100 g) in pink for decorative bow
  • 08
    Thin cotton yarn matching plush yarn colors for sewing body parts together

β€” Tools Required

  • 01
    Crochet hook 3.5-4 mm for body work with plush yarn
  • 02
    Crochet hook 2-2.5 mm for eyes and bow with cotton yarn
  • 03
    Long needle for tightening facial features
  • 04
    Large needle for sewing body parts together
  • 05
    Stitch markers to track rounds and placement
  • 06
    Pins with large heads for positioning parts before sewing
  • 07
    Scissors for cutting yarn
  • 08
    Fiber filling for stuffing
  • 09
    Synthetic or tooth thread for facial tightening

Progress Tracker

0% Complete

β€” Upper Paws (Make 2) :

Round 1 :

6 SC in MR (6)

Round 2 :

6 INC (12)

Round 3 :

(SC, INC) x 6 (18)

Round 4 :

18 SC (18)

Round 5 :

4 SC, (SC, DEC) x 3, 5 SC (15)

Round 6 :

15 SC (15)

Round 7 :

4 SC, 3 DEC, 5 SC (12)

Rounds 8-13 :

12 SC (12)

Round 14 :

Work incomplete round about 10-11 SC so decreases align on one side when folded

Finishing :

Work 1 CH, fold in half and crochet sides together with 6 SC, fix and cut thread

β€” Bottom Paws (Make 2) :

Round 1 :

6 SC in MR (6)

Round 2 :

6 INC (12)

Round 3 :

(SC, INC) x 6 (18)

Round 4 :

(2 SC, INC) x 6 (24)

Round 5 :

24 SC (24)

Round 6 :

6 SC, (2 SC, DEC) x 3, 6 SC (21)

Round 7 :

21 SC (21)

Round 8 :

6 SC, (SC, DEC) x 3, 6 SC (18)

Round 9 :

18 SC (18)

Round 10 :

6 SC, 3 DEC, 6 SC (15)

Rounds 11-13 :

15 SC (15)

Round 14 :

Work incomplete round about 12-13 SC so decreases align on one side when folded

Finishing :

Work 1 CH, fold in half and crochet sides together with 7 SC, fix and cut thread

β€” Head-Body :

Round 0 :

Chain 9, work in spiral starting in 2nd chain from hook

Round 1 :

7 SC, 3 SC into last chain, on other side: 6 SC, INC (18)

Round 2 :

INC, 6 SC, 3 INC, 6 SC, 2 INC (24)

Round 3 :

SC, INC, 6 SC, (SC, INC) x 3, 6 SC, (SC, INC) x 2 (30)

Round 4 :

2 SC, INC, 6 SC, (2 SC, INC) x 3, 6 SC, (2 SC, INC) x 2 (36)

Round 5 :

3 SC, INC, 6 SC, (3 SC, INC) x 3, 6 SC, (3 SC, INC) x 2 (42)

Round 6 :

4 SC, INC, 6 SC, (4 SC, INC) x 3, 6 SC, (4 SC, INC) x 2 (48)

Rounds 7-8 :

48 SC (48)

Round 9 :

5 SC, INC, 6 SC, (5 SC, INC) x 3, 6 SC, (5 SC, INC) x 2 (54)

Rounds 10-11 :

54 SC (54)

Info :

Fold detail in half along start chain, shift marker to side on bend for proper increase placement

Round 12 :

11 SC, 6 INC, 37 SC (60)

Rounds 13-15 :

60 SC (60)

Round 16 :

11 SC, 6 DEC, 37 SC (54)

Round 17 :

5 SC, DEC, 6 SC, (5 SC, DEC) x 3, 6 SC, (5 SC, DEC) x 2 (48)

Round 18 :

4 SC, DEC, 6 SC, (4 SC, DEC) x 3, 6 SC, (4 SC, DEC) x 2 (42)

Round 19 :

3 SC, DEC, 6 SC, (3 SC, DEC) x 3, 6 SC, (3 SC, DEC) x 2 (36)

Round 20 :

2 SC, DEC, 6 SC, (2 SC, DEC) x 3, 6 SC, (2 SC, DEC) x 2 (30)

Round 21 :

SC, DEC, 6 SC, (SC, DEC) x 3, 6 SC, (SC, DEC) x 2 (24)

Info :

Change to black yarn, shift marker to side so decreases align under increases from Round 12

Info :

Mark upper paw placement: 6 SC on sides with 6 SC distance front and back, paw bend toward body

Round 22 :

6 SC with first paw, 6 SC, 6 SC with second paw, 6 SC (24)

Round 23 :

(7 SC, INC) x 3 (27)

Round 24 :

27 SC (27)

Round 25 :

(8 SC, INC) x 3 (30)

Info :

Change to white/ivory yarn

Round 26 :

30 SC (30)

Round 27 :

(9 SC, INC) x 3 (33)

Round 28 :

33 SC (33)

Round 29 :

(10 SC, INC) x 3 (36)

Info :

Mark belly middle and work increases centered: 6 INC on left and right from middle

Round 30 :

8 SC, (SC, INC) x 6, 16 SC (42)

Rounds 31-32 :

42 SC (42)

Info :

Mark bottom paw placement: 7 SC on sides with 14 SC distance front and back, paw bend toward body

Round 33 :

2 SC, 7 SC with first paw, 14 SC, 7 SC with second paw, 12 SC (42)

Round 34 :

(5 SC, DEC) x 6 (36)

Round 35 :

(4 SC, DEC) x 6 (30)

Round 36 :

(3 SC, DEC) x 6 (24)

Round 37 :

(2 SC, DEC) x 6 (18)

Round 38 :

(SC, DEC) x 6 (12)

Round 39 :

6 DEC (6)

Finishing :

Tighten hole, fix thread and hide end inside

Muzzle Tightening :

Mark 4 points: 2 at bottom on color change line, 2 at top between Rounds 11-12 between increases, insert needle from lower to upper point, cross to opposite side, tighten and tie

β€” Ears (Make 2) :

Round 1 :

6 SC in MR (6)

Round 2 :

6 INC (12)

Round 3 :

12 SC (12)

Finishing :

Work 1 CH, fold in half and crochet sides together with 6 SC, leave long end for sewing

β€” Tail :

Round 1 :

6 SC in MR (6)

Round 2 :

6 INC (12)

Round 3 :

12 SC (12)

Round 4 :

6 DEC (6)

Finishing :

Fix thread and leave long end for sewing

β€” Nose :

Round 0 :

Chain 6, work in spiral starting in 2nd chain from hook

Round 1 :

INC, SC, 3 SC in one stitch, SC, 4 SC into last chain, on other side: 3 SC, INC (14)

Finishing :

Fix thread and leave long end for sewing

β€” Blushes (Make 2) :

Round 1 :

6 SC in MR (6)

Finishing :

Fix thread and leave long end for sewing

β€” Eye Patches (Make 2) :

Round 0 :

Chain 6, work in spiral starting in 2nd chain from hook

Round 1 :

3 SC, HDC, 5 HDC into last chain, on other side: HDC, 2 SC, INC (14)

Round 2 :

INC, 2 SC, HDC, 5 INC HDC, HDC, 2 SC, 2 INC (22)

Finishing :

Fix thread, cut and sew with thin black cotton thread

β€” Eyes (Make 2) :

Round 1 :

6 SC in MR with black (6)

Round 2 :

6 INC (12)

Round 3 :

(SC, INC) x 4, change to white, back loops only: SC, 3 INC (20)

Round 4 :

Back loops only: INC, SC, SS (4)

Finishing :

Leave long ends of black and white for sewing and embroidering glare, work blue chain stitch under white SC for iris

β€” Bow :

Row 0 :

Chain 28 plus 2 turning chains (30)

Rows 1-4 :

28 HDC, turn and work 2 turning chains at end of each row

Finishing :

Leave long end, fold sides together and join with slip stitches, wrap thread around middle to create bow shape

Assembly Instructions

  • Sew ears to head between Rounds 5 and 10 on both sides of the head
  • Attach nose in Round 13 positioned directly under the increases from Round 12
  • Embroider smile by stretching thread under pins and fixing the curve with two bottom anchor points
  • Position eye patches so upper edges sit 2 rounds above the muzzle increases, then attach eyes and blushes to patches before sewing
  • Sew assembled eye patches with attached eyes and blushes onto head using thin black cotton thread
  • Embroider eyebrows 2-3 rounds above eye patches using black cotton yarn
  • Position panda in sitting pose and mark tail placement so it supports the body, then sew securely in place
  • Wrap and attach decorative bow to top of head for finishing touch

Important Notes

  • πŸ’‘Maintain consistent yarn tension when working with plush yarn to prevent gaps and uneven stitches throughout the project
  • πŸ’‘Always use stitch markers to track your position, especially before working increases or decreases in specific rounds
  • πŸ’‘Stuff the head to create a slightly flat panda face shape with a convex muzzle rather than a perfectly round head
  • πŸ’‘Pin all body parts in their correct positions before sewing to ensure proper symmetry and alignment
  • πŸ’‘Choose hook sizes appropriate for your personal crochet tension - the 2:1 yarn thickness ratio is critical for proper proportions
  • πŸ’‘Leave long thread tails when finishing each piece to make assembly easier and more secure

This enchanting Yumi Baby Panda pattern combines the softness of plush yarn with intricate cotton detailing to create a truly special handmade companion. The innovative construction method seamlessly integrates limbs during crocheting, making assembly a breeze while ensuring durability. With its sweet expression, dimensional features, and huggable 25-28 cm size, this panda is destined to become a treasured keepsake. Whether you're crafting for yourself or creating a heartfelt gift, Yumi brings warmth and whimsy to every stitch. Happy crocheting and enjoy watching this adorable panda come to life! 🐼🧢✨

You ask,

we answer.

FAQs

Can I use different yarn brands than the ones specified in the pattern?

Yes, you can substitute yarn brands as long as you maintain the 2:1 thickness ratio between body yarn and eye detail yarn, and adjust your hook size accordingly to match your tension and achieve the correct finished size.

Why is my panda's face not flat like in the photos?

The flat panda face is achieved through careful stuffing technique and proper execution of the muzzle tightening step. Make sure to stuff moderately (not too firm) and follow the tightening instructions with strong synthetic thread to create the characteristic panda facial shape.

How do I prevent holes when working with plush yarn?

Maintain consistent tension throughout your work and make sure your hook size is appropriate for the yarn thickness. If you still see gaps, try going down half a hook size or adjusting your personal crochet tension.

Can I make the panda larger or smaller?

Yes, you can adjust the size by using thicker or thinner yarn with appropriately sized hooks. Remember to maintain the 2:1 ratio between body yarn and detail yarn, and be aware that changing yarn weight will affect the final dimensions and yarn consumption.

What's the best way to attach the limbs so they're secure?

The pattern attaches limbs during construction for maximum security. Make sure to use strong sewing thread that matches your yarn colors, and sew through multiple stitches on both the limb and body for reinforcement. Pin everything in place first to check positioning.

Do I need to stuff the entire panda firmly?

No, different parts require different stuffing levels. The head should be moderately stuffed to maintain its shape, limbs should only be stuffed in the bottom portions, and the body should be firmly but not tightly stuffed. Over-stuffing can distort the shape.