๐Ÿงถ Beautiful โœจ Detailed ๐Ÿ’ Adorable

Winnie the Piglet Amigurumi Pattern

Winnie the Piglet Amigurumi Pattern
4.7โ˜… Rating
6-8 Hours Time Needed
2.8K Made This
โœ‚๏ธ

Intermediate Level

Ideal for those with basic knitting experience, featuring slightly more advanced stitches and techniques to expand your skills.

โฑ๏ธ

All-Day Adventure

Requires 8-10 hours, ideal for a full day of immersive knitting.

๐Ÿงธ

Cute Companion

An adorable friend to cherish, handcrafted with love to bring comfort and joy for years to come.

About This Winnie the Piglet Amigurumi Pattern

This enchanting piglet pattern combines plush yarn textures with delightful color-changing stripes to create a truly unique amigurumi. The design incorporates special techniques like back loop only stitches and slip stitch color transitions for those beautiful horizontal stripes across the body. With detailed face-shaping instructions and optional embroidered features, you'll craft a piglet bursting with personality and charm.

Winnie the Piglet Amigurumi Pattern crochet pattern - detailed view of completed project

The pattern includes comprehensive assembly instructions with photo guides for face tightening, thread mounting for poseable arms, and creating an adorable balloon accessory with wire support. Every detail has been thoughtfully designed to help you achieve professional-looking results.

Why You'll Love This Winnie the Piglet Amigurumi Pattern

I absolutely love how this pattern transforms simple plush yarn into something so incredibly huggable and full of character! The color-changing technique creates those gorgeous stripes without any complicated colorwork, and watching the piglet's personality emerge as you add the facial features is truly magical. The thread-mounted arms mean your finished piglet can hold that sweet little balloon or give the best hugs. I especially appreciate how the pattern accommodates both plush and cotton yarn options, so you can customize the size and texture to your preference. It's one of those projects that looks impressive but is actually quite achievable with clear instructions!

Winnie the Piglet Amigurumi Pattern step 1 - construction progress Winnie the Piglet Amigurumi Pattern step 2 - assembly progress Winnie the Piglet Amigurumi Pattern step 3 - details and accessories Winnie the Piglet Amigurumi Pattern step 4 - final assembly and finishing

Switch Things Up

I love experimenting with color combinations on this piglet pattern! Instead of the traditional pink shades, try creating a blue piglet with navy and sky blue stripes for a boy-themed version, or go wild with rainbow stripes using leftover yarn from your stash. You could even make a seasonal piglet with autumn colors like rust orange, burgundy, and cream for fall, or pastel pastels for spring.

The ears offer another great customization opportunity - try making them slightly larger for a more whimsical look, or add some light shading with fabric markers or embroidery to give them dimension. I've also experimented with adding a little curly tail made from pipe cleaners or wire wrapped in yarn for extra character!

For the facial features, while the pattern suggests embroidered eyes for cotton versions, I sometimes use small black beads or even create tiny crocheted circles for a softer, more integrated look. The smile can be modified too - make it bigger for a cheerful piglet or smaller and subtle for a shy, sweet expression.

If you're making this as a gift, consider personalizing the balloon with the recipient's favorite color or adding a tiny embroidered initial. You could also create a whole family of piglets in different sizes by adjusting your hook size and yarn weight - imagine a mama piglet with little piglet babies!

Common Mistakes & How to Fix Them

โœ— Pulling slip stitch rounds too tight which makes the next round difficult to work into the stitches properly โœ— Forgetting to change to back loop only when instructed which affects the stripe pattern and overall texture โœ— Stuffing the head too firmly before face tightening which makes it impossible to create proper facial shaping โœ— Not using stitch markers to track increase placements especially around rounds eight and nine for eye positioning โœ— Skipping the felt backing for safety eyes on small diameter eyes causing them to pull through the fabric โœ— Not positioning arms correctly before thread mounting resulting in asymmetrical or awkward arm placement on body

Winnie the Piglet Amigurumi Pattern

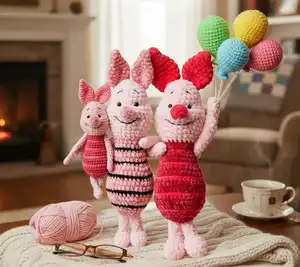
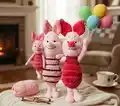
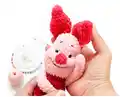
Create your own adorable striped piglet companion with this charming amigurumi pattern! This delightful design features a sweet piglet with a colorful striped body, floppy ears, and an optional balloon accessory. Perfect for plush yarn lovers, this pattern guides you through creating a cuddly friend that stands approximately 28-30cm tall with Himalaya Dolphin Baby yarn or 15-17cm with cotton yarn. The piglet's charming features include embroidered details, carefully positioned safety eyes, and poseable thread-mounted arms that bring personality to life.

Intermediate 6-8 Hours

Materials Needed for Winnie the Piglet Amigurumi Pattern

โ€” Main Fabric

  • 01
    Plush yarn 120m/100gr (Himalaya Dolphin Baby, YarnArt Dolce) in light pink, pink, and crimson colors
  • 02
    Cotton yarn alternative: Alize Cotton Gold or YarnArt Jeans in corresponding colors
  • 03
    Black cotton yarn for embroidering facial features
  • 04
    Main color yarn for sewing and assembly work

โ€” Tools Required

  • 01
    Crochet hook 3-4mm for plush yarn
  • 02
    Crochet hook 2mm for cotton yarn option
  • 03
    Safety eyes approximately 8mm diameter
  • 04
    Small piece of textile or felt for eye backing
  • 05
    Yarn sewing needles
  • 06
    Stitch markers
  • 07
    Pins with large heads
  • 08
    Scissors
  • 09
    Fiber filling for stuffing
  • 10
    Synthetic or tooth thread for tightening and thread mounting
  • 11
    Copper wire 1.5mm or 2mm diameter for balloon accessory
  • 12
    Semi-cotton yarn for balloon
  • 13
    Superglue for balloon wire
  • 14
    Pliers and wire cutters

Progress Tracker

0% Complete

โ€” HEAD - BODY :

Info :

Stuff while crocheting, don't stuff the head too tight to make face tightening easier. Start working with light pink yarn (1)

Round 1 :

6 SC in MR (6)

Round 2 :

6 INC (12)

Round 3 :

(SC, INC) x 6 (18)

Round 4 :

(2 SC, INC) x 6 (24)

Round 5-8 :

4 rounds of 24 SC (24)

Round 9 :

4 INC, 4 SC, 4 INC, 12 SC (32)

Round 10-14 :

5 rounds of 32 SC (32)

Info :

Insert eyes between 8th and 9th rounds at a distance of 4 SC (between INCs), or embroider them with black thread

Round 15 :

(6 SC, DEC) x 4 (28)

Round 16 :

(5 SC, DEC) x 4 (24)

Round 17 :

(6 SC, DEC) x 3 (21)

Info :

Change color to crimson (3)

Round 18-19 :

2 rounds of 21 SC (21)

Round 20 :

(6 SC, INC) x 3 (24)

Info :

Change color to pink (2)

Round 21 :

24 SS (don't pull the thread too much). Work the last SS with crimson thread (3)

Info :

Change color to crimson (3)

Round 22 :

BLO: 24 SC (24)

Round 23 :

(7 SC, INC) x 3 (27)

Round 24 :

27 SC (27)

Info :

Change color to pink (2)

Round 25 :

27 SS (27)

Info :

Change color to crimson (3)

Round 26 :

BLO: (8 SC, INC) x 3 (30)

Round 27 :

(9 SC, INC) x 3 (33)

Round 28 :

(10 SC, INC) x 3 (36)

Info :

Change color to pink (2)

Round 29 :

36 SS (36)

Info :

Change color to crimson (3)

Round 30 :

BLO: 36 SC (36)

Round 31-32 :

2 rounds of 36 SC (36)

Info :

Change color to pink (2)

Round 33 :

36 SS (36)

Info :

Change color to crimson (3)

Round 34 :

BLO: 36 SC (36)

Round 35 :

36 SC (36)

Round 36 :

(4 SC, DEC) x 6 (30)

Info :

Change color to pink (2)

Round 37 :

30 SS (30). Cut pink thread (2) and tie it with the main crimson thread

Info :

Change color to crimson (3)

Round 38 :

BLO: (3 SC, DEC) x 6 (24)

Round 39 :

24 SC (24)

Round 40 :

(2 SC, DEC) x 6 (18)

Round 41 :

(SC, DEC) x 6 (12)

Round 42 :

6 DEC (6)

Info :

Pull the hole down, fix the thread and hide the ending

โ€” EAR (2 details) :

Info :

Use pink yarn (2), don't stuff

Round 1 :

3 SC in MR (3)

Round 2 :

3 INC (6)

Round 3 :

6 SC (6)

Round 4 :

(SC, INC) x 3 (9)

Round 5 :

(2 SC, INC) x 3 (12)

Round 6 :

(3 SC, INC) x 3 (15)

Round 7 :

(4 SC, INC) x 3 (18)

Round 8 :

18 SC (18)

Round 9 :

(4 SC, DEC) x 3 (15)

Round 10 :

(3 SC, DEC) x 3 (12)

Round 11 :

(2 SC, DEC) x 3 (9)

Info :

Fold in half and crochet 4 SS together. Fix the thread and cut it

โ€” ARM (2 details) :

Info :

Use light pink yarn (1), don't stuff

Round 1 :

3 SC in MR (3)

Round 2 :

3 INC (6)

Round 3-4 :

2 rounds of 6 SC (6)

Round 5 :

DEC, 4 SC (5)

Round 6 :

INC, 4 SC (6)

Round 7 :

INC, 5 SC (7)

Round 8-14 :

7 rounds of 7 SC (7)

Round 15 :

3 DEC, don't work in the last St (4)

Info :

Pull the hole down, fix the thread and hide the ending

โ€” LEG (2 details) :

Info :

Use light pink yarn (1)

Round 0 :

Chain 6

Round 1 :

Start in the 2nd chain from the hook: 4 SC, 3 SC into the last chain from the hook, on the other side: 3 SC, INC (12)

Round 2-3 :

2 rounds of 12 SC (12)

Round 4 :

3 SC, 3 DEC, 3 SC (9)

Round 5 :

2 SC, 3 DEC, SC (6)

Info :

Stuff the foot, don't stuff further

Round 6-8 :

3 rounds of 6 SC (6)

Round 9 :

DEC, 4 SC (5)

Info :

Probably, you need to work additional SC so that the foot is positioned directly forward. Fold detail in half and crochet it together 2 SC

โ€” SNOUT :

Info :

Start with pink yarn (2)

Round 1 :

3 SC in MR (3)

Round 2 :

INC, 3 SC in the same St, INC (7)

Info :

Change color to light pink

Round 3 :

7 BPSC (7)

Info :

SS, fix the thread, leave a long ending to sew
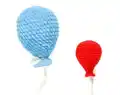
โ€” BALLOON :

Info :

Use red semi-cotton yarn, hook 2.5mm, stuff while crocheting

Round 1 :

6 SC in MR (6)

Round 2 :

6 INC (12)

Round 3 :

(SC, INC) x 6 (18)

Round 4 :

(2 SC, INC) x 6 (24)

Round 5 :

(3 SC, INC) x 6 (30)

Round 6 :

(4 SC, INC) x 6 (36)

Round 7-11 :

5 rounds of 36 SC (36)

Round 12 :

(10 SC, DEC) x 3 (33)

Round 13 :

(9 SC, DEC) x 3 (30)

Round 14 :

(8 SC, DEC) x 3 (27)

Round 15 :

(7 SC, DEC) x 3 (24)

Round 16 :

(6 SC, DEC) x 3 (21)

Round 17 :

(5 SC, DEC) x 3 (18)

Round 18 :

(4 SC, DEC) x 3 (15)

Round 19 :

(3 SC, DEC) x 3 (12)

Round 20 :

(2 SC, DEC) x 3 (9)

Round 21 :

(SC, DEC) x 3 (6)

Round 22 :

6 INC (12)

Round 23 :

(SC, INC) x 6 (18)

Info :

SS, fix the thread, leave long ending to fix the wire

โ€” BALLOON THREAD :

Info :

Spread the glue on the wire ending and wind thin cotton thread in two directions

Info :

Bend the wire ending with pliers to make it safe

Info :

Work SCs along the wire, spin SCs while crocheting to avoid stitches gliding on the wire

Info :

Fix the thread and bend the second wire ending

Info :

Insert wire in the balloon up to the middle

Info :

Sew the narrowest part of the balloon with the left long thread ending together with the stitches on the wire

Info :

Fix the thread and hide it inside

Assembly Instructions

  • Face tightening: Mark 4 points under the eyes 5 rounds lower at a distance of 5-6 SC between two internal points using a strong thread and long needle
  • Insert needle in the first point and withdraw it on the side of the eye, then insert from the other side
  • Withdraw the needle at the bottom near the first point, stretch the thread well and tie several knots, hide endings inside
  • Repeat face tightening steps on the other side, then do horizontal eye tightening if needed
  • Attach the snout to the face and embroider the smile by marking 4 points and stretching thread under pins, fix bottom points
  • Embroider eyebrows and optional black eyelids with black thread
  • Attach ears by pinning them in position and sewing securely to the head
  • Thread mount arms by inserting a long needle through the body and both arms, stepping aside 1-2 SC on front side, stretch thread very well and hide knot inside body
  • Sew legs on one line at the bottom of the body
  • Optional: Attach the balloon accessory to one arm for extra cuteness

Important Notes

  • ๐Ÿ’กChoose hook size according to your crocheting style and tension for best results with the specified yarn
  • ๐Ÿ’กUse stitch markers throughout to track color changes and important placement points like eye positioning
  • ๐Ÿ’กDon't stuff the head too tightly before face tightening as this makes shaping much more difficult
  • ๐Ÿ’กWhen working slip stitch rounds for stripes, don't pull the thread too tight to make the next round easier
  • ๐Ÿ’กAlways work back loop only stitches when instructed to achieve the proper stripe texture effect
  • ๐Ÿ’กUse felt backing for safety eyes on smaller diameters to prevent them from pulling through the fabric
  • ๐Ÿ’กFor thread mounting arms, ensure you pull the thread very tight and hide the knot in the same hole it originated from

This heartwarming Winnie the Piglet pattern brings together the softness of plush yarn with clever stripe techniques to create an absolutely huggable friend! The detailed instructions guide you through special shaping methods, adorable facial features, and even include a sweet wire-supported balloon accessory. Whether you're working with fluffy plush yarn for maximum cuddles or cotton for a classic finish, this pattern offers flexibility while maintaining that irresistible charm. Perfect for gift-giving or adding to your personal collection of handmade treasures! ๐Ÿท๐Ÿ’•โœจ

You ask,

we answer.

FAQs

Can I use different yarn types for this piglet pattern?

Yes! The pattern is designed for both plush yarn (like Himalaya Dolphin Baby or YarnArt Dolce) and cotton yarn (like Alize Cotton Gold or YarnArt Jeans). Using plush yarn will create a 28-30cm tall piglet, while cotton yarn makes a smaller 15-17cm version. Just adjust your hook size accordingly - 3-4mm for plush and 2mm for cotton.

How do I create the striped effect on the body?

The stripes are created using slip stitches in one color, followed by back loop only single crochet in another color. The pattern clearly indicates when to change colors and when to work in BLO. The key is not pulling the slip stitch rounds too tight so the next round is easier to work into.

What is thread mounting and why is it used for the arms?

Thread mounting is a technique where you use a long needle and strong thread to attach both arms simultaneously through the body. This creates moveable, poseable arms that can be adjusted and makes the piglet more durable. The pattern includes detailed step-by-step instructions with guidance on achieving the proper tension.

Do I need to make the balloon accessory?

No, the balloon is completely optional! It's a cute addition that uses wire for structure, but your piglet will be adorable without it. If you do make it, the pattern provides detailed instructions for preparing the wire safely and attaching it securely.

How do I achieve the face tightening effect?

Face tightening involves marking specific points below the eyes and using a strong thread with a long needle to create definition in the face. The pattern includes detailed instructions with measurements (5 rounds below eyes, 5-6 SC apart) and step-by-step guidance to help you achieve that sweet, sculpted expression.