🧢 Beautiful ✨ Detailed πŸ’ Adorable

Willow Mittens Crochet Pattern

Willow Mittens Crochet Pattern
4.7β˜… Rating
3-4 Hours Time Needed
3.0K Made This
βœ‚οΈ

Intermediate Level

Ideal for those with basic knitting experience, featuring slightly more advanced stitches and techniques to expand your skills.

⏱️

Bite-Sized Project

Complete in under 2 hoursβ€”quick, fun, and perfect for a little creative escape.

🧣

Snug Essential

Everyday comfort with practical charm, designed for both functionality and style through changing seasons.

About This Willow Mittens Crochet Pattern

The Willow Mittens pattern offers incredible versatility with five size options ranging from Baby to Large Adult, making it perfect for creating matching sets for the entire family. The distinctive fan stitch creates a beautiful textured design that's both eye-catching and warm, while the ribbed cuff provides a snug, comfortable fit that keeps cold air out. The construction method is ingenious, starting with a flat ribbed cuff that's then seamlessly joined, followed by working in the round for the body with elegant fan stitches that create a lovely drape and flexibility.

Willow Mittens Crochet Pattern crochet pattern - detailed view of completed project

What makes these mittens special is the thoughtful thumb construction for larger sizes while Baby mittens remain thumbless for easy on-and-off wear. The fan stitch pattern adds stretch and texture without complicated colorwork, making these mittens both beautiful and practical for everyday winter wear.

Why You'll Love This Willow Mittens Crochet Pattern

I absolutely love the Willow Mittens pattern because it's one of those rare designs that looks intricate but works up surprisingly quickly once you get into the rhythm of the fan stitch. The ribbed cuff gives such a professional, store-bought finish while being incredibly simple to create with just back loop single crochet. What really wins me over is the versatility – I've made these in soft pastels for baby gifts, bold jewel tones for myself, and neutral earth tones for my husband, and they always turn out beautifully. The fan stitch creates this wonderful texture that catches the light and adds visual interest without requiring you to follow a complex chart or juggle multiple colors. I appreciate how the pattern walks you through each size clearly, making it easy to create matching family sets for holiday photos or gifts. The thumb shaping is cleverly integrated into the design, and I love that the baby version is thumbless, which is so much more practical for little ones who struggle with separate thumb holes. Every time I make these mittens, I'm reminded why simple, well-designed patterns like this are true treasures in any crocheter's collection.

Willow Mittens Crochet Pattern step 1 - construction progress Willow Mittens Crochet Pattern step 2 - assembly progress Willow Mittens Crochet Pattern step 3 - details and accessories Willow Mittens Crochet Pattern step 4 - final assembly and finishing

Switch Things Up

I love experimenting with the Willow Mittens pattern because there are so many creative ways to make each pair uniquely yours. Try working the cuff in one color and switching to a contrasting color for the body – the fan stitch looks absolutely stunning in variegated or self-striping yarn that creates organic color changes as you work. I've made versions with metallic gold thread held together with the main yarn for sparkly holiday mittens that catch the light beautifully.

For a more textured look, consider using a fuzzy or boucle yarn which makes the fan stitch really pop with dimension, or try a gradient yarn that subtly shifts from one shade to another throughout the mitten. You could also add embellishments after completing the mittens – I've sewn small buttons or wooden beads onto the cuff area, or embroidered simple snowflake or heart designs on the back of the hand using a contrasting yarn color.

If you want to make the mittens extra special for gifts, personalize them by crocheting small initials or numbers using surface crochet on the cuff section. Another fun variation is to make the cuff extra long (just add more rows) so it can be folded over for a different look or provide extra warmth on particularly cold days. I've also experimented with making convertible fingerless mittens by simply working fewer rounds after the thumb opening, giving you the warmth of mittens with the dexterity of fingerless gloves.

For children's mittens, adding a simple crocheted chain to connect the two mittens that threads through coat sleeves prevents lost mittens – a trick every parent appreciates! You could also create matching sets with hats or cowls using the same fan stitch pattern for a coordinated winter accessories collection.

Common Mistakes & How to Fix Them

βœ— Not maintaining consistent gauge throughout the ribbed cuff leading to a cuff that's either too tight and uncomfortable or too loose and slides off easily βœ— Forgetting to use stitch markers when working in spiral rounds causing you to lose track of where rounds begin and end resulting in uneven fan stitch placement βœ— Skipping too many or too few stitches when creating the thumb opening which makes the thumb hole either too small and tight or too large and sloppy βœ— Failing to work the first and last stitch of the ribbed cuff rows in standard single crochet under both loops creating messy irregular edges that don't seam well

Willow Mittens Crochet Pattern

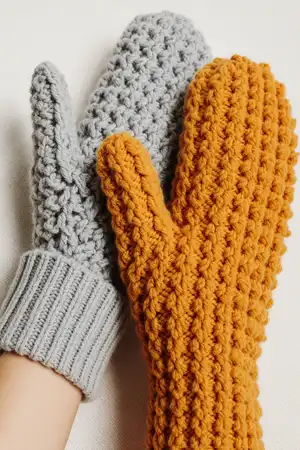
Create beautiful, cozy Willow Mittens with this versatile crochet pattern that includes five different sizes from Baby to Large Adult. Featuring an elegant fan stitch design and ribbed cuffs, these mittens combine warmth with style perfectly. The pattern is worked in three main sections: a flat ribbed cuff for stretch and comfort, a round body with gorgeous textured fan stitches, and a functional thumb opening for sizes Toddler and up. Whether you're crafting for your little one, yourself, or as thoughtful handmade gifts for the whole family, this pattern provides clear instructions for every skill level. With worsted weight yarn and a simple G-hook, you'll create mittens that are both practical for cold weather and beautiful enough to show off your crochet skills.

Intermediate 3-4 Hours

Materials Needed for Willow Mittens Crochet Pattern

β€” Main Fabric

  • 01
    120 yards worsted weight yarn for Baby size
  • 02
    130 yards worsted weight yarn for Toddler size
  • 03
    150 yards worsted weight yarn for Child size
  • 04
    170 yards worsted weight yarn for Teen/Adult size
  • 05
    180 yards worsted weight yarn for Large Adult size
  • 06
    Suggested yarns: Loops & Threads Impeccable or Red Heart with Love

β€” Tools Required

  • 01
    G-6 / 4.25mm crochet hook
  • 02
    Stitch markers
  • 03
    Tapestry needle for seaming and weaving in ends
  • 04
    Scissors

Progress Tracker

0% Complete

β€” CUFF :

Info :

Make 2 mittens. Both mittens are worked in the exact same way, including thumb shaping. Directions for Baby [Toddler, Child, Teen/Adult, Adult L]

Starting Chain :

Chain 8[9, 10, 11, 12], leaving a long tail (10 inches) to seam the edges

Row 1 :

SC in 2nd ch from hook and in each ch across, turn < 7[8, 9, 10, 11]>

Row 2 :

Ch 1 (does not count as a stitch), SC in first st, BLSC in each of next 5[6, 7, 8, 9] sts, SC in last st, turn < 7[8, 9, 10, 11]>

Info :

To obtain a nice edge, make a standard SC (under both loops) in first and in the last st

Rows 3-18[20, 22, 26, 28] :

Repeat Row 2. You must have 18[20, 22, 26, 28] Rows total

Info :

Fold cuff in half and join with a slip stitch, the last stitch with the first stitch of Row 1, to form the cuff. Do not cut the yarn. Continue with the body of mitten in the top side of the ribbing

β€” BODY :

Info :

Worked in the round, onto the edge of the ribbed cuff. Do not turn at the end of the rounds

Round 1 - Baby/Toddler :

Ch 1, working in row-end stitches of cuff, *SC in each of the next 5(4) sts, 2SC in the next st*, repeat from *-* around, join with a Slst in Ch1 < 21(24) SC>

Round 1 - Child/Teen/Adult :

Ch 1, 1SC(2SC) in first st, (SC in the next 3sts, 2SC in the next st) x 5(6) times, SC in last st, join with a Slst in Ch1 < 27(33) SC>

Round 1 - Large Adult :

Ch 1, (SC in next st, 2SC in the next st) x 2 times, *SC in the next 3 sts, 2SC in the next st*, repeat from *-* around, join with a Slst in Ch1 < 36 SC>

Info :

The next rounds are worked in spiral (no slip stitch at the end of the round). Use stitch marker to keep track of start/end of rounds

Round 2 :

Fan in first st, skip 2sts, *Fan in next st, skip 2 sts* repeat *-* around < 7[8, 9, 11, 12] Fan>

Round 3 :

Fan in first SC of previous round (move st marker up as you work), skip next 2 DC. Continue with Fan in each SC of next fans (make a fan in SC and skip the 2DC, around) < 7[8, 9, 11, 12] Fan>

Info :

From now on, each Fan is worked in SC of Fan of previous round, and the DC are skipped, unless otherwise specified

β€” BABY SIZE :

Round 4-10 :

Repeat Round 3 <7 Fan>

Round 11-12 :

SC2tog around, in continuous rounds. Join with a slip st at the end of last row < 6 SC>

Info :

Fasten off, leaving a 5"-6" tail for weaving in. The Baby mitten should now be finished

β€” TODDLER [CHILD, TEEN/ADULT, ADULT L] SIZES :

Info :

Directions for Toddler [Child, Teen/Adult, Adult L]

Round 4-5[6, 7, 7] :

Repeat Round 3 < 8[9, 11, 12] Fan>

Info :

In next round, make the opening for the thumb

Round 6[7, 8, 8] :

Fan in first SC of previous round, skip the 2 DC, SC in the SC of the next fan, chain 3, skip the 2 DC and the next 2 Fan (for thumb hole), continue with Fan in each SC of next fans < 5[6, 8, 9] Fan and 1 SC before the Chain3>

Round 7[8, 9, 9] :

Fan in first SC of previous round, skip the 2 DC, Fan in the SC before the Chain3, Fan in the second chain of Chain3, Fan in each SC of next fans < 7[8, 10, 11] Fan>

Round 8[9, 10, 11]-12[14, 17, 18] :

Fan in each SC < 7[8, 10, 11] Fan>

Round 13[15, 18, 19]-14[16, 19, 20] :

SC2tog around, in continuous rounds. Join with a slip st at the end of last row < 6[6, 8, 9] SC>

Info :

Fasten off, leaving a 5"-6" tail for weaving in. See thumb instructions below

β€” THUMB :

Round 1 :

Pull up a loop on the mitten side of the hole, ch1 and SC in the same space, 4[4, 5, 5]SC across the top of thumb hole, 1SC into the space on the other side of thumb hole, 4[5, 5, 6]SC across the bottom of thumb hole <10[11, 12, 13]SC>

Info :

Do not join, the next rounds are worked in spiral (no slip stitch at the end of the round)

Round 2-5[6, 9, 10] :

SC in each SC around <10[11, 12, 13]SC>

Round 6[7, 10, 11] :

SC2tog around, SC in last stitch for sizes Child and Adult L. Join with a slip st

Info :

Fasten off, leaving a 4"-5" tail for weaving in

β€” ASSEMBLY :

Cuff Seaming :

Using the long tail of the cuff section, seam the edges of the cuff by whip stitching through the SC and the base of the starting chain. Secure and weave in ends

Closing Ends :

Use a tapestry needle to gather the end of the mitten and the end of the thumb closed: go through the front loops only of every stitch around and weave in. Secure the tail

Assembly Instructions

  • Using the long 10-inch tail from the beginning chain, seam the edges of the cuff together by whip stitching through the single crochet stitches and the base of the starting chain
  • Secure the cuff seam firmly and weave in the end to ensure it doesn't come undone with wear
  • Use a tapestry needle to gather the top end of the mitten closed by threading through the front loops only of every stitch around the opening
  • Pull the gathering thread tight to close the top completely and secure with several small stitches before weaving in the tail
  • For sizes Toddler through Large Adult, repeat the gathering process for the thumb tip using the remaining tail
  • Weave in all remaining yarn ends securely on the inside of the mittens, ensuring they won't work loose during wear and washing

Important Notes

  • πŸ’‘Gauge is critical for proper fit: 15 single crochet stitches should equal 4 inches, so adjust your hook size if needed before starting
  • πŸ’‘Leave a full 10-inch tail when starting the cuff as you'll need this length to properly seam the edges together
  • πŸ’‘When working the ribbed cuff, always work standard single crochet (through both loops) in the first and last stitch of each row for neat edges
  • πŸ’‘Use a stitch marker consistently when working in spiral rounds to track where each round begins and ends, moving it up as you work
  • πŸ’‘The fan stitch pattern may feel awkward at first, but after a few rounds you'll develop a rhythm and it works up quickly
  • πŸ’‘When creating the thumb opening, count your stitches carefully to ensure you skip exactly the right number of fans as specified for your size
  • πŸ’‘Block your finished mittens gently by dampening them and laying flat to dry for the most professional appearance and best fit

The Willow Mittens pattern is a wonderfully versatile design that brings together classic ribbed cuffs with an elegant fan stitch body for mittens that are both beautiful and warm. With five sizes included from Baby to Large Adult, you can create matching sets for your entire family or choose the perfect size for gift-giving. The construction is clever and satisfying, starting with a stretchy ribbed cuff that provides a snug fit, then transitioning to worked-in-the-round fan stitches that create gorgeous texture and flexibility. Whether you're looking for a quick weekend project or planning handmade gifts for the holidays, these mittens deliver professional results with intermediate-level techniques. Happy crocheting and stay cozy!

You ask,

we answer.

FAQs

Can I substitute a different yarn weight for this pattern?

While the pattern is designed for worsted weight yarn (#4), you can use a different weight by adjusting your hook size to match the gauge. The key is achieving 15 single crochet stitches per 4 inches. If you use DK or sport weight, go down a hook size or two; for bulky yarn, go up. Just be aware that changing yarn weight will affect the final dimensions and yardage requirements.

How do I know which size to make?

Measure the hand circumference around the widest part (usually across the knuckles). Baby fits 4-5 inches, Toddler 5-6 inches, Child 6-7 inches, Teen/Adult 7-8.5 inches, and Large Adult 9-10 inches. The ribbed cuff provides some stretch, so if you're between sizes, go with the smaller size for a snugger fit or larger for a roomier fit that's easier to get on and off.

What does working in spiral mean and why don't we join rounds?

Working in spiral means you continuously crochet around without joining each round with a slip stitch. This creates a seamless look without the visible jog that happens when you join rounds. You'll need a stitch marker to track where each round begins and ends, moving it up as you work. This technique is perfect for the fan stitch pattern as it maintains the flow of the design.

Can I make these mittens without thumbs for all sizes?

Absolutely! The pattern shows Baby mittens are thumbless, and you can follow that same approach for any size by simply omitting the thumb opening instructions. After completing the fan stitch rounds for your size, just continue working until the mitten is long enough to cover the hand, then work the decrease rounds as directed. Thumbless mittens are great for very young children or for a simpler, faster project.

How do I create the fan stitch properly?

A fan stitch consists of (SC, DC, DC) all worked into the same stitch. Insert your hook into the designated stitch, make a single crochet, then without moving to a different stitch, make two double crochets in that same stitch. This creates a fan or shell shape. The key is working the fan into the single crochet from the previous round's fan while skipping the two double crochets, which creates the beautiful textured pattern.