๐Ÿงถ Beautiful โœจ Detailed ๐Ÿ’ Adorable

Wall Hanging Lama Decor Crochet Pattern

Wall Hanging Lama Decor Crochet Pattern
4.8โ˜… Rating
8-10 Hours Time Needed
3.5K Made This
โœ‚๏ธ

Intermediate Level

Ideal for those with basic knitting experience, featuring slightly more advanced stitches and techniques to expand your skills.

โฑ๏ธ

All-Day Adventure

Requires 8-10 hours, ideal for a full day of immersive knitting.

๐Ÿก

Cozy Accent

A warm touch for your space that transforms ordinary corners into inviting nooks filled with handmade charm.

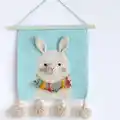
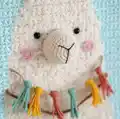
About This Wall Hanging Lama Decor Crochet Pattern

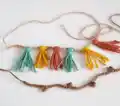
This wall hanging pattern features a sweet llama design worked on a mint-colored canvas background. The llama is created using a combination of bouclรฉ and cotton yarn to achieve a wonderfully fluffy texture that captures the essence of these beloved animals. The canvas is worked in single crochet with color changes to create the llama silhouette, while separate pieces including ears, muzzle, and cheeks are crocheted individually and sewn onto the canvas. The finishing touches include decorative chains with tassels around the neck area and four pompoms attached with wooden beads at the bottom.

Wall Hanging Lama Decor Crochet Pattern crochet pattern - detailed view of completed project

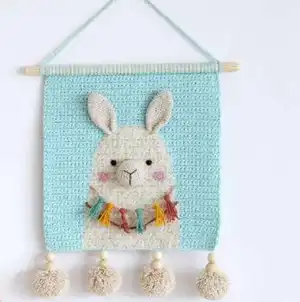
The pattern uses a straightforward technique of working rows back and forth with turning chains, making color changes for the llama design. Assembly involves sewing three-dimensional elements onto the flat canvas and mounting everything on a wooden dowel for display.

Why You'll Love This Wall Hanging Lama Decor Crochet Pattern

I absolutely love this pattern because it combines flat and dimensional crochet techniques to create something truly special for home decor. The use of bouclรฉ yarn gives the llama such an authentic fluffy texture that makes it irresistibly touchable. I appreciate how the pattern walks you through color changes on the canvas, which might seem intimidating at first but becomes quite manageable with the detailed instructions. The addition of pompoms and wooden beads gives it a bohemian, handcrafted feel that works beautifully in modern nurseries or kids' spaces. What really makes this pattern enjoyable is seeing the llama come to life as you add each facial feature, and the satisfaction of creating a finished piece that's both decorative and meaningful.

Wall Hanging Lama Decor Crochet Pattern step 1 - construction progress Wall Hanging Lama Decor Crochet Pattern step 2 - assembly progress Wall Hanging Lama Decor Crochet Pattern step 3 - details and accessories Wall Hanging Lama Decor Crochet Pattern step 4 - final assembly and finishing

Switch Things Up

I love experimenting with color combinations for this wall hanging pattern to match different room aesthetics. Instead of mint, try a soft blush pink background with a white llama for a dreamy nursery vibe, or go bold with a deep navy background and cream llama for a more modern look. You could also use variegated yarn for the pompoms to add extra visual interest at the bottom.

For a more rustic feel, I sometimes replace the wooden beads with small felt balls or even tiny crocheted beads. The neck decoration is another great place to get creative - try using ribbon instead of tassels, or add small crocheted flowers for a spring-themed version. If you're making this for a baby's room, consider embroidering the baby's name or initial on the canvas background.

I've also made mini versions using fingering weight yarn and a smaller hook, which work beautifully as gifts or can be grouped together as a gallery wall. For a winter holiday version, swap the mint for red or green and add a little Santa hat to the llama's head. The possibilities are endless while keeping the same basic structure and technique!

Common Mistakes & How to Fix Them

โœ— Forgetting to use two strands of yarn for the canvas background which can result in a loose, floppy fabric that won't hold its shape properly โœ— Cutting yarn between color changes instead of carrying it along the side, creating unnecessary ends to weave in and a messy wrong side โœ— Not leaving a long enough tail when fastening off the canvas for attaching to the wooden stick, requiring you to rejoin yarn later โœ— Overstuffing the muzzle piece which makes it look bulky and distorts the sweet facial proportions of the llama design โœ— Sewing ears without folding them properly first, resulting in flat ears that lack dimension and don't stand up naturally from the canvas

Wall Hanging Lama Decor Crochet Pattern

Create a charming wall hanging featuring an adorable llama design with this delightful crochet pattern. This decorative piece combines a beautifully worked canvas with three-dimensional details including fluffy ears, a sweet muzzle, and cheerful pompom accents. Perfect for adding a touch of handmade warmth to any nursery, child's room, or cozy corner, this llama wall hanging measures approximately 26cm x 26.5cm and features lovely textured yarn that gives the llama its characteristic fuzzy appearance. The pattern includes detailed instructions for creating the canvas with color changes, crocheting the facial features, and assembling everything onto a wooden stick for easy hanging.

Intermediate 8-10 Hours

Materials Needed for Wall Hanging Lama Decor Crochet Pattern

โ€” Main Fabric

  • 01
    Alize Cotton Gold (100g/330m) mint color #522 - two strands for canvas background
  • 02
    Alize Naturale Boucle (100g/200m) milk color #62 - one strand for llama body
  • 03
    Alize Cotton Gold (100g/330m) beige color #67 - one strand for llama body and two strands for muzzle and ears
  • 04
    Drops Safran (50g/160m) pink color #01 for cheeks
  • 05
    Small amount of dark brown yarn for nose embroidery (embroidery floss or Iris yarn can be used)
  • 06
    Yarn scraps in various colors for neck decoration

โ€” Tools Required

  • 01
    Crochet hook 3.5mm (US E) for canvas
  • 02
    Crochet hook 1.75mm for muzzle, ears, and cheeks
  • 03
    Yarn needle for sewing details
  • 04
    Safety eyes 8mm (optional - eyes can be embroidered)
  • 05
    Toy stuffing (polyester fiberfill or your choice)
  • 06
    Round wooden stick or dowel (6cm longer than canvas width)
  • 07
    8 wooden beads (optional)
  • 08
    Pompom maker
  • 09
    Scissors
  • 10
    Iron for pressing canvas

Progress Tracker

0% Complete

โ€” Canvas :

Size :

46 sc ร— 53 rounds - 26 cm ร— 26.5 cm

Infos :

Turn the work after every row and crochet always from right to left. Odd rows on canvas pattern should be calculated from right to left, even rows (wrong rows) from left to right. The yarn is not cut or stretched under a different color. For each colored part, take a separate skein. Every row starts with 2 turning chains, counted as the first sc.

Starting Row :

With mint color Alize Cotton Gold #522 and 3.5mm hook, make 47 ch, work sc into the 3rd ch, work 8 more sc and change yarn to Alize Naturale Boucle #62 and Alize Cotton Gold #67, crochet 26 sc and change to mint color again using second skein, work the last 10 sc

Continuing Rows :

Continue crocheting according to the canvas pattern till the end, fasten off the last stitch leaving a thread tail with 2.5m in length for attaching canvas to wooden stick, weave in all unnecessary threads at wrong side and iron the canvas

โ€” Ears (Make 2) :

Materials :

Use yarn Alize Cotton Gold beige color #67, in one strand, hook 1.75mm

Rd 1 :

6 sc in MR (6 sts)

Rd 2 :

(inc)*6 (12 sts)

Rd 3-4 :

12 sc (12 sts)

Rd 5 :

(1 sc, inc)*6 (18 sts)

Rd 6-10 :

18 sc (18 sts)

Rd 11 :

(5 sc, inc)*3 (21 sts)

Rd 12-13 :

21 sc (21 sts)

Rd 14 :

(5 sc, dec)*3 (18 sts)

Rd 15-18 :

18 sc (18 sts)

Finishing :

Fold the ear in half and crochet 8 sc through two layers. Fasten off and leave a long tail for sewing

โ€” Muzzle :

Materials :

Use yarn Alize Cotton Gold beige color #67, in one strand, hook 1.75mm

Rd 1 :

6 sc in MR (6 sts)

Rd 2 :

(inc)*6 (12 sts)

Rd 3 :

(1 sc, inc)*6 (18 sts)

Rd 4 :

(2 sc, inc)*6 (24 sts)

Rd 5 :

(5 sc, inc)*4 (28 sts)

Rd 6-11 :

28 sc (28 sts)

Finishing :

Fasten off and leave a long tail for sewing

โ€” Nose :

Embroidery :

Take brown yarn, secure it at the wrong side of the muzzle and embroider the nose contour

โ€” Cheeks (Make 2) :

Materials :

Use yarn Drops Safran, pink color #01

Rd 1 :

6 sc in MR (6 sts)

Rd 2 :

(inc)*6, sl st (12 sts)

Finishing :

Fasten off and leave a long tail for sewing

โ€” Decor on the Neck :

First Chain :

Make 50 ch and on this chain attach with a loop tassels of different colors. Take the yarn for the tassels, about 10 cm long

Second Chain :

(16 ch, sl st in 6th ch)*4, 10 ch

โ€” Pompoms :

Make 4 Pompoms :

Make four pompoms with 5.5 cm in diameter approximately, using a special pompoms maker or in any other convenient way. Leave long tail for attaching to canvas. Trim pompoms to make them even and neat

Assembly Instructions

  • Sew the muzzle between rows 11 and 17 (counting down from the head top) and stuff with fiberfill lightly to make it protruding
  • Secure the safety eyes between rows 11 and 12 (counting down from the top of the head), or embroider eyes if preferred
  • Fold the ears as shown in pattern photos and sew them to the canvas in their designated positions
  • Sew the pink cheeks onto the muzzle area for added cuteness
  • Attach the decorative chains with tassels around the neck area of the llama
  • Take the round wooden stick (6cm longer than canvas) and attach the canvas to it using the long thread tail left from fastening off
  • Make a chain of 60 stitches and tie its ends to the ends of wooden stick forming a hanging loop
  • Add wooden beads to the pompom threads and attach the four pompoms to the bottom of the canvas for finishing

Important Notes

  • ๐Ÿ’กAlways use two strands of yarn when working the canvas background to ensure proper density and structure
  • ๐Ÿ’กKeep separate skeins for each color section when working the canvas to avoid cutting yarn unnecessarily
  • ๐Ÿ’กLeave the 2.5m tail when finishing the canvas as instructed - this will save time during assembly
  • ๐Ÿ’กIron the canvas after completion to create a smooth, professional finish before adding dimensional elements
  • ๐Ÿ’กStuff the muzzle lightly so it has dimension but doesn't look overly bulky or distorted
  • ๐Ÿ’กPosition all pieces with pins before sewing to ensure proper placement and symmetry

This charming Wall Hanging Lama pattern brings texture and personality to your home decor with its delightful combination of flat canvas work and three-dimensional details. The fluffy bouclรฉ yarn creates an authentic llama texture while the mint background provides a fresh, modern backdrop. With its bohemian-style pompoms and wooden bead accents, this piece adds warmth and handmade charm to any space. Perfect for nurseries, kids' rooms, or anyone who loves llamas! ๐Ÿฆ™โœจ

You ask,

we answer.

FAQs

Can I use different yarn weights for this pattern?

Yes, you can use different yarn weights, but remember that this will affect the final size of your wall hanging. If using thinner yarn, consider using two strands for the canvas to maintain proper density. Adjust your hook size accordingly to match your yarn choice.

How do I manage color changes on the canvas without tangling?

Use separate skeins for each color section as instructed in the pattern. Don't cut the yarn between rows - instead, carry it along the side. This keeps the back neat and reduces ends to weave in. The pattern includes photos showing proper color change technique.

Can I embroider the eyes instead of using safety eyes?

Absolutely! The pattern mentions that safety eyes are optional and eyes can be embroidered. Use black embroidery floss or yarn to create French knots or satin stitch eyes between rows 11 and 12 for a sewn alternative.

What if I don't have a pompom maker?

You can make pompoms using the traditional fork method, cardboard circles, or even by wrapping yarn around your fingers. The pattern specifies approximately 5.5cm diameter pompoms, so aim for that size using whatever method you prefer.

How do I keep the canvas from curling while I work?

This is why the pattern recommends ironing the canvas after completion. Work with consistent tension throughout, and when finished, press the canvas with a warm iron (use a pressing cloth for safety) to flatten and smooth it before adding the dimensional pieces.