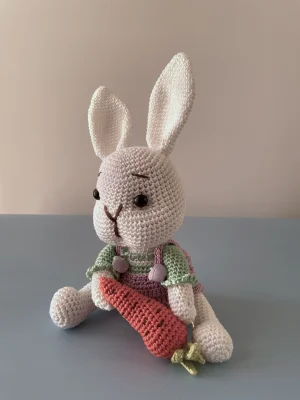
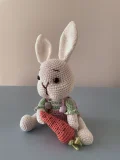
Get ready to create the most charming little forest friend you've ever seen! This bunny is a total delight to crochet, featuring a cozy textured shirt and a tiny pair of lilac overalls that give him so much personality. Whether you're making him as a special nursery gift or a new addition to your own shelf, you'll love how his plump shape and oversized ears come together with every stitch. He even carries his own bright orange carrot, making him a truly whimsical project for any soft toy enthusiast.
Progress Tracker
0% Complete
— 1. Head & Body :
Round 1 :
Start with 6 sc into a mr (6)
Round 2 :
Work 6 x inc (12)
Round 3 :
Repeat (1 sc, 1 inc) 6 times (18)
Round 4 :
Repeat (2 sc, 1 inc) 6 times (24)
Round 5 :
Repeat (3 sc, 1 inc) 6 times (30)
Round 6 :
Repeat (4 sc, 1 inc) 6 times (36)
Round 7 :
Repeat (5 sc, 1 inc) 6 times (42)
Round 8 :
Repeat (6 sc, 1 inc) 6 times (48)
Round 9 :
sc in every st around (48)
Round 10 :
sc in every st around (48)
Round 11 :
sc in every st around (48)
Round 12 :
sc in every st around (48)
Round 13 :
sc in every st around (48)
Round 14 :
sc in every st around (48)
Round 15 :
sc in every st around (48)
Round 16 :
sc in every st around (48)
Round 17 :
Repeat (3 sc, 1 inc) 12 times (60)
Round 18 :
sc in every st around (60)
Info :
Insert safety eyes between Rounds 13 and 14, leaving a gap of 8 stitches between them.
Round 19 :
sc in every st around (60)
Round 20 :
sc in every st around (60)
Round 21 :
sc in every st around (60)
Round 22 :
sc in every st around (60)
Round 23 :
sc in every st around (60)
Round 24 :
Repeat (9 sc, 1 dec) 6 times (54)
Round 25 :
Repeat (8 sc, 1 dec) 6 times (48)
Round 26 :
Repeat (7 sc, 1 dec) 6 times (42)
Round 27 :
Repeat (6 sc, 1 dec) 6 times (36)
Round 28 :
Repeat (5 sc, 1 dec) 6 times (30)
Info :
Begin stuffing the head firmly and continue as you work.
Round 29 :
Repeat (4 sc, 1 dec) 6 times (24)
Round 30 :
sc in every st around (24)
Round 31 :
sc in every st around (24)
Round 32 :
sc in every st around (24)
Round 33 :
sc in every st around (24)
Round 34 :
Repeat (3 sc, 1 inc) 6 times (30)
Round 35 :
Repeat (4 sc, 1 inc) 6 times (36)
Round 36 :
Working in flo, sc in every st (36)
Round 37 :
Repeat (5 sc, 1 inc) 6 times (42)
Round 38 :
Repeat (6 sc, 1 inc) 6 times (48)
Round 39 :
Repeat (7 sc, 1 inc) 6 times (54)
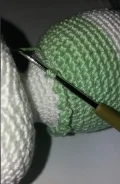
Colour Change :
Switch to Green yarn (Color A).
Round 40 :
sc in every st around (54)
Round 41 :
sc in every st around (54)
Round 42 :
sc in every st around (54)
Round 43 :
sc in every st around (54)
Round 44 :
sc in every st around (54)
Round 45 :
sc in every st around (54)
Round 46 :
sc in every st around (54)
Colour Change :
Switch back to White yarn (Main Color).
Round 47 :
sc in every st around (54)
Round 48 :
sc in every st around (54)
Round 49 :
sc in every st around (54)
Round 50 :
sc in every st around (54)
Round 51 :
sc in every st around (54)
Round 52 :
sc in every st around (54)
Round 53 :
sc in every st around (54)
Round 54 :
sc in every st around (54)
Round 55 :
Working in flo, sc in every st (54)
Round 56 :
Repeat (7 sc, 1 dec) 6 times (48)
Round 57 :
Repeat (6 sc, 1 dec) 6 times (42)
Round 58 :
Repeat (5 sc, 1 dec) 6 times (36)
Round 59 :
Repeat (4 sc, 1 dec) 6 times (30)
Info :
Stuff the body firmly, ensuring the neck area is sturdy.
Round 60 :
Repeat (3 sc, 1 dec) 6 times (24)
Round 61 :
Repeat (2 sc, 1 dec) 6 times (18)
Round 62 :
Repeat (1 sc, 1 dec) 6 times (12)
Round 63 :
Work 6 x dec, then fo (6)
— 2. Arms (Make 2) :
Round 1 :
Using White, 6 sc into a mr (6)
Round 2 :
Work 6 x inc (12)
Round 3 :
Repeat (5 sc, 1 inc) 2 times (14)
Round 4 :
sc in every st around (14)
Round 5 :
sc in every st around (14)
Round 6 :
sc in every st around (14)
Round 7 :
sc in every st around (14)
Round 8 :
sc in every st around (14)
Colour Change :
Switch to Green yarn (Color A).
Round 9 :
Working in flo, sc in every st (14)
Info :
Lightly stuff the hand and sleeve as you go.
Round 10 :
sc in every st around (14)
Round 11 :
sc in every st around (14)
Round 12 :
sc in every st around (14)
Round 13 :
sc in every st around (14)
Round 14 :
sc in every st around (14)
Round 15 :
sc in every st around (14)
Round 16 :
sc in every st around (14)
Round 17 :
sc in every st around (14)
Round 18 :
sc in every st around (14)
Round 19 :
Flatten the top and sc through both layers to close (7). Fasten off with a long tail.
— 3. Legs (Make 2) :
Round 1 :
Using White, 6 sc into a mr (6)
Round 2 :
Work 6 x inc (12)
Round 3 :
Repeat (1 sc, 1 inc) 6 times (18)
Round 4 :
sc in every st around (18)
Round 5 :
sc in every st around (18)
Round 6 :
Work 4 sc, 1 inc, then 7 sc, 1 inc, then 5 sc (20)
Round 7 :
sc in every st around (20)
Round 8 :
sc in every st around (20)
Round 9 :
Work 7 sc, 1 dec, then 7 sc, 1 dec, then 2 sc (18)
Info :
Stuff the foot and leg firmly.
Round 10 :
Work 6 sc, 1 dec, then 4 sc, 1 dec, then 4 sc (16)
Round 11 :
sc in every st around (16)
Round 12 :
sc in every st around (16)
Round 13 :
sc in every st around (16)
Round 14 :
sc in every st around (16)
Round 15 :
sc in every st around (16)
Round 16 :
sc in every st around (16)
Round 17 :
sc in every st around (16)
Round 18 :
sc in every st around (16)
Round 19 :
sc in every st around (16)
Round 20 :
sc in every st around (16)
Round 21 :
sc in every st around (16)
Round 22 :
sc in every st around (16)
Round 23 :
sc in every st around (16)
Round 24 :
sc in every st around (16)
Round 25 :
Flatten the top and sc through both layers to close (8). Fasten off with a long tail.
— 4. Ears (Make 2) :
Round 1 :
Using White, 6 sc into a mr (6)
Round 2 :
Work 2 sc, then 1 inc, repeat once more (8)
Round 3 :
Repeat (3 sc, 1 inc) 2 times (10)
Round 4 :
Repeat (4 sc, 1 inc) 2 times (12)
Round 5 :
Repeat (5 sc, 1 inc) 2 times (14)
Round 6 :
Repeat (6 sc, 1 inc) 2 times (16)
Round 7 :
Repeat (7 sc, 1 inc) 2 times (18)
Round 8 :
Repeat (8 sc, 1 inc) 2 times (20)
Round 9 :
Repeat (9 sc, 1 inc) 2 times (22)
Round 10 :
Repeat (10 sc, 1 inc) 2 times (24)
Round 11 :
Repeat (11 sc, 1 inc) 2 times (26)
Round 12 :
sc in every st around (26)
Round 13 :
sc in every st around (26)
Round 14 :
sc in every st around (26)
Round 15 :
sc in every st around (26)
Round 16 :
sc in every st around (26)
Round 17 :
sc in every st around (26)
Round 18 :
sc in every st around (26)
Round 19 :
sc in every st around (26)
Round 20 :
sc in every st around (26)
Round 21 :
sc in every st around (26)
Round 22 :
sc in every st around (26)
Round 23 :
sc in every st around (26)
Round 24 :
Repeat (11 sc, 1 dec) 2 times (24)
Round 25 :
Repeat (10 sc, 1 dec) 2 times (22)
Round 26 :
Repeat (9 sc, 1 dec) 2 times (20)
Round 27 :
Repeat (8 sc, 1 dec) 2 times (18)
Fasten Off :
Fasten off and leave a long tail for sewing. Do not stuff the ears.
— 5. Jumpsuit :
Round 1 :
Using Lilac, 8 sc into a mr (8)
Round 2 :
Work 8 x inc (16)
Round 3 :
Repeat (1 sc, 1 inc) 8 times (24)
Round 4 :
Repeat (2 sc, 1 inc) 8 times (32)
Round 5 :
Repeat (3 sc, 1 inc) 8 times (40)
Round 6 :
Repeat (4 sc, 1 inc) 8 times (48)
Round 7 :
Repeat (5 sc, 1 inc) 8 times (56)
Round 8 :
Repeat (6 sc, 1 inc) 8 times (64)
Round 9 :
sc in every st around (64)
Round 10 :
ch 10, skip 22 st, sc in next st, ch 10, skip 22 st, sc in next st (64)
Round 11 :
sc in each ch and each sc around (64)
Round 12 :
sc in every st around (64)
Round 13 :
sc in every st around (64)
Round 14 :
Repeat (1 sc, 1 dec) 21 times, then sc in last st (43)
Round 15 :
sc in every st around (42)
Leg Detail :
Join yarn to the leg opening and sc in every st (22) for 3 rounds. Fasten off.
— 6. Jumpsuit Hangers (Make 2) :
Round 2 :
Starting in 2nd ch from hook, sc in every ch (24). Fasten off and leave a tail for sewing.
— 7. Carrot :
Round 1 :
Using Orange, 8 sc into a mr (8)
Round 2 :
Work 8 x inc (16)
Round 3 :
Repeat (1 sc, 1 inc) 8 times (24)
Round 4 :
sc in every st around (24)
Round 5 :
sc in every st around (24)
Round 6 :
sc in every st around (24)
Round 7 :
Repeat (10 sc, 1 dec) 2 times (22)
Round 8 :
Repeat (9 sc, 1 dec) 2 times (20)
Round 9 :
Repeat (8 sc, 1 dec) 2 times (18)
Round 10 :
Repeat (7 sc, 1 dec) 2 times (16)
Info :
Stuff the carrot firmly as you go.
Round 11 :
sc in every st around (16)
Round 12 :
Repeat (6 sc, 1 dec) 2 times (14)
Round 13 :
Repeat (5 sc, 1 dec) 2 times (12)
Round 14 :
Repeat (4 sc, 1 dec) 2 times (10)
Round 15 :
Repeat (3 sc, 1 dec) 2 times (8)
Round 16 :
Work 4 x dec, then fasten off and weave in the end (4)
— 8. Carrot Leaves :
Round 1 :
Using Green, repeat (ch 7, starting in 2nd ch from hook sc 6) 5 times into the top of the carrot. Fasten off.
I hope you have as much fun making this little bunny as I did! There's something so rewarding about seeing all the separate pieces—the tiny ears, the plump body, and that bright carrot—finally come together into a finished friend. Don't forget to share your photos; I'd love to see what colors you choose for his little outfit and if you decide to give him any extra accessories. This project is such a great way to practice your amigurumi skills and create something truly heartwarming. Happy stitching, and enjoy your new handmade companion! 🧶✨