🧢 Beautiful ✨ Detailed πŸ’ Adorable

Snoopy and Woodstock Amigurumi Pattern

Snoopy and Woodstock Amigurumi Pattern
4.1β˜… Rating
8-10 Hours Time Needed
2.5K Made This
βœ‚οΈ

Intermediate Level

Ideal for those with basic knitting experience, featuring slightly more advanced stitches and techniques to expand your skills.

⏱️

All-Day Adventure

Requires 8-10 hours, ideal for a full day of immersive knitting.

🧸

Cute Companion

An adorable friend to cherish, handcrafted with love to bring comfort and joy for years to come.

About This Snoopy and Woodstock Amigurumi Pattern

This comprehensive pattern includes detailed instructions for creating both Snoopy and his feathered friend Woodstock. Snoopy stands approximately 8-10 inches tall when completed, featuring his signature black ears, embroidered facial features, and iconic collar. The pattern includes clever construction techniques for creating Snoopy's distinctive body shape and ensuring he stands upright. Woodstock complements Snoopy perfectly with his layered feather details and tiny legs that allow him to stand independently.

Snoopy and Woodstock Amigurumi Pattern crochet pattern - detailed view of completed project

Both patterns use simple increases and decreases to create dimensional shapes, with special attention to assembly instructions that ensure your finished characters have personality and stability. The embroidery details for faces add character without requiring safety eyes.

Why You'll Love This Snoopy and Woodstock Amigurumi Pattern

I absolutely love this pattern because it captures the essence of these classic characters so perfectly! The way Snoopy's ears are worked separately and attached gives them that distinctive droopy look, and the embroidered face allows for so much personality. I appreciate how the pattern includes thoughtful details like the collar for neck support and specific stuffing guidance to help Snoopy stand proudly. Woodstock's layered feathers are such a clever touch, creating dimension without complexity. These characters work up surprisingly quickly once you get into the rhythm, and seeing them come to life is incredibly rewarding. They make me smile every time I look at them, bringing back childhood memories while creating something tangible to share.

Snoopy and Woodstock Amigurumi Pattern step 1 - construction progress Snoopy and Woodstock Amigurumi Pattern step 2 - assembly progress Snoopy and Woodstock Amigurumi Pattern step 3 - details and accessories Snoopy and Woodstock Amigurumi Pattern step 4 - final assembly and finishing

Switch Things Up

I love how versatile this Snoopy pattern can be with just a few creative modifications! While the classic white and black color scheme is iconic, you could experiment with pastel versions for a softer nursery aesthetic, or even create a holiday Snoopy with a red and green scarf instead of the black collar.

For Woodstock, I've found that using variegated yellow yarn creates a beautiful feathered effect without any extra work, giving him more dimension and visual interest. You could also make multiple Woodstocks in slightly different yellow shades to create his whole bird family!

If you want to add more personality, consider creating accessories like a tiny red doghouse backdrop, a miniature food bowl, or even a small blanket for Snoopy to hold. I've made versions with embroidered aviator goggles on the head to create the famous Flying Ace version.

For Woodstock, tiny wire legs can make him more poseable, though this should only be done for adult collectors. You could also create a small nest using brown yarn worked in a bowl shape for him to sit in.

Another fun variation is adjusting the size by using different hook sizes - a 2mm hook creates an adorable miniature version perfect for keychains, while a 4mm hook makes a larger, more cuddly companion. The pattern scales beautifully!

Common Mistakes & How to Fix Them

βœ— Not stuffing Snoopy's neck firmly enough can cause his head to droop forward, so pack it tightly and use the collar for additional support βœ— Placing the ears incorrectly can throw off Snoopy's expression, always use pins to test placement before sewing them permanently to the head βœ— Skipping the stitch markers when working on Snoopy's head expansions can lead to misaligned facial features, mark those increase rows carefully βœ— Over-stuffing Woodstock's feathers makes them stiff and unnatural, keep the stuffing light so they maintain their soft, curved appearance βœ— Not checking Snoopy's leg placement before final sewing can affect his balance, always test him standing on a flat surface before securing

Snoopy and Woodstock Amigurumi Pattern

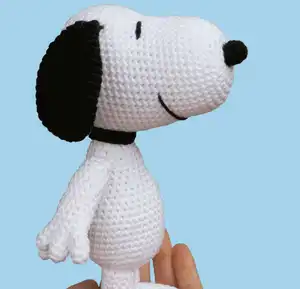
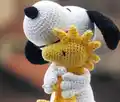
Bring the beloved Peanuts duo to life with this charming Snoopy and Woodstock amigurumi pattern! This delightful crochet project features everyone's favorite beagle and his tiny yellow friend in adorable, huggable form. Perfect for Peanuts fans and amigurumi enthusiasts, this pattern guides you through creating Snoopy's iconic white body, black ears, and expressive face, along with Woodstock's cheerful feathered appearance. These timeless characters make wonderful gifts for children and collectors alike, bringing nostalgic joy to any space.

Intermediate 8-10 Hours

Materials Needed for Snoopy and Woodstock Amigurumi Pattern

β€” Main Fabric

  • 01
    White yarn approximately 75 grams for Snoopy's main body
  • 02
    Black yarn for Snoopy's ears, nose, patch, and collar
  • 03
    Yellow yarn approximately 50 grams for Woodstock
  • 04
    Small amount of black yarn or embroidery thread for Woodstock's eyes

β€” Tools Required

  • 01
    3mm crochet hook (C/2, 11) or hook appropriate for your yarn
  • 02
    Stuffing (polyester fiberfill)
  • 03
    Tapestry needle for sewing and embroidery
  • 04
    Ball-point pins for placement
  • 05
    Stitch marker
  • 06
    Scissors

Progress Tracker

0% Complete

β€” SNOOPY HEAD (with white yarn):

R1:

6 sc in magic ring (6 sts)

R2:

(1 inc)x6 (12 sts)

R3:

(1 sc, 1 inc)x6 (18 sts)

R4:

(2 sc, 1 inc)x6 (24 sts)

R5:

(3 sc, 1 inc)x6 (30 sts)

R6:

(4 sc, 1 inc)x6 (36 sts)

R7:

(5 sc, 1 inc)x6 (42 sts)

R8-17:

sc even (42 sts)

R18:

15 sc, (1 inc, 1 sc)x6, 15 sc (48 sts)

R19:

15 sc, (1 inc, 2 sc)x6, 15 sc (54 sts)

R20-27:

sc even (54 sts)

Info:

Start stuffing

R28:

(7 sc, 1 dec)x6 (48 sts)

R29:

(6 sc, 1 dec)x6 (42 sts)

R30:

(5 sc, 1 dec)x6 (36 sts)

R31:

(4 sc, 1 dec)x6 (30 sts)

R32:

(3 sc, 1 dec)x6 (24 sts)

R33:

(2 sc, 1 dec)x6 (18 sts)

R34:

(1 sc, 1 dec)x6 (12 sts)

Info:

Tightly finish stuffing

R35:

(1 dec)x6 (6 sts)

Info:

Fasten off, close hole and weave in ends

β€” SNOOPY EAR (make 2 with black yarn):

R1:

6 sc in magic ring (6 sts)

R2:

(1 inc)x6 (12 sts)

R3:

(1 sc, 1 inc)x6 (18 sts)

R4:

(2 sc, 1 inc)x6 (24 sts)

R5-12:

sc even (24 sts)

R13:

(6 sc, 1 dec)x3 (21 sts)

R14:

(5 sc, 1 dec)x3 (18 sts)

R15:

(4 sc, 1 dec)x3 (15 sts)

R16:

sc even (15 sts)

R17:

(3 sc, 1 dec)x3 (12 sts)

R18:

(2 sc, 1 dec)x3 (9 sts)

R19:

sc even (9 sts)

Info:

Fasten off, leaving a long tail to sew to head. Don't stuff

β€” SNOOPY NOSE (with black yarn):

R1:

Chain 5 stitches, work around foundation chain in spiral to make oval

R2:

Starting from 2nd chain from hook, crochet 4 sc. Turn and crochet 4 sc on back loops of chain (8 sts)

R3-4:

sc even (8 sts)

Info:

Stuff the nose lightly. Fasten off leaving very long tail for sewing and embroidering eyes and mouth

β€” SNOOPY BODY (with white yarn):

R1:

6 sc in magic ring (6 sts)

R2:

(1 inc)x6 (12 sts)

R3:

(1 sc, 1 inc)x6 (18 sts)

R4:

(2 sc, 1 inc)x6 (24 sts)

R5:

(3 sc, 1 inc)x6 (30 sts)

R6:

(4 sc, 1 inc)x6 (36 sts)

R7:

(5 sc, 1 inc)x6 (42 sts)

R8-14:

sc even (42 sts)

R15:

(5 sc, 1 dec)x6 (36 sts)

R16-17:

sc even (36 sts)

R18:

(4 sc, 1 dec)x6 (30 sts)

R19:

sc even (30 sts)

R20:

(3 sc, 1 dec)x6 (24 sts)

Info:

Start stuffing

R21-23:

sc even (24 sts)

R24:

(6 sc, 1 dec)x3 (21 sts)

R25:

(5 sc, 1 dec)x3 (18 sts)

R26:

(4 sc, 1 dec)x3 (15 sts)

R27:

sc even (15 sts)

Info:

Finish stuffing and fasten off, leaving long tail for sewing

β€” SNOOPY ARM (make 2 with white yarn):

Info:

Begin by crocheting 3 fingers separately, then join them to continue with hand and arm

Finger (make 2 first):

R1: 4 sc in magic ring (4 sts), R2: (1 sc, 1 inc)x2 (6 sts), R3: sc even (6 sts). Cut yarn

Third Finger:

R1: 4 sc in magic ring (4 sts), R2: (1 sc, 1 inc)x2 (6 sts), R3: sc even (6 sts). Do not cut yarn

R4 (joining):

Insert hook in first st of second finger, crochet 1 sc in next 3 sc. Join first finger, crochet 1 sc in each of 6 sc. Continue with remaining 3 sc of second finger and 6 sc of third finger (18 sts)

R5:

(1 sc, 1 dec)x6 (12 sts)

R6-15:

sc even (12 sts)

R16:

(2 sc, 1 dec)x3 (9 sts)

Info:

Stuff lightly

R17:

sc even (9 sts)

Info:

Fasten off, leaving long tail for sewing

β€” SNOOPY FOOT (make 2 with white yarn):

R1:

6 sc in magic ring (6 sts)

R2:

(1 inc)x6 (12 sts)

R3:

(3 sc, 1 inc)x3 (15 sts)

R4-15:

sc even (15 sts)

R16:

(3 sc, 1 dec)x3 (12 sts)

Info:

Stuff

R17:

(1 dec)x6 (6 sts)

Info:

Cut yarn, close hole and weave in ends

β€” SNOOPY LEG (make 2 with white yarn):

R1:

Leaving long tail at beginning, chain 12 stitches and make circle by joining last chain with first chain (careful not to twist chain)

R2-6:

sc even (12 sts)

R7:

5 sc, 1 sl st

Info:

Cut yarn, leaving long tail to sew

β€” SNOOPY COLLAR (with black yarn):

R1:

Chain 18 stitches, work in flat

R2:

From second chain from hook, crochet 1 sc in every chain (17 sts)

Info:

Fasten off, leaving long tail to sew

β€” SNOOPY TAIL (start with white yarn):

R1:

4 sc in magic ring (4 sts)

R2:

sc even (4 sts)

R3:

(1 sc, 1 inc)x2 (6 sts)

R4:

(2 sc, 1 inc)x2 (8 sts)

R5-7:

sc even (8 sts)

R8:

(2 sc, 1 dec)x2 (6 sts)

Info:

Change to black yarn

R9:

sc even (6 sts)

Info:

Fasten off, leaving long tail for sewing. Stuff lightly

β€” SNOOPY PATCH (with black yarn):

R1:

Chain 5 stitches

R2:

Starting from 2nd chain from hook, crochet 4 sc. Turn and crochet 4 sc on back loops of chain (8 sts)

R3:

(1 sc, 1 inc)x4 (12 sts)

R4:

4 sc, 4 inc, 4 sc (16 sts)

Info:

Fasten off, leaving long tail to sew to body
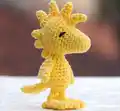
β€” WOODSTOCK HEAD:

R1:

6 sc in magic ring (6 sts)

R2:

(1 inc)x6 (12 sts)

R3:

(5 sc, 1 inc)x2 (14 sts)

R4:

sc even (14 sts)

R5:

(6 sc, 1 inc)x2 (16 sts)

R6:

sc even (16 sts)

R7:

(7 sc, 1 inc)x2 (18 sts)

R8-9:

sc even (18 sts)

R10:

(2 sc, 1 inc)x6 (24 sts)

R11:

sc even (24 sts)

R12:

(3 sc, 1 inc)x6 (30 sts)

R13-14:

sc even (30 sts)

R15:

(3 sc, 1 dec)x6 (24 sts)

R16:

sc even (24 sts)

Info:

Start stuffing

R17:

(2 sc, 1 dec)x6 (18 sts)

R18:

(1 sc, 1 dec)x6 (12 sts)

R19:

(1 dec)x6 (6 sts)

Info:

Finish stuffing and close hole. Weave in ends

β€” WOODSTOCK BODY:

R1:

6 sc in magic ring (6 sts)

R2:

(1 inc)x6 (12 sts)

R3:

(1 sc, 1 inc)x6 (18 sts)

R4-7:

sc even (18 sts)

R8:

(4 sc, 1 dec)x3 (15 sts)

R9:

sc even (15 sts)

R10:

(3 sc, 1 dec)x3 (12 sts)

R11:

(2 sc, 1 dec)x3 (9 sts)

R12:

sc even (9 sts)

Info:

Cut yarn, leaving long tail to sew to head. Stuff firmly
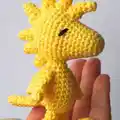
β€” WOODSTOCK HEAD FEATHERS:

BIG (make 1):

R1: 4 sc in magic ring (4 sts), R2: sc even (4 sts), R3: 1 inc, 3 sc (5 sts), R4: 1 inc, 4 sc (6 sts), R5: 1 inc, 5 sc (7 sts), R6: 1 inc, 6 sc (8 sts). Cut yarn, leaving tail

MEDIUM (make 3):

R1: 4 sc in magic ring (4 sts), R2: sc even (4 sts), R3: (1 inc, 1 sc)x2 (6 sts), R4: sc even (6 sts), R5: (1 inc, 2 sc)x2 (8 sts). Cut yarn, leaving tail

SMALL (make 2):

R1: 4 sc in magic ring (4 sts), R2: sc even (4 sts), R3: (1 inc, 1 sc)x2 (6 sts), R4: sc even (6 sts). Cut yarn, leaving tail

LITTLE (make 1):

R1: 4 sc in magic ring (4 sts), R2: sc even (4 sts), R3: (1 inc, 1 sc)x2 (6 sts). Cut yarn, leaving tail

β€” WOODSTOCK FOOT (make 2):

Finger 1:

R1: 4 sc in magic ring (4 sts), R2-4: sc even (4 sts). Cut yarn

Finger 2:

R1: 4 sc in magic ring (4 sts), R2-4: sc even (4 sts). Do not cut yarn

R5 (joining):

1 sc in every sc of each finger (8 sts)

R6:

(2 sc, 1 dec)x2 (6 sts)

R7:

(1 sc, 1 dec)x2 (4 sts)

R8:

sc even (4 sts)

Info:

Stuff very lightly and close hole

β€” WOODSTOCK LEGS (make 2):

R1:

Chain 5, leaving long tail at beginning. Join to first chain to make ring (5 sts)

R2-4:

sc even (5 sts)

Info:

Cut yarn, leaving long tail to sew to body

β€” WOODSTOCK WINGS (make 2):

First Piece:

R1: 6 sc in magic ring (6 sts), R2-3: sc even (6 sts). Cut yarn

Second Piece:

R1: 4 sc in magic ring (4 sts), R2: sc even (4 sts)

R4 (joining):

1 sc in every sc of each piece (10 sts)

R5:

sc even (10 sts)

R6:

(3 sc, 1 dec)x2 (8 sts)

R7:

(2 sc, 1 dec)x2 (6 sts)

Info:

Cut yarn, leaving long tail to sew to body. Don't stuff

β€” WOODSTOCK TAIL:

R1:

Chain 7 (7 sts)

R2:

Starting from 2nd chain from hook, crochet 6 sc. Turn and crochet 6 sc on back loops of chain (12 sts)

R3-5:

sc even (12 sts)

R6:

(1 dec, 4 sc)x2 (10 sts)

R7:

sc even (10 sts)

R8:

(1 dec, 3 sc)x2 (8 sts)

R9-10:

sc even (8 sts)

R11:

(1 dec, 2 sc)x2 (6 sts)

Info:

Cut yarn, leaving long tail to sew to body. Don't stuff

Assembly Instructions

  • Place pins on R18 of Snoopy's head to mark reference points for facial features, marking first increase, last increase, and stitch between third and fourth increase
  • Sew nose over initial magic ring of head ensuring it's horizontally straight in relation to pins placed earlier
  • Embroider eyes between rows 16-17 using pins as reference, counting 3 stitches from outer pins toward center for eye placement, use double thread
  • Embroider mouth 11 rows down from nose edge at central point, counting 8 stitches left and 8 right, use single thread and hide excess under ear
  • Sew ears to temples at head center alignment, roughly 6 rows above eye centers with curved part facing forward
  • Attach body between rows 24-28 of head using mattress stitch, stuffing neck very tightly as this is the weakest connection point
  • Sew tail between rows 9-10 of body back and sew black patch directly over tail placement
  • Attach arms between rows 23-24 on both sides of body, adjusting stuffing amount for desired arm position
  • Fasten collar around neck for additional support and decorative finish
  • Embroider Woodstock's feet between rows 2-3 by marking middle point and counting 2 stitches each side
  • Sew Woodstock body to head between rows 10-13, then stuff and attach all seven feathers in size order starting at row 10
  • Attach Woodstock's legs to feet at chain end, then sew opposite end to bottom of body ensuring bird can stand independently
  • Sew Woodstock's wings between rows 11-12 with larger piece facing forward, and attach tail at row 4 of body bottom
  • For final Snoopy leg assembly, sew legs on both sides of initial magic ring with row 7 facing externally, test standing position before securing permanently

Important Notes

  • πŸ’‘Use ball-point pins extensively to test placement of all parts before final sewing to ensure proper proportions and balance
  • πŸ’‘The neck connection between head and body is critical for Snoopy - use mattress stitch and stuff extremely firmly
  • πŸ’‘Cotton yarn provides best structure and hold for Snoopy, but softer yarns work with collar support
  • πŸ’‘Keep stitch markers in place throughout construction especially during head expansion rows to maintain facial feature alignment
  • πŸ’‘Stuff Woodstock's feathers very lightly so they maintain natural curved appearance rather than becoming stiff
  • πŸ’‘Between fingers on Snoopy's hands, you may need to add a few securing stitches where pieces join
  • πŸ’‘Test Snoopy's standing position on flat surface before final leg attachment to ensure proper balance and stance

This timeless Snoopy and Woodstock pattern brings Charles M. Schulz's beloved Peanuts characters to life in huggable amigurumi form! With detailed instructions for both characters, you'll create the iconic beagle and his tiny feathered companion complete with expressive embroidered faces and carefully crafted proportions. The pattern includes clever construction techniques like Woodstock's layered feathers and Snoopy's jointed fingers, while thoughtful assembly guidance ensures your finished pieces have personality and can stand proudly. Whether you're a Peanuts fan creating these for yourself or crafting them as gifts, these classic characters are sure to bring smiles and nostalgic joy. Happy crocheting! 🧢✨

You ask,

we answer.

FAQs

What size will my finished Snoopy be?

When made with the recommended 3mm hook and worsted weight yarn, Snoopy will stand approximately 8-10 inches tall. Woodstock will be roughly 3-4 inches tall, making him the perfect companion size.

Can I use safety eyes instead of embroidering the faces?

While the pattern calls for embroidered features, you could use safety eyes for Snoopy. However, embroidery is recommended as it allows you to capture Snoopy's distinctive expression more accurately and makes the toy safer for young children.

Why won't my Snoopy stand upright properly?

The most common issue is insufficient stuffing in the neck area. Make sure to stuff the neck very firmly and use the collar for additional support. Also check that the legs are positioned symmetrically on either side of the body's magic ring and that the body is attached between rows 24-28 of the head.

How do I prevent gaps between Snoopy's fingers?

After joining the three fingers in round 4, use your tapestry needle to add a few small stitches where the fingers meet (marked by the black circle in the pattern). This reinforces the connection and closes any visible gaps.

What's the best way to attach Woodstock's feathers?

Stuff each feather very lightly so they maintain their natural curve. Start with the big feather at row 10, making sure the curved part points forward, then work your way through the medium and small feathers in descending order. Save the little feather for last to hide the knot from the eye embroidery.

Can I make Snoopy's arms poseable?

While the pattern doesn't include this feature, you could insert thin floral wire or pipe cleaners into the arms before stuffing. However, if making for children, it's safer to leave them soft and adjust the stuffing amount to control how the arms hang.