🧢 Beautiful ✨ Detailed πŸ’ Adorable

Santa Keychain Amigurumi Pattern

Santa Keychain Amigurumi Pattern
4.7β˜… Rating
2-3 Hours Time Needed
3.1K Made This
βœ‚οΈ

Intermediate Level

Ideal for those with basic knitting experience, featuring slightly more advanced stitches and techniques to expand your skills.

⏱️

Bite-Sized Project

Complete in under 2 hoursβ€”quick, fun, and perfect for a little creative escape.

πŸŽ„

Holiday Cheer

Festive fun for the season, bringing handmade magic to celebrations and creating new family traditions.

About This Santa Keychain Amigurumi Pattern

This Santa Keychain pattern brings holiday magic to life in a perfectly portable size. The design cleverly incorporates front post stitches to create dimensional ears and a charming nose that gives Santa his characteristic appearance. The layered construction technique builds from the peach-toned head through the white beard details and finishes with a classic red hat topped with a fluffy white bobble. Special attention to detail in the beard and hair sections creates wonderful texture through chain loop techniques.

Santa Keychain Amigurumi Pattern crochet pattern - detailed view of completed project

The pattern uses basic amigurumi construction with clever embellishments that make it special. Working in continuous rounds with strategic shaping creates the perfect miniature Santa head complete with all his iconic features.

Why You'll Love This Santa Keychain Amigurumi Pattern

I absolutely love how this pattern transforms simple stitches into such a recognizable character! The technique for creating Santa's fluffy beard using chain loops is brilliantly satisfying to work, and watching those textured details come together feels magical. I appreciate how the front post stitches add dimension to create the ears and nose without complicated shaping. The compact size means you can finish it quickly, making it perfect for last-minute gift crafting or creating multiple Santas for everyone on your list. The bobble-topped hat detail is especially charming and adds that perfect finishing touch.

Santa Keychain Amigurumi Pattern step 1 - construction progress Santa Keychain Amigurumi Pattern step 2 - assembly progress Santa Keychain Amigurumi Pattern step 3 - details and accessories Santa Keychain Amigurumi Pattern step 4 - final assembly and finishing

Switch Things Up

I love experimenting with this Santa pattern to create different holiday characters and variations! One of my favorite modifications is changing the hat color to green and adjusting the beard style to create a festive elf keychain instead. You could also work the pattern in different skin tones by simply swapping the peach yarn for brown, tan, or any shade that represents diversity in your holiday decor.

For a Mrs. Claus version, I've tried adding longer chain loops arranged differently to create a bun hairstyle, and switching the red hat to white or another festive color creates a completely different character. You could even eliminate the beard entirely and add some embroidered details for a sweet Mrs. Claus face.

Another fun variation is adjusting the bobble size or adding small felt decorations to the hat like holly leaves and berries, or even tiny jingle bells for extra charm. I've also experimented with metallic yarn for the hat band to add some sparkle, which looks absolutely magical!

For those who want to create a set, try making multiple Santas in different sizes by using various yarn weights. A fingering weight version becomes a tiny ornament, while chunky yarn creates an adorable larger decoration. You could also modify the facial features by changing eye placement or adding rosy cheeks with pink embroidery or colored pencil for a different expression.

Common Mistakes & How to Fix Them

βœ— Overstuffing the head and hat causing the stitches to stretch and the stuffing to show through the fabric βœ— Placing the beard shaping incorrectly which throws off the facial symmetry and makes Santa look lopsided or distorted βœ— Missing the slip stitch joins at the end of rounds which can cause the work to spiral incorrectly βœ— Pulling the gathering stitches on the bobble too tightly or loosely affecting the shape and proportion of the hat topper βœ— Positioning the eyes incorrectly in relation to the nose and beard affecting Santa's overall expression and character βœ— Not using stitch markers to track rounds leading to miscounts especially during the hat decreasing sections

Santa Keychain Amigurumi Pattern

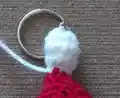
Create your own adorable miniature Santa Claus keychain with this delightful crochet pattern! This charming design features Santa's iconic red hat with fluffy white trim, a sweet peach-toned face with characteristic nose details, and a beautifully textured white beard and hair made from delicate chain loops. Perfect for holiday decorating, gift-giving, or adding festive cheer to your keys and bags, this compact project combines simple amigurumi techniques with creative texture work. The finished piece includes a bobble-topped hat and carefully crafted facial features that capture Santa's jolly spirit in miniature form.

Intermediate 2-3 Hours

Materials Needed for Santa Keychain Amigurumi Pattern

β€” Main Fabric

  • 01
    Hayfield Bonus DK yarn in White (0961) - 4g
  • 02
    Hayfield Bonus DK yarn in Peaches (0888) - 3g
  • 03
    Hayfield Bonus DK yarn in Ladybird/Red (0698) - 3g
  • 04
    Hayfield Bonus DK yarn in Black (0965) - small amount for eyes

β€” Tools Required

  • 01
    3mm crochet hook
  • 02
    Wool needle for sewing
  • 03
    Keychain hardware
  • 04
    Hi-Loft quality toy stuffing
  • 05
    Stitch markers
  • 06
    Scissors

Progress Tracker

0% Complete

β€” Head :

Row 1 :

Using Peaches, ch2, sc 6 into 2nd st from hook (alternatively sc 6sts into magic ring) (6)

Row 2 :

inc x6 (12)

Row 3 :

(sc into next st, inc) x6 (18)

Row 4 :

(sc into the next 2sts, inc) x6 (24)

Rows 5-7 :

sc (24) (3 rows)

Row 8 :

sc into the next 5sts, FPdc into the sc 2 rows below, sc into next 5sts, cl, sc into the next 5sts, FPdc into the sc 2 rows below, sc into next 6sts (24)

Row 9 :

sc into the next 5sts, FPdc into the previous dc, sc into next 11sts, FPdc into the previous dc, sc into next 6sts (24)

Row 10 :

sc (24) sl st to join. F/O leaving a short end

β€” Hair and Beard :

Row 1 :

Using White, sl st into F/O st, sl st into next 6sts, (you should be just in front of the ear, adjust if not), slip st at an angle down the face for the next 3sts, moving 1 row and a st down the face each time, sl st straight across for the next 6sts (the 3rd and 4th st should be central to the base of the nose), slip st at an angle up the face for the next 3sts, moving 1 row and a st up the face each time, (you should be just in front of the 2nd ear), sl st into the next 6sts (24) sl st to join

Row 2 :

(ch7, sl st through the next sl st from the previous row) x5, (ch9, sl st through the next sl st on beard shaping) x12, (ch7, sl st through the next sl st from the previous row) x7 (12 loops Beard, 12 loops Hair). F/O leaving a short end

β€” Hat :

Row 1 :

Using Ladybird, sl st into F/O st on peaches row at top of head, sc into next 24sts (24)

Rows 2-3 :

sc (24) (3 rows)

Row 4 :

(sc into the next 6sts, dec) x3 (21)

Row 5 :

(sc into the next 5sts, dec) x3 (18)

Row 6 :

(sc into the next 4sts, dec) x3 (15)

Row 7 :

(sc into the next 3sts, dec) x3 (12)

Row 8 :

(sc into the next 2sts, dec) x3 (9)

Info :

Stuff head and hat

Row 9 :

(sc into next st, dec) x3 (6). F/O leaving a short end

β€” Bobble :

Row 10 :

Using White, leaving a 20cm end, sl st into st to right of F/O st, (sc into next st, inc) x3 making sure that the end is to the outside sl st to join (End will be used to shape bobble) (9)

Rows 11-12 :

sc (9) (2 rows)

Info :

Stuff bobble

Row 13 :

(sc into next st, dec) x3 (6). F/O leaving a 20cm end

Infos :

Thread F/O end through the front loops of the last 6sts and pull tight to gather. Secure end with a couple of small sts. Using small back sts attach the keychain to the top of the bobble. Secure with a couple of small sts. Weave end through bobble and cut flush. Using 20cm end from start of bobble thread through the base of the 1st row of white sts and pull tight to gather. Secure end with a couple of small sts. Weave end through Head and cut flush

β€” Hat Band :

Row 1 :

Using White, leaving a 25cm end, ch24(24) sl st to join

Row 2 :

ch1, hdc into the next 23ch (24) sl st to join. F/O leaving a 25cm end

Infos :

Place hat band on head so that the base is touching the top of the hair. Using each 25cm end in turn, attach both sides of the band to the head using small back sts. Secure ends with a couple of small sts before threading through head and cutting flush

β€” Eyes :

Instructions :

Using black oddment thread through to front of face, 1 row up from top of nose and 2sts to outside. Sew 3 small back sts 1 row in length to form 1st eye. Thread through to opposite side of face and repeat for 2nd eye. Weave end through head and cut flush

Assembly Instructions

  • Work the white beard and hair directly onto the completed head by slip stitching around the face following the shaping pattern
  • Attach the red hat by slip stitching into the fasten off stitch on the peach row at the top of the head
  • Create the white bobble on top of the hat and use the initial tail to gather the base tightly against the hat top
  • Attach the keychain hardware to the top of the bobble using small backstitches for security
  • Sew the white hat band around the base of the hat where it meets the hair using both tail ends
  • Embroider the eyes with black yarn positioned one row up from the nose top and two stitches to the outside on each side

Important Notes

  • πŸ’‘Work in continuous rounds and use stitch markers to track the last stitch of each row
  • πŸ’‘Stuff the head and hat moderately firm but not overstuffed to prevent the filling from showing through stitches
  • πŸ’‘The front post stitches create dimensional ears and nose so work them carefully two rows below as indicated
  • πŸ’‘Position the beard shaping carefully to ensure symmetry with the third and fourth stitches central to the nose base
  • πŸ’‘Leave long tails as specified for the bobble and hat band as these are essential for shaping and assembly
  • πŸ’‘When creating chain loops for beard and hair maintain consistent tension for uniform texture
  • πŸ’‘Weave in all ends through the stuffed head rather than cutting them at the surface for a neater finish

This charming Santa Keychain pattern captures the magic of Christmas in a perfectly portable form! Designed with clever techniques like front post stitches for dimensional features and textured chain loops for that iconic fluffy beard, this project combines traditional amigurumi methods with creative finishing touches. Whether you're crafting festive gifts or adding holiday cheer to your everyday accessories, this miniature Santa brings joy with every stitch. The quick-to-complete design makes it perfect for spreading Christmas spirit all season long! πŸŽ…πŸ§Άβœ¨

You ask,

we answer.

FAQs

Can I use different yarn weights for this pattern?

While the pattern is designed for DK weight yarn with a 3mm hook, you can adapt it to other yarn weights. Just remember that using bulkier yarn will create a larger keychain, while finer yarn will make it smaller. Adjust your hook size accordingly to maintain proper tension and fabric density.

What's the finished size of the Santa keychain?

When made with the recommended DK yarn and 3mm hook, the finished Santa measures approximately 2-3 inches tall, making it perfect for attaching to keys, bags, or using as a Christmas ornament.

How do I work the front post stitches for the nose and ears?

Front post stitches are worked by inserting your hook from front to back around the post of the specified stitch (two rows below), then completing the stitch as normal. This creates a raised, dimensional effect perfect for Santa's features.

Can I make the beard and hair less fluffy?

Yes! The fluffiness is determined by the chain loop length. The pattern calls for ch7 and ch9 loops, but you can use shorter chains (like ch5 or ch6) for a more compact look or longer chains for extra volume.

What if I don't have access to the specific yarn colors mentioned?

Any DK weight yarn in similar colors will work beautifully! Use a peachy-pink or beige for the face, red for the hat, white for trim and beard, and black for eyes. The pattern is quite forgiving with color substitutions.

Is this pattern suitable for beginners?

This pattern is best suited for crocheters with some amigurumi experience. It requires knowledge of basic stitches plus some special techniques like front post stitches and cluster stitches. If you're comfortable with basic amigurumi, the clear instructions will guide you through the special techniques.