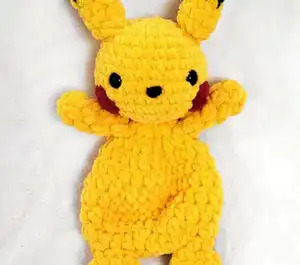
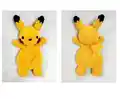
Create your very own adorable Pika, the beloved electric mouse, with this delightful bulky yarn amigurumi pattern! This pattern guides you through crafting a soft, huggable companion using Bernat Blanket yarn, resulting in a plush and squishy friend that's perfect for Pokemon fans of all ages. With detailed instructions for the head, body, arms, ears, tail, and those iconic rosy cheeks, you'll bring this charming character to life stitch by stitch. The pattern includes helpful photos and tips for invisible color changes and proper assembly.
Progress Tracker
0% Complete
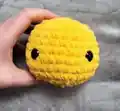
— Head :
Round 1 :
8 Sc into Magic Ring (8)
Round 3 :
(Sc 1, Inc) x 8 (24)
Round 4-6 :
Sc around (24) - 3 Rounds x 24 Sc = 72 Sc
Round 7 :
(Sc 3, Inc) x 6 (30)
Round 8-9 :
Sc around (30) - 2 Rounds x 30 Sc = 60 Sc
Info :
Place safety eyes between rounds 7 & 8, 5 stitches apart. If embroidering eyes, loop yarn through repeatedly until you have a full, round eye. Tie ends off and leave the tails inside the head. Nose can be added at this time, or at the end.
Round 10 :
(Sc 3, Dec) x 6 (24)
Round 11 :
(Sc 2, Dec) x 6 (18)
Round 12 :
(Sc 1, Dec) x 6 (12)
Info :
Stuff the head until the desired firmness is achieved.
Info :
Tie off, leaving a 6" tail. Using a tapestry needle, finish off the head by picking up the front loops of the final 6 stitches. Pull tight to close and then hide the yarn tail through the piece and trim the excess.
— Arms :
Round 1 :
5 Hdc into Magic Ring (5)
Round 2-4 :
Hdc around (5) - 3 Rounds x 5 Hdc = 15 Hdc
Round 5 :
Hdc 3, Hdc Dec (4)
Info :
Fasten off and leave a long tail for sewing onto the body. Set aside for sewing later.
— Body :
Info :
Begin by holding the head upside down and face pointing away from you. You will be placing 6 sc into the bottom of the head using Round 13 as a guide for stitch placement. You will start the row at the back of the head.
Round 1 :
6 sc into head (6)
Round 2 :
Hdc Inc x 6 (12)
Round 3 :
(Hdc 1, Hdc Inc) x 6 (18)
Round 4 :
(Hdc 2, Hdc Inc) x 6 (24)
Round 6 :
(Hdc 3, Hdc Inc) x 6 (30)
Round 7-8 :
Hdc around (30) - 2 Rounds x 30 Hdc = 30 Hdc
Round 9 :
(Hdc 3, Hdc Dec) x 6 (24)
Round 10 :
(Hdc 2, Hdc Dec) x 6 (18)
Info :
Add extra Hdc to get to the centre of the back. Do not fasten off yet, you will go directly to the leg instructions.
— Ears :
Round 1 :
In Black: 5 Sc into Magic Ring (5)
Round 3 :
Invisible colour change to Yellow: Sl st, Sc 5 (6) - The sl st reduces the appearance of the colour change
Round 4 :
(Sc 2, Inc) x 2 (8)
Info :
Fasten off and leave a long tail for sewing onto the head.
— Legs :
Info :
Lay the body flat to figure out how to place the legs. There will be 5 stitches designated for each leg, that will leave 8 stitches unworked. Using stitch markers, mark 5 stitches for each leg, with a 4 stitch gap in between on each side. Add extra Hdc to get to the first st marker, if needed.
First Leg Round 1 :
Sc Inc x 5 (10)
Round 2 :
(Sc 4, Inc) x 2 (12)
Round 3 :
(Sc 2, Dec) x 3 (9)
Round 4 :
(Sc 1, Dec) x 3 (6)
Info :
Fasten off and weave in tail.
Second Leg Info :
Add Yellow yarn to Round 10 of body, leaving a 10" yarn tail. The second leg will be worked the same way as the first leg. Use the 10" yarn tail to sew closed the gap between the legs.
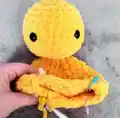
— Tail :
Info :
In Yellow, leave a long tail at the beginning to sew onto body
Row 2 :
Starting 2nd Ch from the hook: Sc 5 (5) Ch 1 & turn
Row 3 :
Sc 5 (5) Ch 1 & turn
Row 4 :
Sc 2 (2) Ch 1 & turn
Row 5 :
Sc 2, Ch 4 (6) turn
Row 6 :
Starting 2nd Ch from the hook: Sc 5 (5) Ch 1 & turn
Row 7 :
Sc 5 (5) Ch 1 & turn
Info :
Fasten off and sew between Rounds 7 & 8, at a slight angle.
— Nose :
Info :
In Black: Sew a strand of black yarn around the centre stitch of Rounds 8 & 9, between the eyes. Secure the ends inside the head.
— Cheeks :
Info :
Make 2 in Cranberry
Round 1 :
5 Sc into Magic Ring (5) Sl st
Info :
Fasten off and sew between Rounds 9 & 11, slightly behind the eyes.
— Assembly :
Step 1 :
Sew the arms onto Round 2 of the body, 4 stitches apart, at the front.
Step 2 :
Sew the ears onto either side of the head, between Rounds 3 & 4.
This adorable Pika the Electric Mouse pattern brings everyone's favorite electric-type Pokemon to life in the softest, squishiest way possible! Using bulky Bernat Blanket yarn, this pattern works up quickly and creates a plush companion that's perfect for Pokemon fans young and old. The detailed instructions and helpful photos guide you through every step, from the signature lightning bolt tail to those sweet rosy cheeks. Whether you're crafting for yourself or creating a gift for a Pokemon enthusiast, this pattern delivers maximum cuteness with minimal effort. Happy crocheting, and may your stitches be as electric as your new companion! ⚡🧶✨