About This Oliver the Elephant Amigurumi Pattern
This sweet little elephant makes a wonderful baby shower gift or a whimsical addition to a nursery shelf, bringing handmade warmth and charm to any space.
Ideal for those with basic crocheting experience, featuring slightly more advanced stitches and techniques to expand your skills.
Takes 5-7 hours, making it an enjoyable project to finish over a couple of days.
Delightful animal designs with sweet details that capture the essence of your favorite woodland and farmyard friends.
This sweet little elephant makes a wonderful baby shower gift or a whimsical addition to a nursery shelf, bringing handmade warmth and charm to any space.
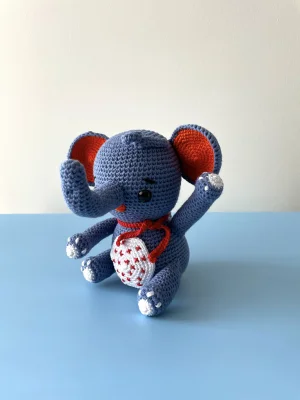
I love how the vibrant orange inside the ears brings this little guy to life! The construction is wonderfully engaging, and adding the tiny embroidered stars on the tummy patch feels like adding a touch of handmade magic.
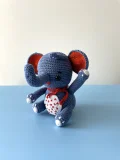
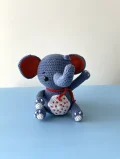
When I first sat down to design this little elephant, I wanted to capture that classic, storybook feel of a gentle giant with a big heart. There is something so incredibly soothing about working with these cool blue tones, especially when you pair them with that surprising pop of vibrant orange inside the ears! It completely transforms the character and gives him so much personality.
My absolute favorite part of the process has to be embroidering the little stars on his tummy patch. It is a tiny detail, but it really makes the whole project feel like a treasured heirloom. If you want to customize your elephant, you could easily swap the blue for a soft grey or even a pastel pink! And don't feel limited by the red stars—little french knots or tiny embroidered flowers would look just as sweet. I highly recommend taking your time with the trunk placement; giving it a slight upward tilt really brings out his cheerful, curious expression. Grab a warm cup of tea and enjoy every single stitch!
Meet your next favorite creative project! This sweet little elephant is packed with personality, from his delightfully oversized ears to his tiny embroidered tummy patch. You will love watching him come together stitch by stitch, and he makes the absolute perfect addition to any nursery shelf or toy collection.
Work 8 sc into a mr (8)
inc in each of the next 8 sts (16)
(sc in next st, inc in next st) 8 times (24)
(sc in next 2 sts, inc in next st) 8 times (32)
(sc in next 3 sts, inc in next st) 8 times (40)
(sc in next 4 sts, inc in next st) 8 times (48)
(sc in next 5 sts, inc in next st) 8 times (56)
ch 10, hdc in second ch from hook, sc in next 8 ch, sl st to head to create hair strand. Repeat to make hair strands, then sc in remaining sts around (56)
Working behind the hair strands, sc in each st around (56)
sc in each st around (56)
(sc in next 6 sts, inc in next st) 8 times (64)
sc in each st around (64)
Position and secure the safety eyes between Rounds 19 and 20, leaving a space of 11 sts between them.
(sc in next 6 sts, dec) 8 times (56)
sc in each st around (56)
(sc in next 5 sts, dec) 8 times (48)
sc in each st around (48)
(sc in next 4 sts, dec) 8 times (40)
sc in each st around (40)
(sc in next 3 sts, dec) 8 times (32)
sc in each st around (32)
Stuff the head firmly with fiberfill.
(sc in next 3 sts, inc) 8 times (40)
sc in each st around (40)
(sc in next 4 sts, inc) 8 times (48)
(sc in next 5 sts, inc) 8 times (56)
sc in each st around (56)
(sc in next 6 sts, inc) 8 times (64)
sc in each st around (64)
Working in flo, sc in each st around (64). Stuff the body firmly.
(sc in next 6 sts, dec) 8 times (56)
(sc in next 5 sts, dec) 8 times (48)
(sc in next 4 sts, dec) 8 times (40)
(sc in next 3 sts, dec) 8 times (32)
(sc in next 2 sts, dec) 8 times (24)
(sc in next st, dec) 8 times (16)
(sc in next st, dec) 8 times (8)
dec 4 times (4). fo.
Make 2, starting with white yarn.
Work 6 sc into a mr (6)
inc in each of the next 6 sts (12)
Switch to main color yarn.
sc in next 4 sts, (inc, sc in next 4 sts) twice, inc in last st (16)
sc in each st around (16)
sc in next 4 sts, (dec, sc in next 4 sts) twice, dec in last st (12)
Stuff the arm lightly as you go.
sc in each st around (12)
Flatten the top opening and work 6 sc through both layers to close. fo, leaving a long tail for sewing.
Embroider three small white claws on the tip of the paw.
Make 2, starting with white yarn.
Work 6 sc into a mr (6)
inc in each of the next 6 sts (12)
Switch to main color yarn.
sc in next 4 sts, (inc, sc in next 4 sts) twice, inc in last st (16)
sc in next 6 sts, (inc, sc in next 4 sts) twice, inc in last st (20)
sc in each st around (20)
sc in next 6 sts, (dec, sc in next 4 sts) twice, dec in last st (16)
sc in each st around (16)
Flatten the top opening and work 8 sc through both layers to close. fo, leaving a long tail for sewing.
Make 4 pieces total: 2 in main color and 2 in orange.
Work 6 sc into a mr (6)
inc in each of the next 6 sts (12)
(sc in next st, inc) 6 times (18)
(sc in next 2 sts, inc) 6 times (24)
(sc in next 3 sts, inc) 6 times (30)
(sc in next 4 sts, inc) 6 times (36)
(sc in next 5 sts, inc) 6 times (42)
sc in each st around (42)
Place one main color piece and one orange piece wrong sides together. Join them by working sc through both thicknesses around using main color. fo, leaving a long tail for sewing.
Using main color yarn.
Work 6 sc into a mr (6)
(sc, inc) 4 times, sc in remaining sts (10)
sc in each st around (10)
(sc, inc) 2 times, sc in remaining sts (12)
Stuff the trunk lightly as you go.
sc in each st around (12)
(sc, inc) 2 times, sc in remaining sts (14)
sc in each st around (14). fo, leaving a long tail for sewing.
Using white yarn.
Work 6 sc into a mr (6)
inc in each of the next 6 sts (12)
(sc in next st, inc) 6 times (18)
(sc in next 2 sts, inc) 6 times (24)
(sc in next 3 sts, inc) 6 times (30)
(sc in next 4 sts, inc) 6 times (36)
(sc in next 5 sts, inc) 6 times (42)
(sc in next 6 sts, inc) 6 times (48). fo, leaving a long tail for sewing.
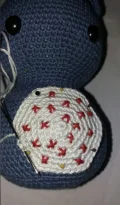
Embroider small decorative stars across the front of the patch using red yarn.
Start with white yarn.
Work 6 sc into a mr (6)
inc in next 2 sts, sc in next 4 sts (8)
Switch to main color yarn.
(sc in next st, inc) 4 times (12)
sc in each st around (12)
dec twice, sc in next 8 sts (10)
sc in each st around (10)
Flatten the opening and work 5 sc through both layers to close. fo, leaving a long tail for sewing.
Using red yarn, ch 80
sc in second ch from hook and each ch across. fo, weaving in ends.
I can't wait to see your adorable little elephants come to life! Crafting this sweet character is such a joyful experience, from watching his cute trunk take shape to embroidering those tiny red stars on his tummy. Be sure to share your finished creations with our wonderful crafting community—we all love cheering each other on! Happy crocheting, my friends, and may your stitches always bring you absolute peace and joy! 🧶🐘✨
Absolutely! You can use worsted weight or even chunky chenille yarn. Just remember to adjust your hook size accordingly so your stitches remain tight enough to keep the stuffing from showing through.
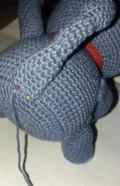
The secret is in the stuffing! Stuff the tip of the trunk lightly, and as you sew it to the head, tilt the base upward and pin it securely in place before stitching to hold that cute curved shape.
I recommend using a simple cross-stitch or making tiny star shapes with three intersecting straight stitches. Do this on the white patch before sewing it to the body so you can easily tie off and hide your yarn tails on the back.
Yes! If you are gifting this to a baby, swap out the plastic safety eyes for embroidered eyes using black embroidery floss or yarn to eliminate any choking hazards.
