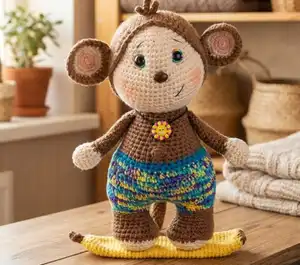
Create your very own adorable surf-loving monkey companion with this detailed amigurumi pattern! Oakley the Monkey stands 11 inches tall and comes complete with a charming cap, surfboard accessory, and playful personality. This intermediate-level pattern guides you through crafting every detail, from his sweet cream-colored face to his variegated striped shirt and poseable tail. Perfect for makers who want to create a unique handmade gift or add a whimsical character to their amigurumi collection.
Progress Tracker
0% Complete
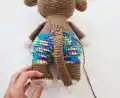
— Legs and Body :
Starting with Legs (Make 2) - Color B :
Round 1 :
Make 6 sc into a magic ring (6)
Round 2 :
Increase in each st around (12)
Round 3 :
(sc, inc) x 6 (18)
Round 4 :
(2 sc, inc) x 6 (24)
Round 5 :
(3 sc, inc) x 6 (30)
Round 6 :
sc in each st around (30)
Round 7-8 :
sc in each st around (30)
Round 9 :
dec x 6, 18 sc (24)
Round 10 :
2 sc, dec, 9 sc, dec x 2, 7 sc (21)
Info :
Start stuffing the feet
Round 11-13 :
sc in each st around (21)
Round 14 :
(6 sc, inc) x 3 (24) - Mark the 3rd st on the 1st leg with a stitch marker
Joining Legs :
Do not F/O the 2nd leg! Work 6 more sc around the top of the 2nd leg. Ch 4, work a sc into the marked stitch on leg 1, work 23 more sc around the 1st leg, work 4 sc on the back of the ch 4, work 24 more sc around the 2nd leg, work 4 sc on the front of the ch 4 (56)
Body Round 1 :
sc in each st around (56)
Round 2 :
(13 sc, inc) x 4 (60)
Round 3-6 :
sc in each st around (60)
Round 7 :
(8 sc, dec) x 6 (54)
Info :
Stuff the body as you work
Round 8 :
sc in each st around (54)
Round 9 :
(7 sc, dec) x 6 (48)
Round 10 :
On stitch 30 change to Color E, sc in each st around (48)
Round 11 :
(6 sc, dec) x 6 (42)
Round 12 :
On stitch 25 change to Color A, sc in each st around (42)
Round 13 :
sc in each st around (42)
Round 14 :
(5 sc, dec) x 6 (36)
Round 15 :
2 sc, bobble stitch, 33 sc (36)
Round 16-17 :
sc in each st around (36)
Round 18 :
(10 sc, dec) x 3 (33)
Round 19 :
sc in each st around (33)
Round 20 :
(9 sc, dec) x 3 (30)
Round 21 :
sc in each st around (30)
Round 22 :
(8 sc, dec) x 3 (27)
Round 23 :
sc in each st around (27)
Round 24 :
(7 sc, dec) x 3 (24)
Info :
F/O and leave a long tail for sewing
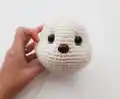
— Head :
Info :
Crocheted from top to bottom, starting with Color B
Round 1 :
Make 6 sc into a magic ring (6)
Round 2 :
Increase in each st around (12)
Round 3 :
(sc, inc) x 6 (18)
Round 4 :
sc, inc, (2 sc, inc) x 5, sc (24)
Round 5 :
(3 sc, inc) x 6 (30)
Round 6 :
2 sc, inc, (4 sc, inc) x 5, 2 sc (36)
Round 7 :
(5 sc, inc) x 6 (42)
Round 8 :
3 sc, inc, (6 sc, inc) x 5, 3 sc (48)
Round 9-13 :
sc in each st around (48)
Info :
Mark the 1st and last increase of round 14 with a stitch marker
Round 14 :
10 sc, inc x 6, 10 sc, inc x 6, 16 sc (60)
Round 15-18 :
sc in each st around (60)
Infos :
Place eyes between rounds 11 and 12, leaving 10 holes between them. Place the 1st eye before the 1st increase. Count 10 holes after the first eye and place the 2nd eye. If you want the sunken eye look, do not place the backs of the eyes on until round 23. Place nose in between rounds 14 and 15, in between the eyes.
Round 19 :
10 sc, (sc, dec) x 3, 12 sc, (sc, dec) x 3, 20 sc (54)
Round 20 :
(7 sc, dec) x 6 (48)
Round 21 :
sc in each st around (48)
Round 22 :
(6 sc, dec) x 6 (42)
Round 23 :
(5 sc, dec) x 6 (36)
Info :
Stuff the head well. Cut a long piece of yarn and remove the eyes. Place the needle in the hole where the first eye was and thread the needle into a hole next to the eye hole. Go back and forth between each eye hole repeating the process from the first eye. Pull slightly on the yarn after going through each hole. Do this about 3 times on each side until you reach the look you want. To place the backs of the eyes you will need to remove most of the stuffing to place the washers on the eyes then re stuff it.
Round 24 :
sc in each st around (36)
Round 25 :
(4 sc, dec) x 6 (30)
Round 26 :
(3 sc, dec) x 6 (24)
Info :
F/O and leave a short tail
— Cap :
Round 1 :
Make 6 sc into a magic ring (6)
Round 2 :
Increase in each st around (12)
Round 3 :
(sc, inc) x 6 (18)
Round 4 :
(2 sc, inc) x 6 (24)
Round 5 :
(3 sc, inc) x 6 (30)
Round 6 :
(4 sc, inc) x 6 (36)
Round 7 :
(5 sc, inc) x 6 (42)
Round 8 :
(6 sc, inc) x 6 (48)
Round 9 :
(7 sc, inc) x 6 (54)
Round 10 :
(8 sc, inc) x 6 (60)
Round 11-18 :
sc in each st around (60)
Round 19 :
18 sc, 2 sl, 3 hdc, 4 dc, 3 hdc, 2 sl, 3 hdc, 4 dc, 3 hdc, 2 sl, 10 sc
Info :
F/O and leave a tail
— Ears :
Info :
Make 2 in Color A, 2 in Color B
Round 1 :
Make 6 sc into a magic ring (6)
Round 2 :
Increase in each st around (12)
Round 3 :
(sc, inc) x 6 (18)
Round 4 :
(2 sc, inc) x 6 (24)
Info :
Do not F/O the Color A ears! Place the back sides of Color A and Color B ears together. You will be working around the ears to connect them together
Round 5 :
(3 sc, inc) x 6 (30)
Info :
F/O and leave a long tail for sewing
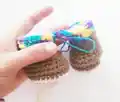
— Arms :
Round 1 :
Make 6 sc into a magic ring (6)
Round 2 :
Increase in each st around (12)
Round 3 :
(3 sc, inc) x 3 (15)
Round 4 :
sc in each st around (15)
Round 5 :
3 dc cluster, ch 1, 14 sc (15)
Round 6 :
Do not work on the ch 1 from the previous round, (3 sc, dec) x 3 (12)
Round 7 :
(2 sc, dec) x 3 (9)
Info :
Start stuffing the arms. Change to Color A. No longer stuff the arms
Round 8-19 :
sc in each st around (9)
Info :
Fold the arms in half and sc the opening closed. F/O and leave a long tail for sewing
— Tail :
Round 1 :
Make 4 sc into a magic ring (4)
Round 2 :
Increase in each st around (8)
Round 3-5 :
sc in each st around (8)
Info :
Change to Color A. Pipe cleaner can be used instead of stuffing
Round 6-29 :
sc in each st around (8)
Info :
If using a pipe cleaner, fold it in half and twist it together. Insert it into the tail. Fold the tail in half and sc the opening closed. F/O and leave a long tail for sewing
— Surfboard :
Round 1 :
Make 4 sc into a magic ring (4)
Round 2-4 :
sc in each st around (4)
Round 5 :
Increase in each st around (8)
Round 6 :
(sc, inc) x 4 (12)
Round 7 :
(2 sc, inc) x 4 (16)
Round 8 :
sc in each st around (16)
Round 9 :
(3 sc, inc) x 4 (20)
Info :
Do not stuff the surfboard
Round 10-44 :
sc in each st around (20)
Round 45 :
(3 sc, dec) x 4 (16)
Round 46 :
sc in each st around (16)
Round 47 :
(2 sc, dec) x 4 (12)
Info :
F/O and sew the hole closed
This delightful Oakley the Monkey pattern brings together classic amigurumi techniques with creative details to create a surf-loving companion full of character! The pattern includes special instructions for achieving expressive sunken eyes and features adorable accessories including a tiny surfboard. Whether you're making this for yourself or as a heartfelt gift, Oakley's sweet face and playful personality will bring joy to any space. 🧶 Happy crocheting! 🐒✨