๐Ÿงถ Beautiful โœจ Detailed ๐Ÿ’ Adorable

Mushroom Bag Crochet Pattern

Mushroom Bag Crochet Pattern
4.6โ˜… Rating
6-8 Hours Time Needed
2.0K Made This
โœ‚๏ธ

Intermediate Level

Ideal for those with basic knitting experience, featuring slightly more advanced stitches and techniques to expand your skills.

โฑ๏ธ

Weekend Treat

Takes 5-7 hours, making it an enjoyable project to finish over a couple of days.

๐ŸŽ

Cozy Accent

A warm touch for your space that transforms ordinary corners into inviting nooks filled with handmade charm.

About This Mushroom Bag Crochet Pattern

Mushroom Bag Crochet Pattern crochet pattern - detailed view of completed project

Working with two strands of yarn throughout creates a sturdy, structured bag that holds its shape beautifully. The red mushroom cap features treble crochet stitches for a distinctive ridged edge, while the white spots can be customized in various sizes to match your creative vision.

Why You'll Love This Mushroom Bag Crochet Pattern

I absolutely love this mushroom bag pattern because it combines functionality with pure whimsy! There's something incredibly satisfying about watching the flat circular base transform into a three-dimensional bag, and adding those white spots to the red mushroom cap brings out the inner child in all of us. I especially appreciate how versatile this pattern is โ€“ you can adjust the size, play with different color combinations, or even create seasonal variations. The textured stitches add visual depth that makes the finished piece look far more complex than it actually is to create. Plus, the flower embellishments on the drawstring ends are those perfect little details that make you smile every time you use it!

Mushroom Bag Crochet Pattern step 1 - construction progress Mushroom Bag Crochet Pattern step 2 - assembly progress Mushroom Bag Crochet Pattern step 3 - details and accessories Mushroom Bag Crochet Pattern step 4 - final assembly and finishing

Switch Things Up

I love experimenting with this mushroom bag pattern to create completely different looks! One of my favorite variations is making it in soft pastel colors โ€“ imagine a baby pink cap with lavender spots for a dreamy fairy aesthetic. You could also try an autumnal version using burnt orange and cream, or go bold with turquoise and yellow for a modern twist.

For a more sophisticated look, I've used neutral tones like camel and ivory, which transforms the whimsical mushroom into an everyday accessory that still has character. If you're feeling adventurous, try adding small embroidered details to the spots โ€“ tiny French knots or lazy daisy stitches can turn simple circles into flowers or stars.

I've also experimented with size โ€“ making a mini version as a coin purse (just stop at round 8 for the body) or going extra large for a market bag by adding multiple increase rounds. Another fun idea is creating a set of matching mushroom bags in graduating sizes for a mother-daughter duo or as a gift set. You could even swap the flower embellishments for tiny crocheted ladybugs or bees for extra woodland charm!

Common Mistakes & How to Fix Them

โœ— Forgetting to work with two strands together throughout the pattern which results in a flimsy bag that doesn't hold its shape properly โœ— Skipping the back loop only instructions in rounds 4 and 7 of the body which eliminates the textured ridges that define the bag's structure โœ— Not measuring the mushroom top against the bag opening before finishing to ensure it's wide enough to cover the bag properly โœ— Pulling the drawstring too tight when threading it through round 13 which can distort the bag opening and make it difficult to open and close โœ— Attaching the strap without using stitch markers first to ensure even placement which leads to an off-center or twisted strap โœ— Weaving in yarn ends too early before checking that all pieces are securely attached which can cause structural problems later

Mushroom Bag Crochet Pattern

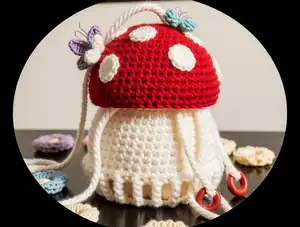
Create your own charming mushroom-shaped drawstring bag with this delightful crochet pattern! This whimsical project combines a sturdy white base with a vibrant red mushroom cap adorned with white spots, complete with a practical drawstring closure and comfortable shoulder strap. Perfect for storing small treasures, carrying essentials, or gifting to someone special, this bag measures approximately 5 inches in diameter and 7 inches tall. The pattern features detailed instructions for creating the body, decorative mushroom top, adjustable strap, and adorable flower embellishments on the drawstring ends.

Intermediate 6-8 Hours

Materials Needed for Mushroom Bag Crochet Pattern

โ€” Main Fabric

  • 01
    Approximately 210 yards of white 4 weight DK yarn (color A) for body, strap, and drawstring
  • 02
    Approximately 100 yards of red 4 weight DK yarn (color B) for mushroom top
  • 03
    Additional yarn for flower embellishments in white and red

โ€” Tools Required

  • 01
    5.5 mm crochet hook
  • 02
    4 mm crochet hook
  • 03
    Scissors
  • 04
    Darning needle
  • 05
    2 stitch markers

Progress Tracker

0% Complete

โ€” BODY :

Info :

Use two strands together of color A, work in the round, join with a sl st into the first dc at the end of each round

Begin :

Magic ring - ch 2, 12 dc in magic ring (12)

Round 1 :

ch 2, 2 dc in each st (24)

Round 2 :

ch 2, *1 dc, 2 dc, repeat from * to last st (36)

Round 3 :

ch 2, *1 dc, 1 dc, 2 dc, repeat from * to last st (48)

Info :

Work should measure approximately 5 in. diameter. If you would like your bag to be bigger, add another increase round of *1 dc, 1 dc, 1 dc, 2 dc

Round 4 :

ch 2, BLO dc in each st (48)

Round 5 :

ch 2, *FPdc in dc row below, dc in next st, repeat from * to last st (48)

Round 6-12 :

ch 2, dc in each st (48). If you want your bag taller, add more rounds of dc

Round 13 :

ch 2, *dc, ch 1, skip a stitch, repeat from * to last st (48)

Round 14 :

Drop 1 strand, but do not cut - continue with other strand. ch 2, 1 dc, 3 dc, *2 dc, 3 dc repeat from * to last st (120). Bag should measure approximately 7 inches tall

โ€” STRAP :

Instructions :

Grab the dropped strand of yarn and work two strands together. Ch until you reach your desired strap length (32 inches suggested for kid, 36 inches for adult). Turn, sc into the back bump of each chain stitch, sl st to fasten. Strap will only be attached to 1 side at this time

โ€” TOP :

Info :

Use 2 strands together with color B, work in the round, join with a sl st in first dc at the end of each round

Begin :

Magic ring - ch 2, 10 dc in the magic ring (10)

Round 1 :

ch 2, 2 dc in each stitch (20)

Round 2 :

ch 2, *1 dc, 2 dc repeat from * to last st (30)

Round 3 :

ch 2, *1 dc, 1 dc, 2 dc repeat from * to last st (40)

Round 4 :

ch 2, *1 dc, 1 dc, 1 dc, 2 dc repeat from * to last st (50)

Info :

If you made your bag bigger than 5 inches diameter, add at least one more increase round - you'll want your top wider than the bag

Round 5-6 :

ch 2, 1 hdc in each stitch (50)

Round 7 :

Drop 1 strand of yarn, fasten off, and work with remaining strand only. ch 3, tr BLO in each stitch (50)

Round 8 :

ch 1, sl st each stitch, fasten off and weave in ends (50)

โ€” MUSHROOM SPOTS :

Info :

Create as many small, medium, and large spots as you want in color A. Leave enough of a tail so you can use it to attach to the mushroom top. Switch to a 4 mm hook

Small :

Magic ring - ch 1, 5-6 sc, sl st to join

Medium :

Magic ring - ch 2, 8-10 hdc, sl st to join

Large :

Magic ring - ch 2, 10-12 dc, sl st to join

โ€” DRAWSTRING :

Instructions :

Using the 5.5 mm hook and 2 strands of color A yarn, chain until desired length (about 30 inches) and tie off. Leave 4 inches on each end of the drawstring for flower embellishments. Thread the finished drawstring through every other skipped stitch opening (round 13 of body)

โ€” FLOWER EMBELLISHMENTS :

Info :

Use 4 mm hook

With color A :

Start with a magic ring, ch 2 - 5 hdc in the ring, sl st to join and fasten off

With color B :

Pull up a loop and *ch 1, (hdc, dc, hdc, sl st), repeat from * 4 more times and sl st to join and fasten off

Assembly Instructions

  • Before attaching spots, place a stitch marker between the stitches in either the 3rd or 4th row from the center on opposite sides of the mushroom top for strap placement
  • Use your darning needle to securely attach white spots to the red mushroom top in a random or planned pattern
  • Starting from under the mushroom top, thread your strap up between your marked stitches and back down through the other marked stitches
  • Attach the strap to the bag securely on the opposite side ensuring it's centered and lies flat
  • Thread the finished drawstring through every other skipped stitch opening created in round 13 of the bag body
  • Use your darning needle to sew the completed flowers to both ends of the drawstring for decorative finishing touches
  • Weave in all remaining yarn ends securely and trim excess

Important Notes

  • ๐Ÿ’กAlways work with two strands of yarn held together throughout the body and top for structural integrity
  • ๐Ÿ’กThe first chain(s) of each round do not count as a stitch - keep this in mind when counting stitches
  • ๐Ÿ’กMake sure the mushroom top is wider than the bag opening so it sits nicely over the top
  • ๐Ÿ’กUse stitch markers to mark strap placement before threading to ensure symmetrical positioning
  • ๐Ÿ’กThe back loop only technique creates textured ridges - make sure to work into the correct loop
  • ๐Ÿ’กCustomize the number and size of white spots to your preference before attaching them permanently
  • ๐Ÿ’กAdjust strap length before attaching - 32 inches for children and 36 inches for adults works well

This whimsical Mushroom Bag pattern transforms simple yarn into a magical woodland accessory that's both functional and adorable! The combination of textured stitches, customizable spots, and charming flower details creates a piece that feels straight out of a fairy tale. Whether you're making it for yourself or as a thoughtful handmade gift, this bag brings joy every time you use it. The sturdy construction means it's not just pretty to look at โ€“ it's practical for everyday use too! ๐Ÿ„โœจ Happy crocheting! ๐Ÿงถ

You ask,

we answer.

FAQs

Can I make this bag larger or smaller?

Yes! To make it bigger, add another increase round to the base using the pattern *1 dc, 1 dc, 1 dc, 2 dc. For height, simply add more rounds of dc in rounds 6-12. Remember to adjust the mushroom top size accordingly so it's wider than your bag opening.

Why do I need to use two strands of yarn together?

Working with two strands creates a thicker, sturdier fabric that holds the bag's shape better and makes it more durable for everyday use. A single strand would result in a flimsy bag that couldn't support the weight of items inside.

What does 'back loop only' mean and why is it important?

Back loop only (BLO) means you insert your hook through only the back loop of the stitch instead of both loops. This technique creates a textured ridge that adds visual definition and structure to specific areas of the bag, particularly where the base meets the sides.

How do I know how many spots to make for the mushroom top?

This is completely up to your personal preference! Traditional mushrooms have random spots, so you can make anywhere from 5-15 spots in various sizes. Lay them out on your finished top before sewing to find an arrangement you love.

Can I use different colors for this pattern?

Absolutely! While the classic red and white creates a traditional mushroom look, you could try brown and tan for a more earthy style, purple and white for a fantasy vibe, or any color combination that inspires you. Just maintain the two-color contrast for the best effect.

What if my strap keeps twisting?

Make sure you're working the single crochet into the back bump of each chain stitch as specified. This creates a flatter strap that resists twisting. Also, pin the strap in place before sewing to ensure it's lying flat and straight.