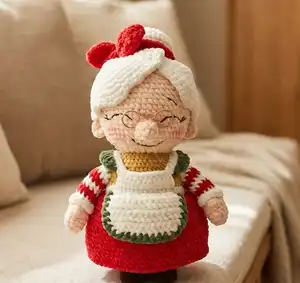
Create a charming Mrs. Claus granny figure with this delightful amigurumi pattern. This adorable grandmother character features a traditional red dress with white apron, beautiful white hair styled in elegant buns, and sweet glasses perched on her nose. Standing at approximately 17 cm (6.7 inches) when made with YarnArt Jeans yarn, this pattern includes detailed instructions for creating every element from her cream-colored face with embroidered features to her brown shoes and festive red headband.
Progress Tracker
0% Complete
— Arms :
Info :
Make 2 pieces, cream yarn, stuff palm well but don't stuff rest of arm yet
Round 1 :
Start in 2nd chain from hook: 3 SC, 3 SC into last chain, on other side: 2 SC, INC (10)
Round 2 :
(4 SC, INC) x 2 (12)
Round 3-4 :
2 rounds of 12 SC
Round 5 :
5 SC, PS, 6 SC (12)
Round 7 :
Change to white: 12 SC
Round 9-10 :
Change to red: 2 rounds of 12 SC
Round 11-12 :
Change to white: 2 rounds of 12 SC
Round 13-14 :
Change to red: 2 rounds of 12 SC
Round 15-16 :
Change to white, fix and cut red thread: 2 rounds of 12 SC
Info :
Work several additional SC to side edge of detail when folding, fix and cut thread
— Sleeve Edge :
Info :
Go back to Round 7 of arm, attach white thread to free front loop
Round 1 :
FLO: (3 SC, INC) x 3 (15)
Round 2 :
15 SC, fix and cut thread, hide thread end inside arm
— Apron :
Info :
White yarn, make a turn and work turning CH at end of each row
Row 1 :
Start in 2nd chain from hook: 14 SC
Row 6 :
Skip a St, 11 SC, DEC (12)
Row 7 :
Skip a St, 9 SC, DEC (10), fix thread and leave long end
Info :
Attach green thread to side upper corner, work side and bottom edges with crab stitch in reverse direction with CH between stitches, attach left white thread end between stitches, fix and cut thread
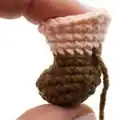
— Legs :
Info :
Start with brown yarn, make 2 details, stuff in process
Round 1 :
Start in 2nd chain from hook: 5 SC, 3 SC into last chain, on other side: 4 SC, INC (14)
Round 2 :
INC, 4 SC, 3 INC, 4 SC, 2 INC (20)
Round 4 :
5 SC, 5 DEC, 5 SC (15)
Round 5 :
5 SC, 3 DEC, 4 SC (12)
Round 6 :
(3 SC, INC) x 3 (15), change to cream, don't cut brown thread
Round 8 :
(4 SC, INC) x 3 (18)
Round 10 :
(5 SC, INC) x 3 (21), fix and cut thread
Info :
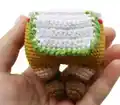
Go back to Round 6, attach brown thread to free front loop, work BLO 15 SC, join with SS first and last stitches, bring thread inside leg and fix
— Leg Connector (Middle Part) :
Info :
Mustard yarn, leave long thread end at beginning to connect legs
Round 1 :
10 SC in MR, don't fasten off
Info :
Mark 3 SC on sides of leg connector at distance of 2 SC, mark 3 SC on side inner parts of legs, place middle part between legs with continuation behind left leg side, middle part upwards
— Body-Head :
Info :
Continue with mustard thread from middle part, stuff in process, rounds start from Round 11 from left leg
Round 11 :
On left leg: 18 SC, on middle part: 2 SC, on right leg: 18 SC, on middle part: 2 SC (40)
Info :
Work each leg and middle part together with SS using mustard thread left at beginning
Round 12 :
(SC, INC) x 2, 8 SC, (SC, INC) x 6, 8 SC, (SC, INC) x 4 (52)
Round 13 :
(2 SC, INC) x 2, 8 SC, (2 SC, INC) x 6, 8 SC, (2 SC, INC) x 4 (64)
Round 14-24 :
11 rounds of 64 SC
Round 25 :
(3 SC, DEC) x 3, 34 SC, (DEC, 3 SC) x 3 (58)
Round 26 :
Change to red, don't cut mustard: 58 SC
Round 27 :
Change to white, fix and cut red: BLO: (2 SC, DEC) x 3, 34 SC, (DEC, 2 SC) x 3 (52)
Round 28 :
Mark 16 St in middle of belly for apron attachment: 18 SC, 16 SC with apron, 18 SC (52)
Round 29 :
Change to mustard, fix and cut white: BLO: (SC, DEC) x 3, 34 SC, (DEC, SC) x 3 (46)
Info :
In Round 30 attach arms, mark 6 SC on each arm for attachment with thumbs forward, mark 6 SC on body sides at distance of 18 SC on chest and 16 SC on back
Round 30 :
8 SC, 6 SC with arm, 18 SC, 6 SC with arm, 8 SC (46)
Round 31 :
8 SC, 6 SC on outer edge of arm, 18 SC, 6 SC on outer edge of arm, 8 SC (46)
Round 32 :
(14 SC, DEC) x 2, 14 SC (44)
Round 33 :
(9 SC, DEC) x 4 (40)
Round 34 :
(8 SC, DEC) x 4 (36)
Round 35 :
(4 SC, DEC) x 6 (30)
Round 36 :
(3 SC, DEC) x 6 (24)
Round 37 :
Change to cream, fix and cut mustard: BLO: 24 SC
Round 38 :
(SC, INC) x 12 (36)
Round 39 :
(2 SC, INC) x 12 (48)
Round 40 :
(7 SC, INC) x 6 (54)
Round 41-52 :
12 rounds of 54 SC
Round 53 :
(7 SC, DEC) x 6 (48)
Round 54 :
(6 SC, DEC) x 6 (42)
Round 55 :
(5 SC, DEC) x 6 (36)
Round 56 :
(4 SC, DEC) x 6 (30)
Round 57 :
(3 SC, DEC) x 6 (24)
Round 58 :
(2 SC, DEC) x 6 (18)
Round 59 :
(SC, DEC) x 6 (12)
Round 60 :
6 DEC (6), tighten hole, fix thread and hide inside
— Skirt :
Info :
Go back to Round 26 of body, turn body upside down, attach red thread at back to front free loop in Round 26, work in spiral
Round 1 :
FLO: 7 SC, INC, (6 SC, INC) x 6, 7 SC, INC (66)
Round 3 :
(10 SC, INC) x 6 (72)
Round 4-15 :
12 rounds of 72 SC
Round 16 :
Crab stitch in reverse direction: 72 SC, finish with straight line, hide thread end
— Apron Top :
Info :
Go back to Round 28 of body, mark 14 front loops in middle on belly, attach white thread to last marked front loop, make turn and work turning CH at end of each row
Row 2 :
Skip a St, 11 SC, DEC (12)
Row 3 :
Skip a St, 9 SC, DEC (10)
Row 4 :
(Chain 20, start in 2nd chain from hook 19 SC), then 8 SC on apron top, (chain 19, start in 2nd chain from hook 18 SC), then SC in last St on apron top
Info :
Sew straps crosswise at back, crochet green frill on left strap: SS, SC, HDC, 3 INC HDC, HDC, SC, SS (12), leave long end to fix, crochet frill on right strap with same pattern counting 9 loops from beginning, tie green thread ends and hide inside body
— Nose :
Info :
Cream yarn, don't stuff
Round 2 :
(SC, INC) x 3 (9)
Round 3 :
9 SC, fix thread and leave long end to sew
Info :
Fold to make oval shape, sew in area of Rounds 43-45 (Rounds 6-8 of head)
— Embroidering Facial Features :
Info :
Mark with pins eye contour (5 SC width) in Round 46 (Round 9 of head) at distance of 5-6 SC
Info :
Insert sewing needle with black thin thread from top of head, withdraw near side pin, stretch thread above pins, insert needle to opposite point, fix with 2 stitches in middle points marked by pins
Info :
Embroider eyelashes, mark eyebrows and smile and embroider, fix smile curve with stitches in two lower points
— Ears :
Info :
Cream yarn, make 2 details
Round 1 :
7 SC in MR, tighten MR, don't join first and last stitches
Info :
Sew ears in area of Rounds 44-46 (Rounds 7-9 of head), blush cheeks with pink artistic pastel optional
— Hair :
Info :
White yarn, make 2 large circles
Round 3 :
(SC, INC) x 8 (24)
Round 4 :
(3 SC, INC) x 6 (30)
Round 5 :
(4 SC, INC) x 6 (36)
Round 6 :
(5 SC, INC) x 6 (42)
Round 7 :
(6 SC, INC) x 6 (48)
Round 8 :
(7 SC, INC) x 6 (54)
Round 9 :
(8 SC, INC) x 6 (60)
Round 10 :
60 SC, fix thread and leave long end to sew
Info :
Make 1 smaller circle
Round 3 :
(SC, INC) x 8 (24)
Round 4 :
(3 SC, INC) x 6 (30)
Round 5 :
(4 SC, INC) x 6 (36)
Round 6 :
(5 SC, INC) x 6 (42)
Round 7 :
(6 SC, INC) x 6 (48)
Round 8 :
(7 SC, INC) x 6 (54), fix thread and leave long end to sew
— Topknot :
Round 3 :
(SC, INC) x 6 (18)
Round 4 :
(2 SC, INC) x 6 (24)
Round 5 :
(3 SC, INC) x 6 (30)
Round 6 :
(4 SC, INC) x 6 (36)
Round 7 :
(5 SC, INC) x 6 (42)
Round 9 :
(5 SC, DEC) x 6 (36)
Round 10 :
(4 SC, DEC) x 6 (30)
Round 11 :
(3 SC, DEC) x 6 (24)
Round 12 :
(2 SC, DEC) x 6 (18), fix thread and leave long end to sew
— Hair Assembly :
Info :
Place one large circle on back of head, then smaller circle on side, then second large circle on top on opposite side
Info :
After fitting, remove last two parts, start sewing circle on back of head along contour, sew last two details with indent between stitches to bend edges and form wave, sew topknot on top
— Headband :
Round 0 :
Chain 51, work in spiral
Round 1 :
Start in 2nd chain from hook: 2 SC, 2 HDC, INC DC, 2 HDC, 36 SC, 2 HDC, INC DC, 2 HDC, SC, 2 SC into last chain, on other side: SC, 2 HDC, INC DC, 2 HDC, 36 SC, 2 HDC, INC DC, 2 HDC, 2 SC (100)
Info :
Fix thread and leave long end to sew, bring thread end from wrong side, wrap topknot with headband and fix with thread end
— Glasses :
Info :
Need wire (aluminum or copper) D=1.5 mm for cotton toy or D=2 mm for plush toy, elongated object with necessary circumference (marker), wire cutters
Info :
Take marker and wrap with wire, use same marker to make recess for bridge of nose, form second circle and cut wire
Info :
Fix glasses on bridge of nose with cream thread
This enchanting Mrs. Claus Granny pattern brings the warmth and nostalgia of Christmas traditions into your hands with every stitch. Designed with meticulous attention to detail, from her elegant layered white hair to her charming wire-framed glasses, this pattern celebrates the art of amigurumi while honoring the beloved grandmother figure of holiday lore. The combination of textured elements, color work, and dimensional assembly creates a truly heirloom-quality piece that will be treasured for generations. Whether displayed on a holiday mantle or gifted to someone special, this handcrafted granny captures the cozy, loving spirit of the season. Happy crocheting and may your creation bring as much joy as the holidays themselves! 🎄🧶✨