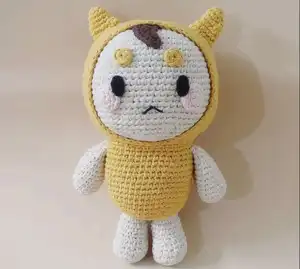
Create your very own adorable Mr. Buckwheat character with this delightful amigurumi pattern! This charming design features a sweet round-faced friend wearing a cozy hood with little horns, complete with embroidered facial details and rosy cheeks. Perfect for beginners and experienced crocheters alike, this pattern will guide you through every step to bring this lovable character to life. Standing at approximately 7.87 inches tall, Mr. Buckwheat makes an ideal handmade gift or a precious addition to your amigurumi collection.
Progress Tracker
0% Complete
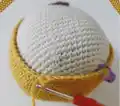
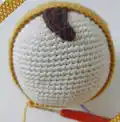
— Head (White) :
Info :
Make sure to stuff the head as you crochet
R2 :
1 inc in each st around (12)
R10 :
4 sc, 1 inc, (8 sc, 1 inc) x 5, 4 sc (60)
R12-25 :
1 sc in each st around (66)
R28 :
1 sc in each st around (54)
R32 :
2 sc, 1 dec, (4 sc, 1 dec) x 5, 2 sc (30)
— Hair (Brown) :
R1 :
Ch 10. Start from the 2nd ch from hook: 9 sc. On the other side of the ch: 3 slst, 2 sc, 2 hdc, 2 dc (9)
Info :
Fasten off and leave a long tail for sewing the hair to the head
Info :
Sew the hair between round 5 and 12 of the head
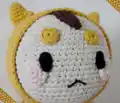
— Hood (Golden Yellow) :
R2 :
1 inc in each st around (12)
R13-21 :
1 sc in each st around (72)
R23 :
1 sc in each st around (66)
R25 :
1 sc in each st around (60)
Info :
Put the head inside the hood and crochet:
Info :
Finish with an invisible fasten off
— Eyebrows x 2 (Golden Yellow) :
Info :
Fasten off and leave a long tail to sew de eyebrows to the head
Info :
Sew between rounds 12 and 15 of the head
— Cheeks x 2 (Pink) :
R2 :
1 inc in each st around (10)
Info :
Fasten off and leave a long tail for sewing the cheeks to the head
Info :
Sew between rounds 18 and 23 of the head
— Eyes x 2 (Black) :
Info :
Cut out two ovals of black felt and glue on between rounds 16 and 20 of the head
— Horns x 2 (Golden Yellow) :
R3 :
1 sc in each st around (9)
R6 :
1 sc, 3 inc, 6 sc (13)
R7 :
1 sc in each st around (13)
Info :
Fasten off and leave a long tail to sew the horn to the head
Info :
Sew the horns in round 17 of the hood with 11 stitches apart
— Body (Golden Yellow) :
Info :
Make sure to stuff the body as you crochet
R2 :
1 inc in each st around (12)
R8 :
1 sc in each st around (42)
R10-17 :
1 sc in each st around (48)
R19-20 :
1 sc in each st around (42)
Info :
Sew between rounds 11 and 24 of the Hood
— Arms x 2 (White) :
R2 :
1 inc in each st around (12)
R4-11 :
1 sc in each st around (18)
R13 :
1 sc in each st around (12)
Info :
Fasten off and leave a long tail to sew the arm to the body
Info :
Stuff with fiberfill
Info :
Sew in round 19 of the body
— Legs x 2 (White) :
R2 :
1 inc in each st around (12)
R5 :
6 sc, (1 sc, 1 dec) x 4, 6 sc (20)
R6 :
1 sc in each st around (20)
R7 :
6 sc, 4 dec, 6 sc (16)
R8-10 :
1 sc in each st around (16)
Info :
Stuff with fiberfill
Info :
Fasten off and leave a long tail for sewing the leg to the body
Info :
Sew between rounds 1 and 5 of the body
This charming Mr. Buckwheat amigurumi pattern brings together simple crochet techniques and thoughtful design details to create an irresistibly sweet character. With his gentle expression, cozy hood, and perfectly proportioned little body, this project is ideal for crocheters who want to create something truly special without overwhelming complexity. The combination of textured stitches, embroidered features, and carefully placed embellishments results in a handmade treasure that's perfect for gifting or keeping as your own crafting companion. 🧶 Happy crocheting! 🧵✨