🧢 Beautiful ✨ Detailed πŸ’ Adorable

Mother and Baby Lama Amigurumi Pattern

Mother and Baby Lama Amigurumi Pattern
4.7β˜… Rating
8-10 Hours Time Needed
1.7K Made This
βœ‚οΈ

Intermediate Level

Ideal for those with basic knitting experience, featuring slightly more advanced stitches and techniques to expand your skills.

⏱️

All-Day Adventure

Requires 8-10 hours, ideal for a full day of immersive knitting.

🧸

Cute Companion

An adorable friend to cherish, handcrafted with love to bring comfort and joy for years to come.

About This Mother and Baby Lama Amigurumi Pattern

This delightful lama pattern brings double the joy with both a mother and baby design! The mother lama showcases advanced details like textured wool curls, decorative front post double crochet embellishments, and a functional pocket that perfectly cradles the baby lama. Each piece uses simple increases and decreases to create beautifully shaped bodies, heads, and limbs that come together seamlessly.

Mother and Baby Lama Amigurumi Pattern crochet pattern - detailed view of completed project

The clever construction technique joins legs directly to the body, while arms are attached mid-round for secure positioning. Color changes create natural-looking sections that mimic a lama's distinctive coat pattern.

Why You'll Love This Mother and Baby Lama Amigurumi Pattern

I absolutely love how this pattern creates a heartwarming mother-and-baby set that tells a story! The functional pocket detail is geniusβ€”watching the baby lama nestle into mama's pouch brings such joy every time. I'm impressed by how the pattern guides you through color transitions and texture work without feeling overwhelming. The curly hair details add personality, and the embroidered facial features let you customize each lama's expression. It's incredibly satisfying to see both pieces come together as a coordinated set!

Mother and Baby Lama Amigurumi Pattern step 1 - construction progress Mother and Baby Lama Amigurumi Pattern step 2 - assembly progress Mother and Baby Lama Amigurumi Pattern step 3 - details and accessories Mother and Baby Lama Amigurumi Pattern step 4 - final assembly and finishing

Switch Things Up

I love experimenting with this pattern by playing with the color paletteβ€”imagine pastel rainbow lamas or even seasonal colors like autumn oranges and browns! The curls are my favorite place to get creative; instead of beige and brown, I've tried all-white for a fluffy sheep effect or variegated yarn for multicolored texture.

For a more whimsical touch, I sometimes add tiny flowers or bows between the curls, or embroider little hearts on the pocket. You could also personalize each lama with different facial expressionsβ€”closed eyes for a sleeping baby, wide eyes for an alert one, or even adding little eyelashes for extra sweetness.

If you want to make the pocket even more special, consider embroidering a name or initial on it, or adding a contrasting trim in a complementary color. I've also experimented with making the baby lama in a completely different color scheme from the mother for an adopted baby theme, which tells a beautiful story of family coming in all forms.

For gifting, I sometimes attach a small card that tucks into the pocket alongside the baby, or add a ribbon loop to the mother's back to turn her into a wall hanging. The possibilities for customization are endless, and each variation tells its own unique story!

Common Mistakes & How to Fix Them

βœ— Forgetting to place stitch markers at round beginnings can cause your stitch count to drift off, leading to misshapen pieces βœ— Stuffing too firmly before finishing decreases makes it difficult to close openings neatly and creates lumpy surfaces instead of smooth shapes βœ— Not leaving long enough tails for sewing pieces together results in running out of yarn mid-attachment and visible knots βœ— Skipping the BLO and FLO instructions eliminates the textured ridges that create the lama's distinctive clothing sections and decorative edging

Mother and Baby Lama Amigurumi Pattern

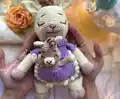
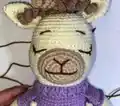
Create an adorable mother and baby lama set with this charming amigurumi pattern! Standing at 24cm tall, the mother lama features intricate details including textured curls, a decorative pocket perfect for holding the baby, and beautiful color transitions. The sweet 12cm baby lama tucks perfectly into mama's pocket, making this the ultimate companion set. This pattern combines beginner-friendly techniques with creative embellishments to bring these lovable characters to life. Perfect for gift-giving or adding handmade charm to any space!

Intermediate 8-10 Hours

Materials Needed for Mother and Baby Lama Amigurumi Pattern

β€” Main Fabric

  • 01
    Sport weight 4ply yarn Yarn Art Jeans in Brown (N40)
  • 02
    Sport weight 4ply yarn Yarn Art Jeans in Yellow (N86)
  • 03
    Sport weight 4ply yarn Yarn Art Jeans in Beige (N87)
  • 04
    Sport weight 4ply yarn Yarn Art Jeans in Purple (N89)

β€” Tools Required

  • 01
    2mm crochet hook
  • 02
    Stuffing material (fiberfill)
  • 03
    Yarn needle for sewing pieces
  • 04
    Stitch markers
  • 05
    Scissors
  • 06
    Brown yarn for embroidery details

Progress Tracker

0% Complete

β€” MOTHER LAMA

β€” Arms (make 2)

Info:

With beige yarn. Place row marker at beginning.

Round 1:

6sc in MR

Round 2:

6inc (12)

Round 3:

(1sc, inc) *6 (18)

Round 4:

(2sc, inc) *6 (24)

Round 5-8:

24sc (4 rounds)

Round 9:

(2sc, dec) *6 (18)

Round 10:

Change color to yellow. BLO 18sc

Round 11-21:

18sc (11 rounds)

Round 22:

Change color to purple. BLO 18sc

Round 23-26:

18sc (4 rounds)

Info:

Stuff the arms with fiberfill. Fold in half and make 9sc through both sides, weave in the yarn ends.

Info:

Return to round 22 of the arms and work with purple yarn through front loops: FLO ch1, 18sc, sl st in one stitch. Cut the yarn and fasten off.

β€” Ears (make 2)

Info:

With yellow yarn. Place row marker at beginning.

Round 1:

6sc in MR

Round 2:

(1sc, inc) *3 (9)

Round 3:

9sc

Round 4:

(2sc, inc) *3 (12)

Round 5:

(3sc, inc) *3 (15)

Round 6:

(4sc, inc) *3 (18)

Round 7-8:

18sc (2 rounds)

Round 9:

(1sc, dec) *6 (12)

Round 10-12:

12sc (3 rounds)

Info:

Leave long tail for sewing. Do not stuff.

β€” Nose

Info:

With beige yarn. Place row marker at beginning.

Round 1:

6sc in MR

Round 2:

6inc (12)

Round 3:

(3inc, 3sc) *2 (18)

Round 4:

(1sc, inc)*3, 3sc, (1sc, inc)*3, 3sc (24)

Round 5:

(3sc, inc) *6 (30)

Round 6-7:

30sc (2 rounds)

Info:

Stuff the nose with fiberfill. Leave long tail for sewing.

β€” Curls (make 6)

Info:

Crochet 3 pieces in beige and 3 pieces in brown. Chain 21. Start in the second chain from the hook 20inc. Leave long tail for sewing.

β€” Legs-Body-Head

β€” Legs (make 2)

Info:

With beige yarn. Place row marker at beginning.

Round 1:

6sc in MR

Round 2:

6inc (12)

Round 3:

(1sc, inc) *6 (18)

Round 4:

(2sc, inc) *6 (24)

Round 5:

(3sc, inc) *6 (30)

Round 6-9:

30sc (4 rounds)

Round 10:

(3sc, dec) *6 (24)

Round 11:

Change color to yellow. BLO 24sc

Round 12-17:

24sc (6 rounds)

Round 18:

Change color to purple. Stuff the legs with fiberfill. Fold in half and crochet 12sc through both sides.

Info:

Cut the yarn and fasten off on the first leg. Crochet the second leg in the same way then continue: turn, ch1, 12sc, do not cut the yarn.

β€” Body

Round 19:

ch10, join the first leg, 12sc in the first leg. Place marker, this will be the beginning of your new round.

Round 20:

Crochet in a spiral: FLO 12sc, 10sc on the chain, FLO 12sc, continue on other side FLO 12sc, 10sc on the chain, FLO 12sc (68)

Round 21:

BLO 68sc

Round 22-29:

68sc (8 rounds)

Round 30:

(32sc, dec) *2 (66)

Round 31:

66sc

Round 32:

(9sc, dec) *6 (60)

Round 33:

60sc

Round 34:

(8sc, dec) *6 (54)

Round 35-37:

54sc (3 rounds)

Round 38:

(7sc, dec) *6 (48)

Round 39-41:

48sc (3 rounds)

Round 42:

Attach the arms: 45sc on the body, attach arm using the last 3 sc on round 42 and the first 6 sc on round 43 (to give a total of 9 sc) through both left arm and body

Round 43:

15sc on the body, 9sc on right arm and body, 18sc on the body (48)

Round 44:

48sc

Round 45:

(6sc, dec) *6 (42)

Round 46-47:

42sc (2 rounds)

Round 48:

Change color to yellow. BLO 42sc

Info:

Stuff the body with fiberfill.

β€” Head

Round 49:

42sc

Round 50:

(6sc, inc) *6 (48)

Round 51:

(7sc, inc) *6 (54)

Round 52:

(8sc, inc) *6 (60)

Round 53-58:

60sc (6 rounds)

Round 59:

(8sc, dec) *6 (54)

Round 60-64:

54sc (5 rounds)

Round 65:

(7sc, dec) *6 (48)

Round 66:

48sc

Round 67:

(6sc, dec) *6 (42)

Round 68:

42sc

Info:

Stuff the head with fiberfill.

Round 69:

(5sc, dec) *6 (36)

Round 70:

(4sc, dec) *6 (30)

Round 71:

(3sc, dec) *6 (24)

Round 72:

(2sc, dec) *6 (18)

Round 73:

(1sc, dec) *6 (12)

Round 74:

6dec

Info:

Fasten off, cut the yarn, weave in the yarn ends.

Info:

Return to round 21 of the body and work with purple yarn through the front loops: ch1,(3dc in one stitch, sc)*34. Cut the yarn and fasten off.

Info:

Return to round 48 of the body-head and work with purple yarn through front loops:

Round 1:

ch1,(dc, dc-inc)*20, 2dc, sl st, turn (62)

Round 2:

ch1,( Fpdc, Bpdc) *31, sl st, turn (62)

Round 3:

ch1, ( Bpdc, Fpdc) *31, sl st (62)

Info:

Fasten off weave in ends.
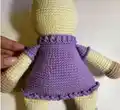
β€” Pocket

Info:

With purple yarn. Work in rows.

Row 1:

Chain 23. From the second chain on the hook: 22sc, turn (22)

Row 2:

Ch1, 4sc, ch6 (skip 6sc, start from the next stitch), 2sc, ch6 (skip 6sc, start from the next stitch), 4sc, turn (22)

Row 3-13:

Ch1, 22sc, turn (10 rounds)

Info:

Crocheted with yellow yarn around the perimeter of the pocket: (sc, 3dc in one stitch) *23. Fasten off, cut the yarn, weave in the yarn ends.

Info:

Sew the pocket on to the front of the body 2 Rows down from under arms and in line to the top of the legs, make sure you allow enough room for the baby lama to be inserted.

β€” Assembly

Info:

Sew the nose and ears to the head. Sew the curls to the head.

Info:

Add Indentations to hooves follow the photos. Embroider the nose, mouth, eyes and eyebrows with brown yarn.
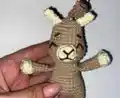
β€” BABY LAMA

β€” Arms (make 2)

Info:

With yellow yarn. Place row marker at beginning.

Round 1:

6sc in MR

Round 2:

6inc (12)

Round 3:

12sc

Round 4:

(2sc, dec) *3 (9)

Round 5:

Change color to beige. BLO 7sc, dec (8)

Round 6-11:

8sc (6 rounds)

Info:

Stuff the arms with fiberfill. Fold in half and make 4sc through both sides, weave in the yarn ends.

β€” Ears (make 2)

Info:

With yellow yarn. Place row marker at beginning.

Round 1:

6sc in MR

Round 2-3:

6sc (2 rounds)

Info:

Leave a long tail for sewing.

β€” Nose

Info:

With yellow yarn. Place row marker at beginning.

Round 1:

6sc in MR

Round 2:

6inc (12)

Round 3:

12sc

Info:

Leave a long tail for sewing.

β€” Tail

Info:

With yellow yarn. Place row marker at beginning.

Round 1:

6sc in MR

Round 2:

6inc (12)

Round 3:

12sc

Round 4:

6dec

Info:

Stuff the tail with fiberfill. Leave a long tail for sewing.

β€” Curl

Info:

With beige yarn. Chain 16. Start in the second chain from the hook: 15inc. Leave a long tail for sewing.

β€” Legs-Body-Head

β€” Legs (make 2)

Info:

With yellow yarn. Place row marker at beginning.

Round 1:

6sc in MR

Round 2:

6inc (12)

Round 3:

12sc

Round 4:

(2sc, dec) *3 (9)

Round 5:

Change color to beige. BLO 9sc

Round 6-8:

9sc (3 rounds)

β€” Body

Info:

Stuff the legs. Fasten off on the first leg. Crochet the second leg in the same way and crochet an extra sl st, do not cut the yarn.

Round 9:

ch5, join the first leg, 9sc, 5sc on the chain, 9sc on the second leg. Place a marker of a new round beginning (28)

Round 10:

28sc

Info:

Stuff the body with fiberfill.

Round 11:

24sc, inc, 2sc, inc (30)

Round 12-14:

30sc (3 rounds)

Round 15:

(3sc, dec) *6 (24)

Round 16-18:

24sc (3 rounds)

Round 19:

Add arms: 1sc, 4sc with the arm and body together; 8sc; 4sc with the second arm and body; 7sc (24)

Round 20:

(2sc, dec) *6 (18)

Round 21:

18sc

β€” Head

Round 22:

(2sc, inc) *6 (24)

Round 23:

(3sc, inc) *6 (30)

Round 24-26:

30sc (3 rounds)

Round 27:

(3sc, dec) *6 (24)

Round 28-32:

24sc (5 rounds)

Round 33:

(2sc, dec) *6 (18)

Round 34:

(1sc, dec) *6 (12)

Round 35:

6dec

Info:

Stuff the head with fiberfill. Fasten off, cut the yarn, weave in the yarn ends.

β€” Assembly

Info:

Sew the nose and ears to the head. Hoof indentations follow the photos.

Info:

Sew the tail to the body and sew the curly hair to the head. Embroider eyes, eyebrows, nose and mouth with brown yarn.

Assembly Instructions

  • Sew the beige nose to the center of the mother lama's face, stuffing it firmly before closing completely.
  • Attach the yellow ears to the sides of the head, positioning them slightly angled outward for a natural look.
  • Distribute and sew the 6 curls (3 beige, 3 brown) across the top and back of the mother lama's head to create textured hair.
  • Attach the purple pocket to the front of the body, positioning it 2 rows below the arms and aligned with the leg tops, ensuring the baby lama fits inside.
  • For the baby lama, sew the nose and small ears to the head, then attach the single curl to the top of the head.
  • Sew the tail to the back of the baby lama's body at the base.
  • Create hoof indentations by stitching horizontal lines across each foot using brown yarn, then embroider facial features (eyes, eyebrows, nose, mouth) on both lamas.

Important Notes

  • πŸ’‘Use stitch markers consistently to track the beginning of each round, especially during color changes and complex shaping
  • πŸ’‘When working BLO and FLO sections, these create the decorative ridges that will later be embellished with purple edging
  • πŸ’‘Leave extra-long tails (at least 12 inches) when finishing pieces to ensure you have enough yarn for secure sewing
  • πŸ’‘Stuff pieces gradually as you work rather than waiting until the end, as openings become smaller during decreases
  • πŸ’‘The mother lama's arms are attached mid-construction (rounds 42-43) rather than sewn on later, so follow placement carefully
  • πŸ’‘Test-fit the baby lama in the pocket before final assembly to ensure proper sizing and positioning
  • πŸ’‘When embroidering facial features, use photos as reference and pin placement first before stitching permanently

This heartwarming Mother and Baby Lama pattern creates a cherished keepsake that celebrates the special bond between parent and child! The ingenious pocket design allows the baby to nestle safely with mama, making it perfect for imaginative play or display. With detailed instructions for textured curls, decorative edging, and sweet embroidered faces, these lamas burst with personality and charm. Whether you're crafting for a baby shower, nursery dΓ©cor, or simply to bring smiles, this duo delivers pure joy! πŸ¦™πŸ’œ Happy crocheting! 🧢✨

You ask,

we answer.

FAQs

Can I use different yarn weights for this pattern?

Yes, but your finished lamas will be different sizes. The pattern specifies sport weight 4ply yarn for a 24cm mother and 12cm baby. Using heavier yarn with a larger hook will create bigger lamas, while thinner yarn creates miniatures. Just maintain consistent yarn weight across all colors for best results.

How do I attach the arms in rounds 42-43?

This technique joins arms while crocheting the body. When you reach round 42, crochet through both the body and the flattened arm edge simultaneously for 9 stitches total. This creates a secure attachment without visible seams. Pin the arm in position first to ensure correct placement before crocheting through both layers.

What does it mean to work through front loops only (FLO) and back loops only (BLO)?

Each stitch has two loops at the top forming a 'V'. BLO means inserting your hook only through the loop farthest from you, while FLO uses the loop closest to you. This creates a ridge of unused loops that adds texture and allows you to return later for decorative edging, as done with the purple embellishments.

How do I make the pocket the right size for the baby lama?

The pattern creates a pocket with two armhole openings (the chain-6 sections in row 2). Position it 2 rows below the arms and aligned with the leg tops. Before sewing permanently, insert the baby lama to test the fitβ€”it should slide in comfortably with the head peeking out. Adjust placement if needed.

Can I make just the baby lama without the mother?

Absolutely! The baby lama is a complete standalone pattern. It works beautifully as a quick gift, ornament, or keychain. You can also create multiple baby lamas in different color combinations to build a whole herd of adorable mini friends.