🧢 Beautiful ✨ Detailed πŸ’ Adorable

Moo Shake Cow Amigurumi Pattern

Moo Shake Cow Amigurumi Pattern
4.2β˜… Rating
5-7 Hours Time Needed
2.1K Made This
βœ‚οΈ

Intermediate Level

Ideal for those with basic knitting experience, featuring slightly more advanced stitches and techniques to expand your skills.

⏱️

Weekend Treat

Takes 5-7 hours, making it an enjoyable project to finish over a couple of days.

🐰

Whimsical Buddy

Playful characters full of personality, designed to spark imagination and become cherished playtime favorites.

About This Moo Shake Cow Amigurumi Pattern

Moo Shake Cow Amigurumi Pattern crochet pattern - detailed view of completed project

What sets this pattern apart is the innovative color-changing technique that creates the spotted pattern without complicated color work, making it accessible while still delivering impressive visual results that look complex and professional.

Why You'll Love This Moo Shake Cow Amigurumi Pattern

I'm completely smitten with this pattern because it's such a clever play on the classic milkshake theme! The way the cow's spotted body emerges from what looks like a cup is just genius, and I love how the striped straw adds that perfect finishing touch. Working through the color changes to create the spots is like solving a fun puzzle, and watching the pattern come together is incredibly satisfying. The little bobble stitches for the pink udder details make me smile every single time, and those tiny horns and floppy ears add so much personality! It's one of those patterns that makes people do a double-take and say 'wait, is that a cow IN a milkshake?' and I absolutely live for those reactions. Plus, it's the perfect size to display on a desk or shelf where it can bring joy every day!

Moo Shake Cow Amigurumi Pattern step 1 - construction progress Moo Shake Cow Amigurumi Pattern step 2 - assembly progress Moo Shake Cow Amigurumi Pattern step 3 - details and accessories Moo Shake Cow Amigurumi Pattern step 4 - final assembly and finishing

Switch Things Up

I love playing with variations on this adorable cow design to create different milkshake flavors and personalities! Try changing the pink yarn to brown for a chocolate shake, or use pastel purple for a berry shake version. You could even create a whole milkshake family with different colored straws and spot patterns!

For a more realistic cow look, try using black spots instead of brown, or mix up the spot sizes and placements to create unique patterns on each cow you make. I've also experimented with adding small embroidered details like eyelashes or rosy cheeks to give extra personality and charm.

The straw offers tons of customization potential tooβ€”try different color combinations for the stripes, make it extra long, or add a tiny bow or cherry on top using red yarn. You could even create seasonal versions with festive colors, like red and green stripes for Christmas or pastel rainbow stripes for spring!

Common Mistakes & How to Fix Them

βœ— Losing track of color changes in the spotted pattern section, which can throw off the entire cow design and create uneven spots βœ— Not securing safety eyes firmly before stuffing the eye pieces, leading to wobbly or loose eyes that don't look professional βœ— Forgetting to stuff the body adequately before shaping the top neck portion, resulting in a floppy appearance instead of a sturdy cup shape βœ— Pulling the straw color changes too tightly or too loosely, creating inconsistent stripe widths that don't match throughout the length

Moo Shake Cow Amigurumi Pattern

Bring this utterly adorable cow milkshake character to life with your crochet hook! This creative pattern features a spotted cow body designed to look like it's sitting inside a cup, complete with a striped straw emerging from the top. Perfect for food-themed amigurumi lovers, this pattern combines brown and white spots with pink accents and includes detailed instructions for creating realistic cow features like ears, horns, and a playful tail that brings personality to your finished piece.

Intermediate 5-7 Hours

Materials Needed for Moo Shake Cow Amigurumi Pattern

β€” Main Fabric

  • 01
    White YarnArt Jeans 03 (50g, 160m)
  • 02
    Brown YarnArt Jeans 70 (50g, 160m)
  • 03
    Pink Gazzal Baby Cotton 3435 (50g, 165m)

β€” Tools Required

  • 01
    Crochet hook size 2.5mm
  • 02
    1 pair of black safety eyes 5mm
  • 03
    Tapestry needles
  • 04
    Brown thread
  • 05
    Pins
  • 06
    Stitch markers
  • 07
    Scissors
  • 08
    Polyester fiberfill

Progress Tracker

0% Complete

β€” Cow's Body (yarn A) :

Info :

We will change color if the letter color changes: Black letter: yarn A, Brown letter: yarn B, Red letter: yarn C

< /div>

Round 1 :

sc 6 into a magic loop (6)

Round 2 :

inc 6 (12)

Round 3 :

[sc 1, inc] 6x (18)

Round 4 :

[sc 1, inc, sc 1] 6x (24)

Round 5 :

[sc 3, inc] 6x (30)

Round 6 :

[sc 2, inc, sc 2] 6x (36)

Round 7 :

[sc 5, inc] 6x (42)

Round 8 :

sc 3, inc, sc 6, inc, sc 1, sc 5, inc, [sc 6, inc] 3x, sc 3 (48)

Round 9 :

sc 7, inc, sc 2, sc 5, inc, [sc 7, inc] 4x (54)

Round 10 :

sc 10, sc 7, sc 37 (54)

Round 11 :

sc 8, sc 10, sc 36 (54)

Round 12 :

sc 8, sc 10, sc 10, sc 1, sc 25 (54)

Round 13 :

sc 8, sc 9, sc 10, sc 3, sc 24 (54)

Round 14 :

sc 9, sc 7, sc 10, sc 4, sc 24 (54)

Round 15 :

sc 10, sc 5, sc 12, sc 2, sc 15, sc 2, sc 8 (54)

Round 16 :

sc 43, sc 4, sc 7 (54)

Round 17 :

sc 17, sc 11 (yarn C), sc 14, sc 5, sc 7 (54)

Round 18 :

sc 15, sc 15, sc 13, sc 3, sc 8 (54)

Round 19 :

sc 14, sc 17, sc 13, sc 1, sc 9, break yarn B (54)

Round 20 :

sc 14, sc 2, Bobble 1, sc 11, Bobble 1, sc 2, sc 23 (54)

Round 21 :

sc 15, sc 15, sc 24 (54)

Round 22 :

sc 17, sc 11, sc 26, break yarn C (54)

Round 23 :

sc 54 (54)

Round 24 :

sc 31, sc 3, sc 20 (54)

Round 25 :

sc 29, sc 7, sc 18 (54)

Round 26 :

[sc 7, dec] 3x, sc 1, sc 6, dec, sc 1, sc 6, dec, sc 7, dec (48)

Round 27 :

sc 3, dec, [sc 6, dec] 2x, sc 4, sc 2, dec, sc 5, sc 1, dec, sc 6, dec, sc 3 (42)

Round 28 :

[sc 5, dec] 3x, sc 2, sc 3, dec, sc 2, sc 3, dec, sc 5, dec, break yarn B (36)

Round 29 :

[sc 2, dec, sc 2] 6x (30)

Round 30 :

[sc 3, dec] 6x, stuff firmly (24)

Round 31 :

[sc 1, dec, sc 1] 6x (18)

Round 32 :

[sc 1, dec] 6x (12)

Round 33 :

(blo) sc 12 (12)

Round 34-38 :

sc 12 (5 rnds) (12)

Round 39 :

dec 6 (6)

Info :

Break the yarn, stuff firmly, using a scissors to push the top inside

β€” Ears (yarn B, X2) :

Round 1 :

Magic loop, sc 1, hdc 1, dc 3, hdc 1, sc 1, cut yarn B, change to yarn A (7)

Round 2 :

inc 1, (hdc 2), (hdc 2), (hdc 4), (hdc 2), (hdc 2), inc 1 (16)

Info :

Break the yarn with a long rest to sew later

β€” Arms (yarn A, X2) :

Round 1 :

sc 6 into a magic loop (6)

Round 2 :

[sc 1, inc] 3x (9)

Round 3-4 :

sc 9 (2 rnds), stuff slightly (9)

Info :

Break the yarn with a long rest to sew later

β€” Legs (yarn A, X2) :

Round 1 :

sc 6 into a magic loop (6)

Round 2 :

inc 6 (12)

Round 3-5 :

sc 12 (3 rnds), stuff slightly (12)

Info :

Break the yarn with a long rest to sew later

β€” Eyes (yarn A, X2) :

Round 1 :

sc 4 into a magic loop (4)

Round 2 :

sc 1, inc 2, sc 1 (6)

Round 3 :

sc 2, inc 2, sc 2 (8)

Round 4 :

sc 3, inc 2, sc 3 (10)

Round 5 :

sc 4, inc 2, sc 4 (12)

Round 6 :

sc 5, inc 2, sc 5 (14)

Round 7-9 :

sc 14 (3 rnds), stuff slightly (14)

Round 10 :

dec 7 (7)

Infos :

Break the yarn with a long rest to sew later, weave in the last 7 sts. Use a pin to locate 2 pieces together, sew 2 pieces together. Insert 5mm safety eyes (use glue to stick the eyes).

β€” Horns (yarn A, X2) :

Round 1-5 :

Repeat rnd 1-5 of the Eyes (12)

Info :

Break the yarn with a long rest to sew later, stuff slightly

β€” Tail (yarn B) :

Round 1 :

[ch 5, slst on the 1st ch] 3x, slst on the 1st ring (created by ch 5), ch 3 (18)

β€” Straw (yarn C) :

Round 1 :

sc 6 into a magic loop (6)

Round 2-3 :

sc 6 (2 rnds), change to yarn A (6)

Round 4 :

sc 6, change to yarn B (6)

Round 5-7 :

sc 6 (3 rnds), change to yarn A (6)

Round 8 :

sc 6, change to yarn B (6)

Round 9 :

sc 6 (6)

Round 10 :

sc 3 blo, sc 3 (6)

Round 11 :

sc 6 (6)

Round 12 :

sc 3 in the flo of the 3sts on rnd 10, sc 3 on the last 3sts of rnd 11 (6)

Round 13 :

sc 6, change to yarn A (6)

Round 14 :

sc 6, change to yarn B (6)

Round 15-17 :

sc 6 (3 rnds), change to yarn A (6)

Round 18 :

sc 6, change to yarn B (6)

Round 19-21 :

sc 6 (3 rnds), change to yarn A (6)

Round 22 :

sc 6, change to yarn B (6)

Round 23-25 :

sc 6 (3 rnds) (6)

Info :

Break the yarn, weave in the last 6sts, hide the remaining yarn

Assembly Instructions

  • Sew the completed white eye pieces with safety eyes onto the cow's face, positioning them symmetrically using pins first
  • Attach the brown and white ears to the top sides of the head, ensuring the brown inner portion faces forward
  • Sew the small white horns just behind and slightly above the ears for proper cow positioning
  • Attach the stubby arms to the sides of the body around the middle section where spots are visible
  • Sew the legs to the bottom of the body, spacing them evenly for stable sitting position
  • Attach the tasseled brown tail to the back center of the body for a playful finishing touch
  • Insert the striped straw into the hole at the top of the cow's head for the complete milkshake effect

Important Notes

  • πŸ’‘Keep careful track of color changes using the pattern guide to ensure spots appear in the correct positions
  • πŸ’‘Use stitch markers at the beginning of each round, especially during the spotted body section with frequent color changes
  • πŸ’‘Stuff the body very firmly to maintain the cup-like shape and prevent it from becoming floppy or misshapen
  • πŸ’‘When working the straw, maintain consistent tension to keep stripes uniform and the tube shape even throughout
  • πŸ’‘Pin all parts in their positions before sewing to visualize the final look and make adjustments if needed
  • πŸ’‘The bobble stitches for the udder should be worked loosely to create nice puffy texture that stands out

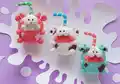
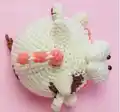
This utterly charming Moo Shake pattern brings together two beloved things: adorable cows and delicious milkshakes! The clever design creates a character that's both whimsical and functional, perfect for display or play. The spotted pattern work provides a satisfying challenge while the cute details like the striped straw and tasseled tail add personality that will make everyone smile. Whether you're a food amigurumi collector or just love unique crochet projects, this pattern delivers maximum charm in every stitch! Happy crocheting! 🧢πŸ₯€βœ¨

You ask,

we answer.

FAQs

Is the color-changing pattern difficult for a beginner?

The color changes might be challenging for absolute beginners, but the pattern provides detailed guidance for each round. Using stitch markers and following the instructions carefully makes it manageable for those with basic crochet experience.

Can I make the straw bendable or posable?

Yes! You can insert a thin wire or pipe cleaner into the straw before closing it to make it bendable. Just be careful with sharp wire ends and ensure they're fully covered if making this for children.

What if I can't find the exact yarn colors mentioned?

Feel free to substitute with similar weight yarns in comparable colors. The key is maintaining good contrast between the white body and brown spots, and having a coordinating pink for the udder accents.

How do I keep track of all the color changes?

Print out the pattern and highlight or check off each round as you complete it. Using different colored stitch markers for each color section can also help you stay organized throughout the project.

Can I skip the bobble stitches if they're too difficult?

While bobble stitches add nice texture to the udder area, you could substitute with regular increases or small pompoms if you prefer. The character will still be recognizable and adorable!