🧢 Beautiful ✨ Detailed πŸ’ Adorable

Macey Ann Square Crochet Pattern

Macey Ann Square Crochet Pattern
4.7β˜… Rating
3-4 Hours Time Needed
3.5K Made This
βœ‚οΈ

Intermediate Level

Ideal for those with basic knitting experience, featuring slightly more advanced stitches and techniques to expand your skills.

⏱️

Weekend Treat

Takes 5-7 hours, making it an enjoyable project to finish over a couple of days.

🏑

Cozy Accent

A warm touch for your space that transforms ordinary corners into inviting nooks filled with handmade charm.

About This Macey Ann Square Crochet Pattern

The Macey Ann Square is a beautifully crafted crochet pattern that combines traditional granny square techniques with advanced decorative elements. This pattern features eight unique petal formations created in Round 3, which are then built upon with long stitches and clusters to create dimensional texture. The design incorporates standing stitches and invisible joins for a seamless, professional finish that eliminates visible seams between rounds.

Macey Ann Square Crochet Pattern crochet pattern - detailed view of completed project

Available in two size variations, the mini square creates an 11x11 inch piece perfect for smaller projects, while the large square expands with additional rounds for blankets or afghans. Multiple colorway options are provided to inspire your creativity.

Why You'll Love This Macey Ann Square Crochet Pattern

I absolutely love this pattern because it challenges you to expand your crochet skills while creating something truly beautiful and meaningful. The combination of textured stitches like popcorn clusters, long double crochets, and back stitches creates incredible depth and visual interest that makes each square a work of art. I appreciate how the pattern includes detailed video tutorials and stitch diagrams, making advanced techniques accessible even if you're stepping outside your comfort zone. The invisible join technique alone is worth learning, as it elevates the finished piece to a professional level. Most of all, I love that this pattern was designed as a legacy piece for a grandchild, bringing heartfelt intention to every stitch you make.

Macey Ann Square Crochet Pattern step 1 - construction progress Macey Ann Square Crochet Pattern step 2 - assembly progress Macey Ann Square Crochet Pattern step 3 - details and accessories Macey Ann Square Crochet Pattern step 4 - final assembly and finishing

Switch Things Up

I love experimenting with this pattern by playing with unexpected color combinations that reflect different moods and seasons. Instead of the traditional colorways provided, I've tried monochromatic versions using different shades of blue or green, which creates a sophisticated, modern look perfect for contemporary home decor.

For a bolder statement, I sometimes reverse the light and dark colors, placing the vibrant shades in the outer rounds and keeping the center more neutral. This draws the eye outward and creates a completely different visual effect from the original design.

I've also found that using variegated or gradient yarns in place of solid colors adds beautiful depth without any extra effort. The color changes happen naturally as you work, creating unique squares every time even when following the same pattern.

Another variation I enjoy is adding metallic or sparkly yarn to certain rounds, especially Round 3's petals or Round 6's cluster stitches. This adds a touch of elegance perfect for special occasion afghans or decorative pillows.

For a scrappy, bohemian vibe, I sometimes work each round in a completely different color from my stash, creating wildly eclectic squares that come together beautifully in a mixed blanket. Each square becomes a unique piece of art while still maintaining the structured design of the original pattern.

Common Mistakes & How to Fix Them

βœ— Skipping the invisible join instructions and using regular slip stitch joins instead, which creates visible bumps between rounds and compromises the seamless appearance βœ— Not working long stitches to the proper height of previous rounds, causing the stitches to pull too tight and distort the square's shape βœ— Forgetting to skip stitches as indicated after working into chain spaces, resulting in incorrect stitch counts and misshapen corners throughout the pattern βœ— Neglecting to use stitch markers to track round beginnings and pattern repeats, leading to confusion with complex stitch sequences and color changes

Macey Ann Square Crochet Pattern

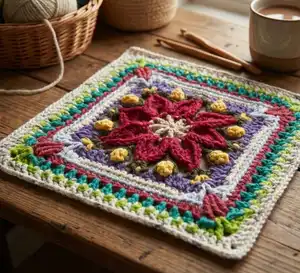
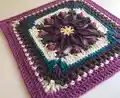
Create a stunning Macey Ann Square with this detailed crochet pattern designed as a legacy piece. This beautiful 11x11 inch granny square features intricate stitch work including popcorn stitches, long stitches, and decorative petals that create a captivating floral-inspired design. Perfect for blankets, pillows, or decorative pieces, this pattern offers both mini and large square variations with multiple colorway options. The pattern includes comprehensive stitch tutorials, symbol guides, and step-by-step instructions to help you craft a truly special handmade piece.

Intermediate 3-4 Hours

Materials Needed for Macey Ann Square Crochet Pattern

β€” Main Fabric

  • 01
    I Love This Cotton worsted weight yarn, 100% cotton
  • 02
    Buttercup yellow yarn (Color A for both sizes)
  • 03
    Rosy II pink or Royalty purple yarn (Color B - varies by size)
  • 04
    Sage green or Mulberry purple yarn (Color C - varies by size)
  • 05
    Deep Teal blue yarn (Color D for large square only)
  • 06
    Ivory or Olive green yarn (Color E - varies by size)
  • 07
    Antique Cream or Ivory yarn (Color F - varies by size)

β€” Tools Required

  • 01
    4.5mm crochet hook
  • 02
    Stitch markers
  • 03
    Darning needle for weaving ends
  • 04
    Scissors
  • 05
    Blocking materials (optional but recommended)

Progress Tracker

0% Complete

β€” RND 1: Color A (Buttercup)

Starting Instructions:

Starting in a double magic ring, ch 5 (counts as a 1st dc of rnd and ch 2), dc in double magic ring; [ch 2, dc] 6 times, ch 2; cut yarn, invisible join to 4th ch of rnd. Counts: 8 dc, 8 ch-2 sp (24 total)

β€” RND 2: Color B (Rosy II for Mini / Royalty for Large)

Instructions:

Work in ch-2 sps only and start in any ch-2 sp, (sc, ch 4, sc) in each ch-2 sp around; cut yarn, invisible join. Counts: 16 sc, 8 ch-4 sp (48 total)

β€” RND 3: Color B (Rosy II for Mini / Royalty for Large)

Instructions:

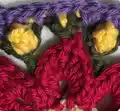
Starting in any ch-4 sp or slst into ch-4 sp and ch 1 (does not count as sc), *(sc, 3 hdc, dc, tr, picot; tr, dc, 3 hdc, sc) in ch-4 sp, sk NEXT sc-this sc may be hidden by the previous sts; slst in NEXT sc; repeat from * around; cut yarn, invisible join. Counts: 16 sc, 48 hdc, 16 dc, 16 tr, 8 picot, 8 slst (112 total)

β€” RND 4: Color E (Ivory for Mini / Olive for Large)

Instructions:

Starting in slst between petals, *working in BL, trtr in slst between 2 sc of rnd 2, ch 4; (sc, ch 1, sc) in top of picot, ch 4; repeat from * around; cut yarn, invisible join. Counts: 16 sc, 8 trtr, 16 ch-4 sp, 8 ch-1 sp (96 total)

β€” RND 5: Color C (Sage for Mini / Mulberry for Large)

Instructions:

Starting in any ch-1 sp, *(sc, ch 2-new corner, sc) in ch-1 sp; ch 4, sk NEXT (sc, ch-4 sp); PC in trtr; ch 4, sk NEXT (ch-4 sp, sc); sc in NEXT ch-1 sp; ch 4, sk NEXT (sc, ch-4 sp); PC in NEXT trtr; ch 4, sk NEXT (ch-4 sp, sc); repeat from * around; cut yarn, invisible join. Counts: 12 sc, 8 PC, 16 ch-4 sp, 4 ch-2 corner sp (84 total/21 per side)

β€” RND 6: Color F (Antique Cream for Mini / Ivory for Large)

Instructions:

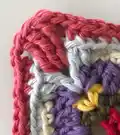
Starting in any ch-2 corner sp, *(dc, ch 1, dc; ch 2, dc, ch 1, dc) in ch-2 corner sp, sk sc; 2dc-cluster in NEXT ch-4 sp of rnd 5, long dc around both ch-4 of rnd 4 AND 5 as one; 2dc-cluster in ch-4 sp of rnd 5 just worked; FPhdc around NEXT PC; hdc in NEXT ch-4 sp; long hdc around ch-4 of rnd 4 AND 5 as one; sc in ch-4 sp of rnd 5 just worked; FPsc around NEXT sc; sc into NEXT ch-4 sp; long hdc around ch-4 of rnd 4 AND 5 as one; hdc in ch-4 sp of rnd 5 just worked; FPhdc around NEXT PC; 2dc-cluster in NEXT ch-4 sp of rnd 5; long dc around NEXT ch-4 of rnd 4 AND rnd 5 as one; 2dc-cluster in ch-4 sp of rnd 5 just worked, sk sc; repeat from * around; cut yarn, invisible join. Counts: 16 dc, 16 2dc-cluster, 8 FPhdc, 8 long-dc, 8 long-hdc, 8 hdc, 8 sc, 4 FPsc, 8 ch-1 sp, 4 ch-2 corner sp (84 total/21 per side)

β€” RND 7: Color F (Antique Cream for Mini / Ivory for Large)

Instructions:

Starting in any ch-2 corner sp, *(sc, ch 2, sc) in ch-2 corner sp; sc in each across to NEXT ch-2 corner sp; repeat from * around; cut yarn, invisible join. Counts: 92 sc, 4 ch-2 corner sp (92 total/23 per side)

β€” RND 8: Color A (Buttercup) - MINI SQUARE ONLY

Instructions:

Starting in any ch-2 corner sp, *(sc, ch 2, sc) in ch-2 corner sp; sc in NEXT st, [sc back-stitch in rnd 6 st directly below, sc in rnd 7] 11 times; repeat from * around; cut yarn, invisible join. Counts: 56 sc, 44 sc back-stitch, 4 ch-2 corner sp (100 total/25 per side)

β€” RND 8a: Color D (Deep Teal) - LARGE SQUARE ONLY

Instructions:

Starting in any ch-2 corner, *(2 dc, ch 2, 2 dc) in ch-2 corner sp; long tr in ch-2 corner sp of rnd 5; FPdc around NEXT dc of rnd 6; sk NEXT 2 sc of rnd 7; long dc over NEXT sc and into ch-1 sp of rnd 6; sc in NEXT sc; working in BL, sc in NEXT 15 sc of rnd 7; sc in NEXT sc; long dc over NEXT sc and into ch-1 sp of rnd 6; sk NEXT 2 sc of rnd 7; FPdc around NEXT dc of rnd 6; long tr in NEXT ch-2 corner sp of rnd 5; repeat from * around; cut yarn, invisible join. Counts: 8 sc, 60 BLsc, 16 dc, 8 FPdc, 8 long dc, 8 long tr, 4 ch-2 corner sp (108 total/27 per side)

β€” RND 9: Color B (Royalty) - LARGE SQUARE ONLY

Instructions:

Working over ch-2 corner of rnd 8a, and in ch-2 corner sp of rnd 6, *(3 dtr) in ch-2 corner sp of rnd 6; ch 1, sk dc; BLhdc in NEXT 4 sts; BLsc in NEXT 17 sts; BLhdc in NEXT 4 sts; sk dc, ch 1; repeat from * around; cut yarn, invisible join. Counts: 12 dtr, 32 BLhdc, 68 BLsc, 8 ch-1 sp (120 total/30 per side)

β€” RND 10: Color E (Olive) - LARGE SQUARE ONLY

Instructions:

Starting in ch-1 sp after any group of 3 dtr, *sc in ch-1 sp after 3 dtr, [ch 3, sk st, sc in NEXT st] 12 times; ch 3, sk st, sc in NEXT ch-1 sp, ch 4; repeat from * around; cut yarn, invisible join. Counts: 56 sc, 52 ch-3 sp, 4 ch-4 corner sp (212 total/53 per side)

β€” RND 11: Color F (Ivory) - LARGE SQUARE ONLY

Instructions:

Working over (behind) ch-4 corner, start in 2nd dtr of 3 dtr group of rnd 9, *(tr, ch 2, tr) in 2nd dtr; working behind ch-4 sp just skipped, 2 dc in NEXT dtr, sk sc; [sc in NEXT ch-3 sp, sk st, ch 1] 12 times; sc in NEXT ch-3 sp, sk sc; working behind ch-4 sp, 2 dc in NEXT dtr; repeat from * around; cut yarn, invisible join. Counts: 8 tr, 16 dc, 52 sc, 48 ch-1 sp, 4 ch-2 corner sp (124 total/31 per side)

β€” RND 12: Color C (Mulberry) - LARGE SQUARE ONLY

Instructions:

Starting in any ch-2 corner sp, *(2 dc, ch 2, 2 dc) in any ch-2 corner sp, dc in NEXT 3 st; [dc back-stitch in NEXT ch-3 sp of rnd 10 directly below, dc in NEXT ch-1 sp] 12 times; dc back-stitch in NEXT ch-3 sp of rnd 10 directly below, dc in NEXT 3 st; repeat from * around; cut yarn, invisible join. Counts: 88 dc, 52 dc back-stitch, 4 ch-2 corner sp (140 total/35 per side)

β€” RND 13: Color C (Mulberry) - LARGE SQUARE ONLY

Instructions:

Starting in any ch-2 corner sp, *(2 dc, ch 2, 2 dc) in ch-2 corner sp; working in BL, dc in each st across to NEXT ch-2 corner sp; repeat from * around; cut yarn, invisible join and weave in ALL yarn ends. Counts: 16 dc, 140 BLdc, 4 ch-2 corner sp (156 total/39 per side)

β€” Finishing

Info:

Blocking is recommended to achieve final shape and size, open up stitches, and create a professional appearance. Use wet blocking or steam blocking methods, being careful with acrylic yarn when steam blocking.

Assembly Instructions

  • Weave in all yarn ends securely using the darning needle, working them through several stitches on the wrong side of the work.
  • Block the completed square to achieve the correct 11x11 inch measurements and to even out all stitches for a professional finish.
  • If creating multiple squares for a blanket or afghan, join squares using your preferred method such as whip stitch, slip stitch, or join-as-you-go technique.
  • For blocking, pin the square to blocking mats ensuring corners are square and edges are straight, then either wet thoroughly or steam gently.
  • Allow blocked square to dry completely before removing pins or using in your final project.

Important Notes

  • πŸ’‘Read through the entire pattern before beginning to familiarize yourself with special stitches and techniques used throughout
  • πŸ’‘The pattern uses standing stitches and invisible joins for a seamless finish, with video tutorials available on A Yarn of Serendipity website
  • πŸ’‘Long stitches are worked by inserting the hook into previous rounds, so maintain even tension to prevent distortion
  • πŸ’‘Stitch counts are provided at the end of each round to help you verify your work is correct before proceeding
  • πŸ’‘The mini square ends at Round 8 while the large square continues through Round 13 for expanded sizing options
  • πŸ’‘Back-stitch technique requires folding work toward you and inserting hook vertically into stitches from previous rounds
  • πŸ’‘Color changes occur frequently, so have all yarn colors ready and cut yarn after each round as instructed for invisible joins

The Macey Ann Square pattern is a heartfelt legacy design that combines intermediate crochet techniques with stunning visual results. Created with love as part of a series for grandchildren, this pattern celebrates creativity and beauty through intricate petal formations, textured stitches, and harmonious color combinations. Whether you choose the mini version for quick projects or the large square for blankets and afghans, you'll create a timeless piece filled with meaning. The detailed instructions and helpful video tutorials make advanced techniques accessible while challenging you to grow your skills. Happy crocheting! 🧢✨

You ask,

we answer.

FAQs

What is the difference between the mini and large square versions?

The mini square completes at Round 8 with a finished size of 11x11 inches and uses 8 rounds total. The large square continues through Round 13, creating a bigger square with additional decorative rounds and more intricate stitch work. Both versions share the first seven rounds but have different color schemes.

What are standing stitches and invisible joins, and why are they important?

Standing stitches allow you to start a new round with a new color without using chain stitches, creating a cleaner beginning. Invisible joins eliminate the visible seam typically created by slip stitch joins, giving your square a seamless, professional appearance. Video tutorials for both techniques are provided in the pattern.

How do I work the long stitches mentioned in the pattern?

Long stitches are worked by inserting your hook into stitches from previous rounds (usually 2 rounds below) and pulling up a loop to the height of the current round before completing the stitch normally. This creates dimensional texture and connects different rounds together visually.

Can I use different yarn weights or colors than specified?

Yes, you can substitute yarns and colors, but using a different weight will change the finished size. If using worsted weight cotton like the original, your gauge should match for the 11x11 inch size. Adjust your hook size if needed to achieve proper gauge, and feel free to create your own color combinations.

What is the back-stitch technique used in Rounds 8 and 12?

The back-stitch creates texture by working into stitches from previous rounds. You fold the work toward you, insert your hook vertically into the tip of the stitch from a round below, come out at the base, and complete the stitch normally. This adds dimensional detail to the square.