🧢 Beautiful ✨ Detailed πŸ’ Adorable

Mabel Pines Oversized Turtleneck Sweater Pattern

Mabel Pines Oversized Turtleneck Sweater Pattern
4.8β˜… Rating
25-35 Hours Time Needed
1.5K Made This
βœ‚οΈ

Intermediate Level

Ideal for those with basic knitting experience, featuring slightly more advanced stitches and techniques to expand your skills.

⏱️

Slow & Steady

A 10-12 hour projectβ€”great for savoring the process over several sessions.

πŸ§₯

Layered Comfort

Perfect for cozy, stylish layering through changing seasons with versatile, mix-and-match potential.

About This Mabel Pines Oversized Turtleneck Sweater Pattern

Mabel Pines Oversized Turtleneck Sweater Pattern crochet pattern - detailed view of completed project

With detailed colorwork instructions and placement guides for every size, you'll be able to center your chosen graphics perfectly whether you're making an XS or 3X. The pattern includes comprehensive sizing charts and made-to-measure instructions, ensuring a flattering fit for everyone.

Why You'll Love This Mabel Pines Oversized Turtleneck Sweater Pattern

I absolutely love how this pattern combines nostalgia with practical wearability! The fact that you can recreate any of Mabel's sweaters from the show makes every stitch feel magical. I appreciate the clear sizing instructions that make adjustments easy, and the roomy fit means it's comfortable for all-day wear. The colorwork might seem intimidating at first, but the detailed placement instructions take the guesswork out completely. What really sold me is the versatility - you can make it cropped, choose your favorite graphic, or even create an all-over pattern. It's like having 20 patterns in one, and each finished piece becomes a wearable conversation starter that fellow Gravity Falls fans will instantly recognize!

Mabel Pines Oversized Turtleneck Sweater Pattern step 1 - construction progress Mabel Pines Oversized Turtleneck Sweater Pattern step 2 - assembly progress Mabel Pines Oversized Turtleneck Sweater Pattern step 3 - details and accessories Mabel Pines Oversized Turtleneck Sweater Pattern step 4 - final assembly and finishing

Switch Things Up

I love how versatile this pattern becomes with a few creative tweaks! Instead of the traditional turtleneck, try making a cozy cowl neck by working the collar twice as wide and letting it drape naturally.

For a summer version, I'd work this in a cotton blend and crop it significantly - about 20 rows shorter - then pair it with the sleeves worked to just above the elbow for a cute three-quarter length.

You could also transform this into a cardigan by working the front panel as two separate pieces with button bands, keeping all the fun graphics intact.

I'm obsessed with the idea of creating a matching set - use the same graphic on a beanie or tote bag for a coordinated look that's totally Mabel-approved.

Don't feel limited to the show's graphics either! You could create your own pixelated designs, use the grids as a template for initials or favorite symbols, or even work gradient colorwork for an ombre effect.

For those who love texture, try working some sections in a different stitch like the puff stitch or bobble stitch to add dimension to certain graphics.

I've also experimented with adding fringe or pom-poms to the bottom hem for extra personality, or sewing on sequins and patches after completion for that extra sparkle factor.

The sleeve graphics don't have to match either - try asymmetrical designs where each sleeve tells a different part of a story, or work one sleeve solid and one with an all-over pattern for an editorial fashion-forward look.

Common Mistakes & How to Fix Them

βœ— Forgetting to check gauge before starting can result in a sweater that's too tight or too loose - always crochet a test swatch first βœ— Not using stitch markers during colorwork changes leads to misaligned graphics - mark your starting points and center stitches clearly βœ— Crocheting the sleeves too tightly when working in the round creates stiff, uncomfortable arms - maintain relaxed tension throughout βœ— Skipping the ribbing stretch test results in neck openings that won't fit over your head - try it on before seaming βœ— Forgetting to crochet over color changes leaves messy ends that show through - always carry yarn along one side consistently

Mabel Pines Oversized Turtleneck Sweater Pattern

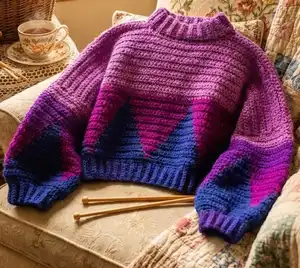
Transform your crochet skills into a wearable masterpiece with this Gravity Falls-inspired oversized turtleneck sweater! Featuring 20 adorable Mabel Pines designs including shooting stars, llamas, and whimsical graphics, this pattern offers incredible versatility with sizes XS-3X. Work up cozy panels from the bottom up using simple half double crochet stitches, then customize with your favorite colorwork designs. Whether you choose the iconic salmon nigiri, playful wiener dog wrap-around, or dreamy sunset graphic, you'll create a statement piece that's both comfortable and uniquely you. Perfect for fans who want to bring cartoon magic into real life!

Intermediate 25-35 Hours

Materials Needed for Mabel Pines Oversized Turtleneck Sweater Pattern

β€” Main Fabric

  • 01
    Worsted weight (5mm) 4-ply acrylic yarn in various colors for base and graphics
  • 02
    Lion Brand Pound of Love yarn recommended
  • 03
    XS: 550g / 1,236yd total
  • 04
    S: 620g / 1,393yd total
  • 05
    M: 690g / 1,550yd total
  • 06
    L: 750g / 1,685yd total
  • 07
    XL: 810g / 1,820yd total
  • 08
    XXL: 880g / 1,977yd total
  • 09
    XXXL: 950g / 2,134yd total

β€” Tools Required

  • 01
    Size H-5mm crochet hook
  • 02
    Yarn needle for weaving ends
  • 03
    Scissors for cutting yarn
  • 04
    Stitch markers for tracking rounds and colorwork placement
  • 05
    Measuring tape for checking gauge and dimensions
  • 06
    Pins for blocking and assembly

Progress Tracker

0% Complete

β€” BODY PANELS (MAKE 2) :

Ribbing - Chain :

Ch 8, turn, starting in the second chain from hook, chs do not count as sts

Ribbing Row 1 :

hdc 7, ch 1, turn (7)

Ribbing Row 2-40 [44, 47, 50, 53, 56, 60] :

in BLO, repeat row 1 (7) - on the last row, ch 1, but do not turn

Info :

The ribbing should now measure approximately 20 (22, 23, 25, 26, 28, 30) inches when stretched slightly and laid flat. Note that the rest of the panel will end up a few inches wider on each side. If adjusted torso width is required, work more or less rows of ribbing, with every 2 rows equaling 1 inch

Panel Row 1 :

Now working into the side of the ribbing, chs do not count as sts. Work 2 hdc (inc) into the side of each row across 80 (88, 94, 100, 106, 112, 120), ch 1, turn

Panel Row 2-45 [47, 50, 52, 55, 57, 60] :

hdc into each st across in both loops, ch 1, turn. 80 (88, 94, 100, 106, 112, 120) sts across. On the last row do not ch 1, fasten off, leaving a tail the width of the panel for seaming (on each panel)

Info :

If adjusted torso length is required, work more or less rows with every 5 rows equaling 2 inches, work about 10 less rows for a cute cropped look

β€” SLEEVES :

Sleeve Cuff - Chain :

Ch 8, turn, starting in the second chain from hook, chs do not count as sts

Cuff Row 1 :

hdc 7, ch 1, turn (7)

Cuff Row 2-18 [19, 20, 21, 22, 23, 24] :

in BLO, repeat row 1 (7). Fold & slip st together, turn it inside out so the sl sts face the inside, ch 1

Info :

If adjusted sleeve circumference is required, work more or less rows of ribbing with every row resulting in a 1 inch wider sleeve. Now working into the side of the ribbing, this can be done in continuous rounds or if you are incorporating colorwork/stripes, it is best to work alternating rows in the round: work 1 round clockwise, sl st to connect, ch 1, turn, work next round counter clockwise, sl st, ch 1, turn, work next round clockwise and so on

Round 1 :

work 2 hdc (inc) into the side of each row 36 (38, 40, 42, 44, 46, 48)

Round 2 :

working into both loops *2hdc (inc), hdc, hdc* repeat around 48 (51, 54, 56, 59, 62, 64)

Round 3-37 :

HDC around 48 (51, 54, 56, 59, 62, 64). Fasten off, leaving a tail twice the circumference

Info :

If adjusted sleeve length is required, work more or less rows with every 5 rows equaling 2 inches. At this point you should be able to try on the sleeve and hold up the panel to the chest to ensure they meet in the middle. Alternatively you could line up the sleeve with the panel, measure from center of panel to sleeve cuff and measure spine to wrist with the arm out to the side and compare

β€” ASSEMBLY :

Prep :

Make sure all pieces are turned inside out before assembling. Seaming with a whip stitch

Shoulder Seams :

Line up the panels on top of each other, seam the outermost stitches if you have not adjusted width: seam 27 (30, 32, 34, 36, 38, 41) stitches on each side, you should be left with 52 (56, 60, 64, 68, 72, 76) open sts around the neck

Info :

Ensure that this is a comfortable fit over the head, if not, add or remove a couple seams until you get to the next measurement

Attach Sleeves :

Lay the sleeves flat against the sides of the body, make sure the long tail is at the bottom of the sleeve. Attach the sleeve through the front and back panel, 20 [21, 23, 24, 25, 26, 28] rows down from the top seam (if you have not adjusted sleeve circumference) or, wherever it sits comfortably

Side Seams :

Continue seaming around the front and back of the sleeve, it does not need to be pulled tight, and when you get back to the starting point, complete the seam down the side of the sweater connecting the panels. Fasten off, repeat for the other sleeve, turn work right side out

β€” COLLAR - MOCKNECK :

Info :

Worked in rows, attached as you go. Pull up a loop at the back of the sweater at the neck opening, ch 5, turn, starting in the second chain from hook

Row 1 :

hdc into next 4 chs of collar, sl st into next 3 sts of sweater neck opening, turn, now working into BLO

Row 2 :

without ch 1, hdc into next 4 sts of collar, ch 1, turn

Row 3 :

hdc into next 4 sts of collar, sl st into next 3 sts on sweater neck opening, turn

Rows 4 and onward :

repeat rows 2 & 3 around

Final row :

fasten off leaving a 10 inch tail, seam the back of the collar closed

β€” COLLAR - TURTLENECK :

Info :

Worked in rows like the mock neck, attached as you go. Pull up a loop at the back of the sweater at the neck opening, ch 17, turn, starting in the second chain from hook

Row 1 :

hdc into next 16 chs of collar, sl st into next 3 sts of sweater neck opening, turn, now working into BLO

Row 2 :

without ch 1, hdc into next 16 sts of collar, ch 1, turn

Row 3 :

hdc into next 16 sts of collar, sl st into next 3 sts on sweater neck opening, turn

Rows 4 and onward :

repeat rows 2 & 3 around

Final row :

fasten off leaving a 15 inch tail, seam the back of the collar closed, fold it over

Finishing :

Weave in any remaining ends and you're done

Assembly Instructions

  • Turn all pieces inside out before beginning assembly to hide seams on the finished garment
  • Line up both body panels and seam 27 (30, 32, 34, 36, 38, 41) stitches on each shoulder using whip stitch, leaving 52 (56, 60, 64, 68, 72, 76) stitches open for the neck
  • Test the neck opening by trying to fit it over your head - adjust seams if needed before proceeding
  • Position sleeves flat against the body sides with the long tail at bottom, then attach them through both front and back panels 20 [21, 23, 24, 25, 26, 28] rows down from shoulder seam
  • Seam around the entire sleeve opening without pulling too tight to maintain the sweater's roomy fit
  • Continue seaming down the sides of the sweater to connect the front and back panels completely
  • Attach collar by working it directly onto the neck opening, then seam the back closed and fold over if using turtleneck style

Important Notes

  • πŸ’‘Always check gauge before starting - 5 rows of 6 HDC should equal 2" x 2" for proper sizing
  • πŸ’‘When working colorwork graphics, crochet over yarn ends on one consistent side to keep the wrong side neat
  • πŸ’‘Use the turning row method for sleeves when incorporating graphics to keep designs facing the right direction
  • πŸ’‘Graphics are centered based on the stitch counts provided - if you adjust panel size, recalculate graphic placement accordingly
  • πŸ’‘The sweater is designed to be roomy - resist the urge to size down or the oversized aesthetic will be lost
  • πŸ’‘For two-color background designs like sunset or golf course, change colors at the specified rows on both panels and sleeves for cohesive look

This Autumn Olive Crochet original pattern is a love letter to Gravity Falls fans everywhere! With 20 unique Mabel-inspired graphics to choose from, you'll have endless possibilities for creating your perfect oversized turtleneck. The pattern's genius lies in its flexibility - sizes XS-3X with easy adjustments, graphics that can be mixed and matched, and construction that's straightforward yet impressive. Whether you're team shooting star, wiener dog wrap-around, or purple pine forest, you'll end up with a cozy, conversation-starting sweater that brings cartoon magic into real life. Mystery shack approved! 🧢✨

You ask,

we answer.

FAQs

Can I mix different graphics from the 20 designs on one sweater?

Absolutely! The pattern encourages creativity. You can place mini graphics like bananas, bubbles, or trees alongside your main center graphic, or create an all-over pattern. Just use the stitch counts provided to map out your design on graph paper or a tool like Stitch Fiddle to ensure proper placement for your size.

How do I adjust the sweater to be more cropped like in the example photos?

Simply work about 10 fewer rows in the body panel section. Since every 5 rows equals approximately 2 inches, removing 10 rows will make your sweater about 4 inches shorter for that cute cropped look while maintaining the same width and overall fit.

What's the best way to work the colorwork graphics if I'm a beginner to color changes?

Change colors on the last stitch of the current color by yarning over with the new color for the final pull-through. Always crochet over your yarn tails along one side of the work to avoid weaving in hundreds of ends later. Use stitch markers to mark where graphics begin and count carefully to stay centered.

Can I make the sleeves shorter or longer?

Yes! The pattern notes that every 5 rounds equals about 2 inches. You can try on the sleeve as you work and measure from the center panel to cuff, comparing it to your spine-to-wrist measurement with your arm extended. Add or subtract rounds as needed before attaching to the body.

Which graphics work best for beginners to colorwork?

Start with simpler designs like the question mark (20 rows x 17 stitches) or the scouts honor hand (20 rows x 20 stitches). These have fewer color changes and less complex shapes compared to detailed designs like the wiener dog wrap-around or the golf course scene.